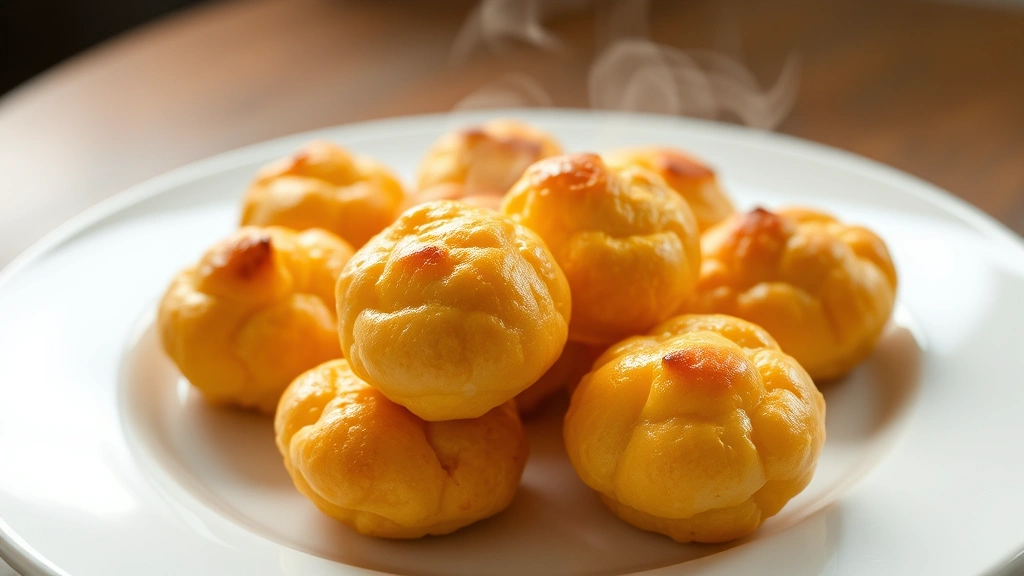
Authentic Pão de Queijo: Brazilian Classic Recipe
Pão de queijo, which translates to “cheese bread” in Portuguese, is one of Brazil’s most beloved and iconic snacks. These delightful cheese puffs are a staple in Brazilian bakeries, coffee shops, and home kitchens throughout the country. With their distinctive airy, chewy texture and rich cheese flavor, pão de queijo offers a unique culinary experience that has captivated food lovers worldwide. Unlike traditional yeast-based breads, this recipe relies on tapioca starch to create its signature elastic crumb and crispy exterior, making it naturally gluten-free and perfect for those with dietary restrictions.
What makes pão de queijo truly special is its simplicity combined with its impressive results. The recipe requires just a handful of ingredients—milk, oil, eggs, tapioca starch, and cheese—yet produces something that tastes like it came from a professional Brazilian bakery. The magic happens in the oven, where these humble ingredients transform into golden, puffy spheres that are irresistibly warm and stretchy when fresh from the heat. Whether you’re looking to explore international cuisine, expand your baking repertoire, or simply enjoy a delicious cheese-based treat, this authentic pão de queijo recipe will guide you through every step of the process.
What is Pão de Queijo?
Pão de queijo originated in the state of Minas Gerais, Brazil, during the colonial period. The recipe emerged as a clever way to use tapioca starch, a byproduct of cassava root processing that was abundant in the region. Portuguese colonists and local indigenous peoples combined this versatile starch with cheese—particularly the traditional queijo meia cura (a semi-cured cheese)—to create a bread that was both economical and delicious. Today, pão de queijo has transcended its regional origins to become a national treasure, enjoyed throughout Brazil and increasingly popular in international markets.
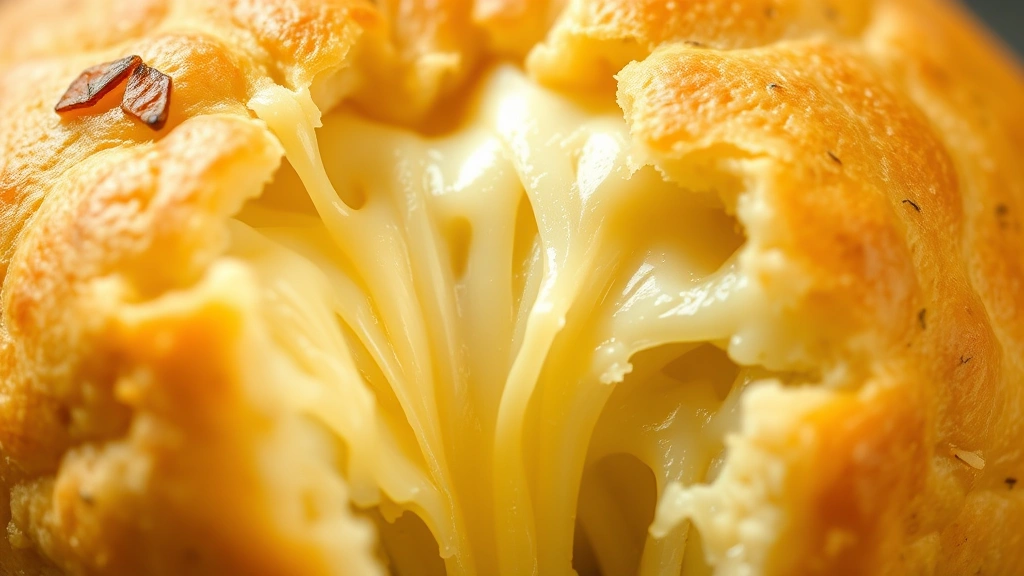
The defining characteristic of pão de queijo is its texture. When baked, the tapioca starch creates a unique structure that’s simultaneously crispy on the outside and wonderfully stretchy on the inside. This contrast is what makes biting into a warm pão de queijo such a memorable experience. The cheese melts throughout the bread, creating pockets of flavor and adding to its richness. Unlike wheat-based breads that rely on gluten development for structure, pão de queijo achieves its texture through the properties of tapioca starch, making it naturally gluten-free and suitable for those avoiding wheat products.
These cheese puffs are typically served warm as a breakfast item, paired with strong Brazilian coffee, or enjoyed as a snack throughout the day. They’re also commonly served at the beginning of meals in Brazilian restaurants, similar to bread baskets in other cuisines. The versatility of pão de queijo makes it perfect for various occasions—from casual family breakfasts to more formal entertaining situations.
Essential Ingredients Explained
Understanding each ingredient in your pão de queijo recipe is crucial for achieving authentic results. Let’s break down what you need and why each component matters:
- Tapioca Starch: This is the foundation of your pão de queijo. Tapioca starch, also called tapioca flour or cassava starch, creates the characteristic chewy, elastic texture. Unlike wheat flour, it doesn’t contain gluten, which is why this bread has such a unique mouthfeel. You can find tapioca starch in most supermarkets, specialty stores, or online retailers. Make sure you’re using pure tapioca starch and not tapioca pearls or flour blends.
- Cheese: The traditional choice is queijo meia cura, but if you can’t find it, a combination of sharp cheddar and Parmesan works beautifully. You can also use Gruyère, Emmental, or even mozzarella for different flavor profiles. The cheese should be finely grated to ensure even distribution and melting throughout the dough.
- Milk: Whole milk provides richness and helps create the tender crumb. If you only have low-fat milk available, the results will still be good, though slightly less rich. Some bakers prefer using a mixture of milk and cream for extra decadence.
- Eggs: Eggs bind the ingredients together and provide structure. They also contribute to the rise and create that characteristic puffiness. Use room-temperature eggs for best results, as they incorporate more smoothly into the batter.
- Oil or Butter: This adds moisture and richness to the dough. Neutral vegetable oil works well, though melted butter adds wonderful flavor. Some traditional recipes use a combination of both.
- Salt: A small amount of salt enhances the cheese flavor and balances the richness. Don’t skip this ingredient, as it’s essential for proper seasoning.
When selecting your cheese, consider that you want something with good melting properties and enough flavor to shine through. A mix of cheese varieties can create more complex, layered flavors in your finished pão de queijo.
Equipment You’ll Need
Fortunately, making pão de queijo doesn’t require specialized equipment. Here’s what you’ll want to have on hand:
- Mixing Bowls: One large bowl for combining wet ingredients and another for dry ingredients. Alternatively, you can use one large bowl for everything.
- Measuring Cups and Spoons: Accurate measurements are important for consistent results. Use dry measuring cups for the tapioca starch and liquid measuring cups for milk.
- Blender or Food Processor: While optional, these tools make combining ingredients incredibly easy and help incorporate air into the mixture, resulting in lighter, puffier pão de queijo.
- Baking Sheets: Standard baking sheets work perfectly. Line them with parchment paper or silicone baking mats for easy cleanup and even browning.
- Rubber Spatula or Wooden Spoon: For mixing and scraping down the bowl.
- Small Ice Cream Scoop or Spoon: This helps you portion the dough into uniform sizes for even baking.
- Oven Thermometer: Optional but helpful for ensuring your oven is at the correct temperature.
Step-by-Step Instructions
Follow these detailed instructions to create authentic pão de queijo that rivals Brazilian bakery versions:
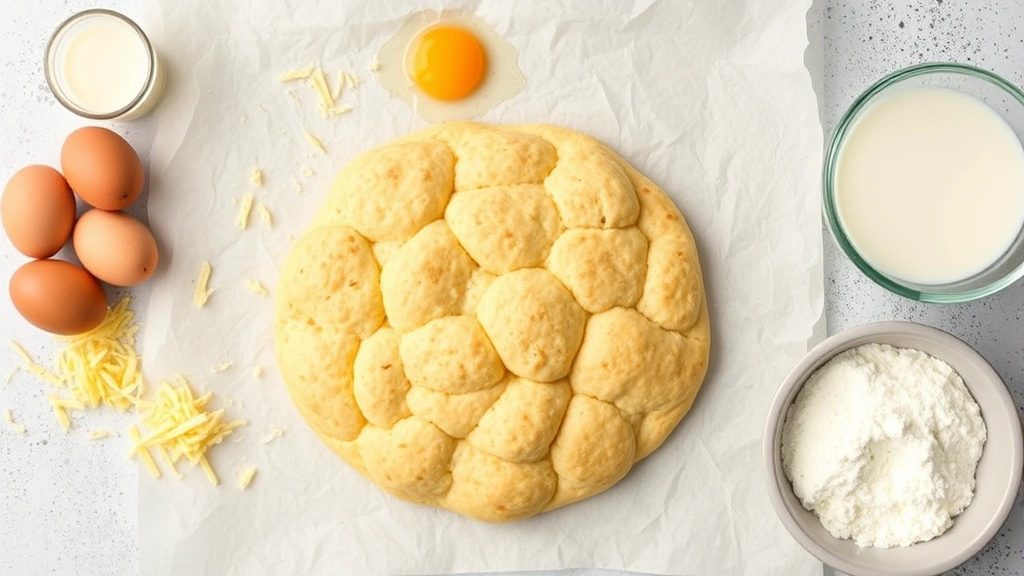
Ingredients:
- 1 cup whole milk
- ½ cup vegetable oil or melted butter
- 2 cups tapioca starch
- 3 large eggs
- 1 cup finely grated cheese (sharp cheddar, Parmesan, or traditional queijo meia cura)
- 1 teaspoon salt
Instructions:
- Preheat Your Oven: Start by preheating your oven to 375°F (190°C). This ensures it reaches the proper temperature by the time your dough is ready. Allow at least 15 minutes for proper preheating.
- Combine Wet Ingredients: In a blender or large mixing bowl, combine the milk, oil, and eggs. If using a blender, blend until well combined, about 20-30 seconds. If mixing by hand, whisk vigorously until the mixture is uniform and slightly frothy. The incorporation of air at this stage contributes to the final puffiness.
- Mix Dry Ingredients: In a separate bowl, whisk together the tapioca starch and salt. This ensures the salt is evenly distributed throughout the dry ingredients.
- Combine Everything: Add the wet ingredients to the dry ingredients, stirring gently but thoroughly. The mixture will be thick and somewhat sticky—this is correct. Fold in the grated cheese until evenly distributed throughout the dough. The cheese should be visible throughout, not clumped in one area.
- Rest the Dough: Let the dough rest for 5 minutes at room temperature. This allows the tapioca starch to fully hydrate, which helps achieve the best texture in the finished product.
- Prepare Baking Sheets: Line your baking sheets with parchment paper or silicone mats. This prevents sticking and allows for easy cleanup.
- Portion the Dough: Using a small ice cream scoop or two teaspoons, drop portions of dough onto the prepared baking sheets, spacing them about 2 inches apart. These will puff up significantly during baking, so proper spacing is important to prevent them from touching. Each portion should be roughly the size of a walnut.
- Bake: Place in the preheated oven and bake for 20-25 minutes, until the pão de queijo are golden brown on the outside. They should look puffed and slightly cracked on top, indicating they’ve risen properly. The exact baking time depends on your oven and the size of your portions, so start checking around the 20-minute mark.
- Cool Slightly: Remove from the oven and let cool on the baking sheet for 3-5 minutes. These are best enjoyed warm, but they’ll continue to set as they cool. Transfer to a wire rack if desired, though they’re delicious eaten right from the baking sheet.
The entire process from start to finish takes approximately 40-45 minutes, making this a quick and convenient recipe for busy weekday mornings or weekend entertaining.
IMAGE_2
Pro Tips for Perfect Results
Achieving perfect pão de queijo requires attention to detail and understanding the science behind the recipe. Here are professional tips to ensure success:
- Temperature Matters: Use room-temperature eggs and milk. Cold ingredients don’t incorporate as smoothly and can result in a less uniform dough. Remove eggs from the refrigerator 15-20 minutes before baking.
- Quality Tapioca Starch: Not all tapioca products are created equal. Ensure you’re purchasing pure tapioca starch, not tapioca flour or tapioca meal, which may contain other ingredients. The purity of your tapioca starch directly affects the texture of your finished product.
- Don’t Overmix: While you want to combine ingredients thoroughly, excessive mixing can result in dense, heavy pão de queijo. Mix just until the cheese is evenly distributed.
- Blender Method: For the lightest, puffiest results, use a blender to combine wet ingredients and then a food processor to mix everything together. This incorporates maximum air into the dough.
- Uniform Portions: Use an ice cream scoop to portion dough evenly. This ensures all your pão de queijo bake at the same rate and finish simultaneously.
- Oven Accuracy: Invest in an oven thermometer to verify your oven temperature. Many home ovens run hot or cold, which can affect baking time and browning.
- Don’t Open the Oven: Resist the temptation to open the oven door during baking, especially in the first 15 minutes. This releases steam and heat, potentially preventing proper rising.
- Cheese Selection: Use freshly grated cheese rather than pre-shredded varieties, which contain anti-caking agents that can affect texture. Finely grating cheese by hand or in a food processor ensures even melting and distribution.
Variations and Flavor Twists
Once you’ve mastered the basic pão de queijo recipe, you can experiment with exciting variations. Consider pairing your creation with complementary sauces or exploring these flavor combinations:
Herb and Garlic Version: Add 1-2 teaspoons of minced fresh garlic and 1 tablespoon of finely chopped fresh herbs (rosemary, thyme, or basil) to the dough. The aromatics create a savory depth that pairs beautifully with the cheese.
Jalapeño and Cheddar: Mix in ¼ cup of diced jalapeños and use sharp cheddar cheese. This version has a pleasant kick of heat that builds as you eat it.
Smoked Cheese Version: Substitute smoked gouda or smoked cheddar for regular cheese. The smoky notes create a sophisticated flavor profile perfect for more formal occasions. This variation also pairs wonderfully with smoked meats at barbecues.
Bacon and Chive: Add 4-5 crumbled pieces of cooked bacon and 2 tablespoons of finely chopped fresh chives. This creates a breakfast-friendly version with savory, smoky notes.
Pesto Infused: Stir in 2-3 tablespoons of prepared pesto along with the cheese. This Mediterranean twist introduces bright, herbal flavors.
Sweet Version: For a less traditional but delicious option, reduce cheese to ½ cup, add 2 tablespoons of sugar, and include 1 teaspoon of vanilla extract. Serve these slightly sweet pão de queijo with jam or honey for dipping.
Storage and Make-Ahead Guide
IMAGE_3
One of the wonderful aspects of pão de queijo is its versatility in storage and make-ahead preparation. Understanding proper storage methods ensures you can enjoy these treats throughout the week:
Room Temperature Storage: Freshly baked pão de queijo keeps well at room temperature for 1-2 days when stored in an airtight container or sealed plastic bag. They’re best enjoyed within the first day while still tender and chewy.
Refrigerator Storage: Place cooled pão de queijo in an airtight container and refrigerate for up to 5 days. Before eating, reheat them in a 300°F oven for 5-10 minutes to restore their warm, chewy texture.
Freezing: Pão de queijo freezes beautifully for up to 3 months. You have two options: freeze the baked pão de queijo or freeze the unbaked dough. For baked pão de queijo, let them cool completely, then place in a freezer-safe container with parchment paper between layers. To reheat, bake frozen pão de queijo at 350°F for 12-15 minutes until warmed through and slightly crispy on the outside.
Freezing Unbaked Dough: Portion the dough onto a baking sheet, freeze until solid (about 2 hours), then transfer portions to a freezer bag. When ready to bake, place frozen portions directly on a lined baking sheet and bake at 375°F for 25-30 minutes, adding 5-10 minutes to the standard baking time.
Make-Ahead Strategy: For busy mornings, prepare the dough the night before. Cover it tightly and refrigerate overnight. The next morning, portion and bake as directed, adding 2-3 minutes to the baking time if baking from cold dough.
For a deeper understanding of how texture and flavor develop in baked goods, explore King Arthur Baking Company’s science-focused baking resources. Additionally, Serious Eats offers excellent information about international bread traditions and techniques. For those interested in the cultural history of Brazilian cuisine, the Brazilian Food Society provides fascinating insights into regional specialties.
Check out our collection of best breakfast food recipes for other morning-friendly options to complement your pão de queijo. You might also enjoy exploring our Fresh Plated Daily Blog for more international recipes and cooking techniques. For protein-focused breakfast ideas, consider our guide to healthy food recipes with chicken breast for serving alongside your pão de queijo.
FAQ
Can I make pão de queijo without a blender?
Absolutely! While a blender helps incorporate air and creates lighter results, you can successfully make pão de queijo by hand. Simply whisk the milk, oil, and eggs together vigorously in a bowl until well combined and slightly frothy. Then mix in the tapioca starch and cheese as directed. The results will be slightly denser than the blender version but still delicious.
What can I use if I can’t find tapioca starch?
Tapioca starch is really the essential ingredient that creates pão de queijo’s unique texture. However, in a pinch, some bakers have experimented with potato starch or arrowroot powder as substitutes, though the results won’t be identical. Your best option is to order tapioca starch online or check specialty grocery stores, Latin markets, or health food stores that carry gluten-free baking supplies.
Why are my pão de queijo dense and not puffy?
Dense pão de queijo usually results from one of a few issues: overmixing the dough, using cold ingredients, incorrect oven temperature, or opening the oven door during baking. Ensure you’re mixing just until combined, using room-temperature eggs and milk, and maintaining a steady 375°F oven temperature throughout baking.
Can I make pão de queijo dairy-free?
Traditional pão de queijo relies on cheese for both flavor and structure, making it challenging to create a truly dairy-free version. However, you could experiment with dairy-free cheese alternatives, though results may vary. The milk can be replaced with unsweetened plant-based milk, though this may affect the final texture slightly.
How do I know when pão de queijo is done baking?
Pão de queijo are done when they’re golden brown on the outside, puffed up, and have slight cracks on top. They should feel firm but not hard when gently pressed. If they’re pale and soft, they need more time. If they’re very dark brown, reduce oven temperature slightly for your next batch.
Can I reheat pão de queijo?
Yes! Reheat cooled pão de queijo at 300°F for 5-10 minutes to restore their warm, chewy texture. You can also microwave individual pão de queijo for 20-30 seconds, though this may make them slightly less crispy on the outside. The oven method produces superior results.
What’s the difference between pão de queijo and other cheese breads?
Pão de queijo is unique because it’s made with tapioca starch rather than wheat flour, resulting in its characteristic chewy, elastic texture. Other cheese breads typically use wheat flour and often include yeast, creating a different structure and crumb. This makes pão de queijo naturally gluten-free and gives it a completely distinct eating experience.


