Deer Chili Recipe: Hunter’s Favorite Method
Venison chili stands as a testament to culinary tradition and resourcefulness. When hunters successfully harvest deer, transforming that prize into a rich, warming chili represents the ultimate respect for the animal and maximizes the value of the hunt. Unlike beef chili, deer chili recipe variations demand understanding venison’s unique flavor profile—leaner meat, deeper gamey notes, and a texture that requires specific cooking techniques to achieve tender, mouthwatering results.
This comprehensive guide walks you through creating an authentic hunter’s chili that has graced hunting camp tables and family dinners for generations. Whether you’re a seasoned hunter preparing your first batch or a curious cook exploring wild game cuisine, this method emphasizes technique, ingredient selection, and timing to produce a chili that transforms venison into something extraordinary.
Understanding Venison for Chili
Venison differs significantly from domesticated beef, and recognizing these differences separates mediocre venison chili from exceptional preparations. Deer meat contains approximately 26 grams of protein per 3.5-ounce serving while maintaining only 1.5 grams of fat—substantially leaner than beef. This leanness creates both advantages and challenges. The reduced fat content means fewer calories and cleaner flavor, but it also demands careful cooking to prevent dryness.
The gamey flavor profile that characterizes venison comes from the animal’s diet of wild vegetation and the presence of myoglobin in the muscle tissue. Rather than masking this distinctive taste, successful deer chili recipe preparations embrace and balance it with complementary spices, acidic elements, and slow cooking methods that allow flavors to meld harmoniously.
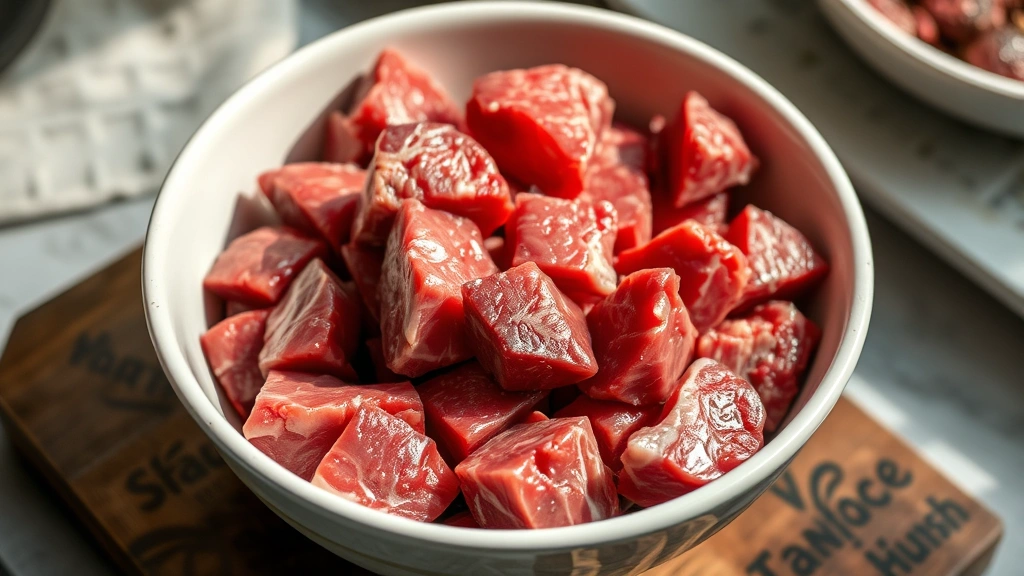
Different cuts of venison perform differently in chili applications. Shoulder meat, neck, and trim from larger roasts work beautifully for chili because these tougher cuts benefit from the extended simmering that breaks down connective tissue. Avoid using premium cuts like backstrap or hindquarter steaks—reserve those for grilling or pan-searing. Instead, utilize the economical cuts that become increasingly tender and flavorful through hours of gentle cooking.
Essential Ingredients and Substitutions
A traditional hunter’s deer chili requires foundational ingredients that work together to create depth and complexity. Here’s what you’ll need for a batch serving 8-10 people:
- Venison meat: 3 pounds, coarsely ground or cut into 1/4-inch cubes
- Onions: 2 large yellow onions, diced
- Garlic: 6-8 cloves, minced
- Chili powder: 4-5 tablespoons (adjust based on heat preference)
- Cumin: 2 tablespoons, ground
- Paprika: 2 tablespoons, smoked variety preferred
- Oregano: 2 teaspoons, dried
- Cayenne pepper: 1-2 teaspoons (optional, for additional heat)
- Tomato products: 2 cans (28 ounces each) crushed tomatoes plus 1 can (6 ounces) tomato paste
- Kidney beans: 3 cans (15 ounces each), drained and rinsed
- Beef broth: 2 cups, preferably homemade or low-sodium
- Olive oil: 3 tablespoons
- Salt and black pepper: To taste
- Worcestershire sauce: 2 tablespoons
- Hot sauce or jalapeños: Optional, for personalization
For those seeking to expand flavor profiles, consider adding pepper jelly for subtle sweetness and depth, or incorporate cocktail sauce elements like horseradish for complexity. These additions should be minimal—approximately 1-2 tablespoons—to avoid overpowering the venison.
Substitution options exist for those with specific dietary needs. Black beans or pinto beans work equally well as kidney beans. Vegetable broth replaces beef broth for vegetarian guests, though the flavor profile shifts accordingly. Some hunters add coffee or dark beer to enhance the richness, introducing additional depth without obvious coffee or alcohol flavors.
Preparation and Butchering Tips
Proper preparation begins before cooking starts. If you’ve processed your own venison, trim away any silver skin or connective tissue that contributes to a stringy texture. These membranes don’t break down adequately during cooking and create an unpleasant mouthfeel in finished chili.
Ground venison works best for chili because it distributes evenly throughout the pot and breaks down completely during cooking. If grinding at home, ensure your grinder is clean and cold—warm equipment smears the meat rather than cutting it cleanly. Alternatively, ask your butcher to grind venison to a medium consistency, not too fine.
For those preferring chunked venison, cut meat into uniform 1/4-inch cubes to ensure even cooking. Larger chunks require longer cooking times and may not achieve the tender texture characteristic of excellent chili. The goal involves breaking down muscle fibers sufficiently without creating mushy, overcooked meat.
Prepare your mise en place by dicing onions, mincing garlic, and measuring all spices before beginning. This organization prevents scrambling mid-cooking and ensures you add ingredients at optimal times. Toast your spices lightly in a dry pan before adding them to the chili—this technique awakens volatile oils and amplifies flavors significantly.
Step-by-Step Cooking Method
The cooking process demands patience and attention. Begin by heating olive oil in a large, heavy-bottomed pot or Dutch oven over medium-high heat. Once shimmering, add diced onions and sauté for 5-7 minutes until softened and translucent. This step develops the onion’s natural sugars through the Maillard reaction, creating a flavor foundation.
Add minced garlic and cook for an additional 2 minutes, stirring constantly to prevent burning. Burnt garlic introduces bitter notes that compromise the entire dish. Once fragrant and golden, push the aromatics to the pot’s sides and increase heat to high.
Add venison in batches, allowing each batch to brown properly before adding more. Overcrowding the pot prevents browning and instead steams the meat, resulting in a gray, unappetizing appearance and less developed flavor. Break apart chunks with a wooden spoon as they cook, aiming for fine, evenly browned pieces. This browning process requires 10-15 minutes total and develops complex flavors through the Maillard reaction.
Once all venison is browned, add tomato paste and stir thoroughly, coating all meat particles. Cook this mixture for 2-3 minutes to allow the tomato paste to caramelize slightly, deepening its flavor contribution.
Sprinkle in your measured chili powder, cumin, paprika, oregano, and cayenne pepper. Stir constantly for 1-2 minutes, allowing the spices to bloom in the residual heat and fat. This blooming process activates the spices’ aromatic compounds and distributes them evenly throughout the pot.
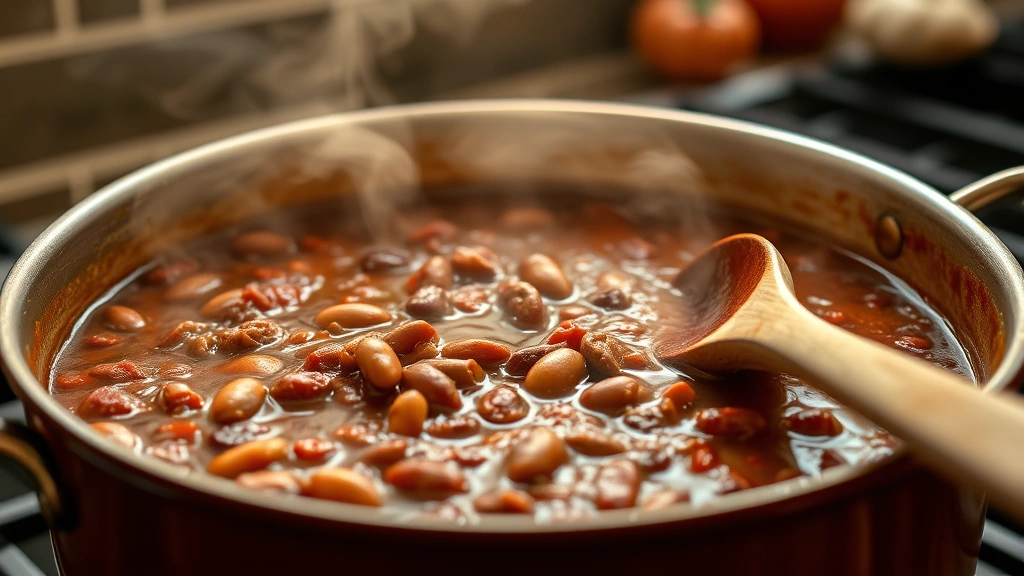
Deglaze the pot by pouring in beef broth, scraping the bottom with a wooden spoon to incorporate all flavorful browned bits. Add crushed tomatoes and Worcestershire sauce, stirring to combine thoroughly. Bring the mixture to a gentle simmer.
Reduce heat to low and add kidney beans. The chili should simmer gently—small bubbles occasionally breaking the surface—rather than boiling vigorously. Vigorous boiling breaks apart beans and can cause venison to toughen. Cover the pot partially, leaving the lid slightly ajar to allow some evaporation, and simmer for 2-3 hours.
Stir occasionally, approximately every 20-30 minutes, ensuring nothing sticks to the bottom and flavors distribute evenly. After 2 hours, taste and adjust seasoning with salt, pepper, and additional chili powder if desired. The chili should taste rich, balanced, and free from harsh or sharp notes.
Flavor Development and Seasoning
Building complex flavor in venison chili involves layering tastes rather than adding everything at once. The initial blooming of spices creates the base, but additional seasoning techniques develop sophistication throughout cooking.
Approximately 30 minutes before serving, consider adding finishing touches that brighten and balance the chili. A squeeze of fresh lime juice cuts through richness and adds brightness. Apple cider vinegar (1-2 tablespoons) introduces acidity that prevents the chili from tasting flat or one-dimensional. These acidic elements don’t taste obviously sour; instead, they heighten other flavors and create a more dynamic eating experience.
For those seeking umami depth, add soy sauce or additional Worcestershire sauce in small increments. Start with 1 teaspoon, taste, and adjust. This savory quality makes the chili taste more complex and satisfying without introducing obvious salty notes.
Salt requires careful handling in venison chili. Unlike beef, venison lacks significant fat that carries salt flavor, so season conservatively and taste frequently. Salt enhances all other flavors, but too much creates an unpleasant, mouth-drying sensation. Most cooks add salt in stages: a pinch when adding beans, additional amounts 30 minutes before serving, and final adjustments just before plating.
Consider your guests’ heat tolerance and add jalapeños, hot sauce, or additional cayenne pepper according to preference. Some hunters serve a bottle of hot sauce tableside, allowing each diner to customize heat levels. This approach respects individual preferences while maintaining the chili’s balanced flavor profile.
Serving Suggestions and Pairings
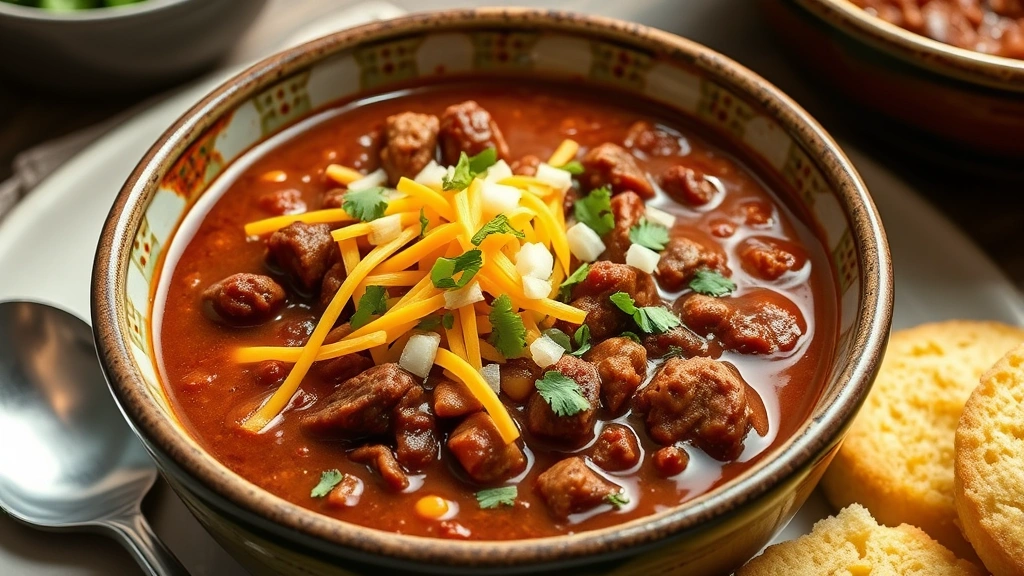
Traditional chili toppings enhance the eating experience and add textural contrast. Finely diced onions, shredded cheddar cheese, sour cream, and fresh cilantro represent classic choices. Cornbread or jalapeño cornbread provides a slightly sweet, crumbly complement that offsets the chili’s savory richness.
For a complete meal, serve your deer chili alongside breakfast items like crusty bread or biscuits for a hearty hunting camp dinner. The chili’s warmth and substance make it ideal for cold-weather gatherings when hunters return from early mornings in the field.
Beverage pairings matter when serving venison chili. Dark beers with roasted malt notes complement the gamey venison beautifully. Alternatively, serve robust red wines like Cabernet Sauvignon or Syrah that possess tannins and body matching the chili’s intensity. For non-alcoholic options, hot apple cider or strong coffee work surprisingly well, warming the palate and enhancing spice perception.
If you’re planning a larger gathering, consider transforming your chili into a topping for other dishes. Serve it over baked potatoes, rice, or pasta. Create chili-cheese fries using crispy fried potatoes layered with your venison chili and melted cheese. These applications extend the recipe’s versatility and appeal to different preferences.
For those interested in expanding their culinary repertoire, explore how chili principles apply to other game meats and wild proteins. The techniques discussed here translate to elk chili, moose chili, and wild boar preparations, allowing hunters to maximize their harvests creatively.
Storage and Make-Ahead Instructions
One of venison chili’s greatest advantages involves its exceptional flavor development over time. The chili actually improves when refrigerated overnight, allowing spices to fully integrate and flavors to meld completely. This make-ahead quality makes it perfect for meal planning or feeding groups.
Store cooled chili in airtight containers in the refrigerator for up to five days. The flavors remain stable, and reheating actually enhances the eating experience. Simply reheat gently over medium-low heat, adding a splash of broth or water if the chili has thickened excessively during storage.
Freezing venison chili preserves it for months without quality degradation. Portion the chili into freezer-safe containers, leaving approximately 1 inch of headspace to accommodate expansion. Frozen chili keeps well for up to three months. Thaw in the refrigerator overnight before reheating, or reheat directly from frozen over low heat, stirring occasionally and adding broth as needed.
For those managing high-protein recipes for weight loss, venison chili offers exceptional nutritional value. The lean meat provides substantial protein without excessive fat, making it suitable for fitness-conscious diets. A single serving delivers approximately 25-30 grams of protein with minimal saturated fat.
Consider preparing your deer chili recipe in large batches during hunting season when venison is plentiful and fresh. Freeze portions for months of convenient, homemade meals that require minimal preparation. This approach maximizes your hunting success and ensures your freezer contains wholesome, delicious food year-round.
For preservation enthusiasts, canning venison chili extends shelf stability to years when following proper pressure-canning procedures. However, this requires understanding food safety principles. Consult authoritative resources like the National Center for Home Food Preservation before attempting pressure canning at home.
FAQ
Can I make venison chili without grinding the meat?
Absolutely. Cut venison into uniform 1/4-inch cubes and follow the same cooking method. Cubed venison requires slightly longer cooking—approximately 3-4 hours—to achieve proper tenderness. The texture differs from ground venison, offering more substantial meat pieces, which some hunters prefer.
What should I do if my venison chili tastes too gamey?
Several strategies address overly gamey flavors. Add tomato paste or crushed tomatoes in small increments—the acidity balances gamey notes. Introduce a tablespoon of sugar or honey to create sweetness that rounds out harsh flavors. Some cooks add a small amount of coffee or dark beer to add complexity that masks excessive gaminess. If all else fails, serve with substantial toppings like sour cream and cheese that mellow the flavors.
How long should venison chili simmer?
A minimum of 2 hours of gentle simmering develops proper flavor and tenderness. Many experienced hunters simmer venison chili for 3-4 hours, allowing extended time for flavors to integrate and meat to become exceptionally tender. The longer cooking time doesn’t negatively impact the chili—it continues improving as long as heat remains low enough to prevent rapid evaporation.
Can I add vegetables like bell peppers or celery?
Certainly. Diced bell peppers and celery add freshness and textural variety. Sauté them with the onions during the initial aromatics step. Some hunters include diced carrots for subtle sweetness. Avoid adding these vegetables too late in cooking, as they may become mushy. Add them during the onion-cooking stage for best results.
What’s the best way to thicken venison chili?
If your chili seems too thin, simmer uncovered for 20-30 minutes to allow evaporation. Alternatively, create a slurry by mixing 2 tablespoons cornstarch with 3 tablespoons cold water, then stir it into the simmering chili. Mix a spoonful of flour into a small amount of cold water and add it gradually while stirring. Avoid adding excessive thickening agents—the chili should remain pourable but coat a spoon lightly.
Is venison chili appropriate for guests unfamiliar with wild game?
Yes, when properly prepared. The long cooking time, spice blend, and complementary ingredients mask extreme gaminess and create a familiar, approachable dish. Many people who claim to dislike venison enjoy well-made venison chili because they don’t recognize the meat as wild game. Introduce it confidently, and most guests respond positively.
Can I use venison from previous hunting seasons?
Yes, frozen venison maintains quality for approximately one year when stored properly at 0°F or below. Thaw it in the refrigerator overnight before using. Older frozen venison may have slightly more pronounced gamey flavors, so adjust your seasoning strategy accordingly by incorporating more acidic elements and sweetness.


