
Master Sourdough Baguette: Proven Bakery Tips for Perfect Results
Creating an authentic sourdough baguette at home requires patience, technique, and understanding the science behind fermentation. This French classic—with its crackling crust and open, airy crumb structure—has captivated home bakers for decades. The beauty of sourdough baking lies in its simplicity: just flour, water, salt, and time. Yet achieving that bakery-quality result demands attention to detail and proven methods that professional bakers have perfected over generations.
Whether you’re a beginner embarking on your sourdough journey or an experienced baker seeking to refine your technique, this comprehensive guide will walk you through every step of crafting exceptional sourdough baguettes. We’ll explore starter maintenance, dough development, shaping techniques, and the critical factors that transform ordinary bread into something extraordinary. By the end, you’ll understand not just the how, but the why behind each decision in the baking process.
Building Your Sourdough Starter Foundation
Your sourdough starter is the living heart of your baguette. This symbiotic culture of wild yeast and beneficial bacteria dictates fermentation speed, flavor development, and rise strength. A healthy starter should double in size within 4-8 hours of feeding, depending on your kitchen temperature and feeding ratio.
Begin with equal parts flour and water by weight. Feed your starter once or twice daily using a 1:1:1 ratio (starter:flour:water). After 5-7 days of consistent feeding, you’ll notice a distinctive sour aroma and visible bubbling—signs that wild yeast colonization is thriving. The starter’s peak activity occurs when it reaches maximum rise and just begins to recede; this is your ideal moment for baking.
Temperature dramatically affects starter behavior. At 68°F, fermentation progresses slowly; at 75°F, activity accelerates significantly. Many professional bakers maintain their starters at 75-78°F for predictable results. If your kitchen runs cool, consider placing your starter in a proofing box or near a heat source. Always use filtered or dechlorinated water, as chlorine can inhibit wild yeast development.
Store your mature starter at room temperature if you bake frequently (2-3 times weekly), or refrigerate it between bakes. A refrigerated starter can last 2-3 weeks between feedings. Before baking, remove it from cold storage and feed it 2-3 times at room temperature over 12-24 hours until it shows vigorous activity.
Selecting Quality Ingredients for Superior Results
Professional bakers understand that ingredient quality directly impacts your final loaf. For sourdough baguettes, you need just three components: flour, water, and salt. Yet each deserves careful consideration.
Flour Selection: Bread flour (12-14% protein) provides the gluten strength necessary for an open crumb and strong gluten network. All-purpose flour (10-12% protein) yields denser results. Many artisan bakers prefer European-style bread flours from mills like King Arthur Baking Company or Anita’s Organic Grain Mill, which offer superior fermentation characteristics. Avoid cake or pastry flour entirely—insufficient protein means weak dough.
Type 65 flour, the French standard for baguettes, contains the bran and germ removed from whole wheat but retains more nutrients than white flour. If sourcing Type 65 proves difficult, a 90% bread flour and 10% whole wheat blend approximates this profile beautifully.
Water Quality: Filtered water prevents chlorine interference with fermentation. Hard water (mineral-rich) can strengthen gluten, while soft water ferments faster. Most tap water works acceptably; if your water is heavily chlorinated, let it sit uncovered for 24 hours or use filtered alternatives. Water temperature influences dough temperature—use cooler water in summer and warmer water in winter to maintain consistent dough development.
Salt Importance: Sea salt or kosher salt (avoid iodized table salt) strengthens gluten and controls fermentation speed. Salt also enhances flavor and improves crust color. Add salt toward the end of mixing to prevent premature gluten breakdown.
Mixing and Developing Your Dough
The mixing method profoundly affects crumb structure and fermentation. Two primary approaches exist: the traditional hand-mixing method and machine mixing. Each produces slightly different results.
The Autolyse Method: Begin by mixing flour and water (reserve salt) and allowing them to rest 30-60 minutes. This rest period allows flour to fully hydrate and gluten to develop without mechanical mixing. The autolyse produces more extensible dough and often improves final crumb open-ness. After the autolyse rest, incorporate your active starter and mix thoroughly.
Incorporating Starter: Use a starter that’s at peak activity—doubled in size and bubbly. For a 500-gram flour dough, incorporate 100 grams of active starter (20% hydration). Dissolve the starter in your water before combining with flour. This ensures even distribution and consistent fermentation.
Dough Temperature: Professional bakers calculate desired dough temperature (DDT) to ensure consistent fermentation. Target a final dough temperature of 75-78°F. Calculate: (desired temp × 3) – (room temp + flour temp + friction factor). Adjust your water temperature accordingly.
Mixing Technique: Whether using hands or a mixer, develop the dough to medium strength—you should see a smooth surface and feel resistance when stretching. Avoid over-mixing; sourdough requires less intensive mixing than commercial yeast breads. Typically, 8-10 minutes by hand or 5-6 minutes in a stand mixer suffices.
Mastering Bulk Fermentation for Optimal Development
Bulk fermentation is where flavor develops and gluten strengthens. This phase typically lasts 4-6 hours at 75°F, though timing varies based on starter strength and room temperature. Rather than watching the clock, monitor dough appearance: you’re seeking 50-75% volume increase and visible bubbles at the surface and sides.
Stretch and Fold Technique: Every 30 minutes during the first 2 hours of bulk fermentation, perform 4-6 stretch and folds. Wet your hand, grab one side of the dough, stretch it up and fold it over the center. Rotate the bowl 90 degrees and repeat. This builds strength without degassing the dough. After 2 hours, the dough should feel noticeably stronger and hold its shape better.
Fermentation Windows: The dough reaches optimal fermentation when it’s increased in volume, jiggles slightly when the bowl is shaken, and shows visible bubbles throughout. Over-fermented dough becomes slack and difficult to shape; under-fermented dough won’t develop proper oven spring. Visual cues matter more than timers.
Temperature Monitoring: If your kitchen runs cool (below 70°F), extend bulk fermentation by 1-2 hours. Conversely, warm kitchens (above 78°F) may complete bulk fermentation in 3-4 hours. A digital thermometer helps track dough temperature throughout fermentation.
Consider using a clear dough container marked with lines indicating 50%, 75%, and 100% volume increase. This visual reference eliminates guesswork and improves consistency across bakes.
Shaping Your Baguette: The Critical Technique
Baguette shaping determines your final loaf’s structure and appearance. This step requires confidence and proper technique.
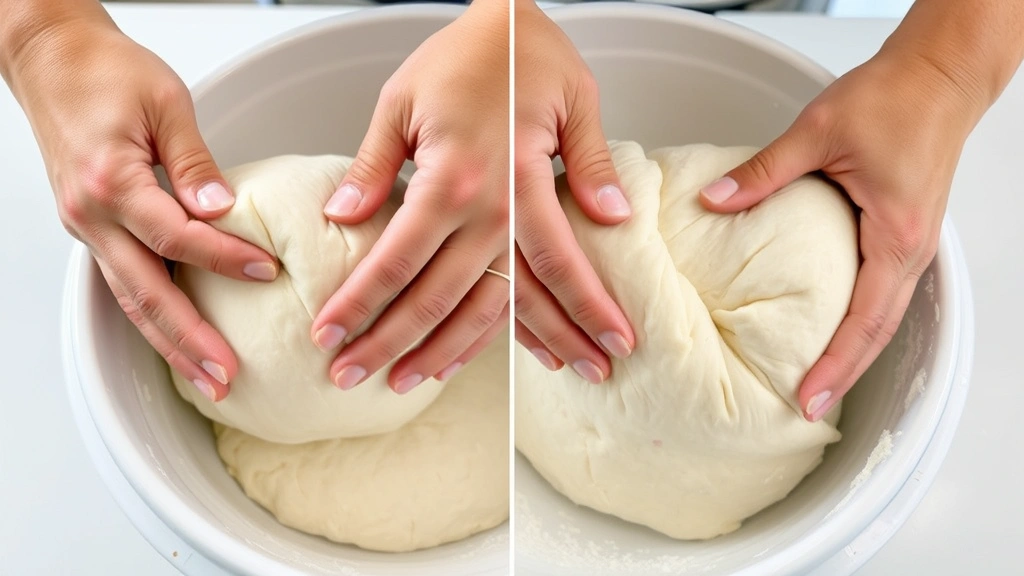
Pre-shaping: After bulk fermentation, turn the dough onto a lightly floured surface. Using your bench scraper, gently pre-shape into a rectangle, being careful not to degas excessively. Let this rest 20-30 minutes (bench rest) to relax the gluten and allow gas redistribution.
Final Shaping: Place the dough seam-side up before you. Fold the top third down and seal with your palm. Fold the next third down and seal. Finally, roll the dough toward you, sealing each rotation with the heel of your hand. The finished baguette should be uniformly thick, approximately 14-16 inches long.
Tension is Essential: Proper tension during shaping creates surface tightness that yields good oven spring and a crispy crust. Insufficient tension produces flat loaves with poor rise. Conversely, over-tensioning deflates the dough and prevents proper proofing.
Couche or Banneton: Place your shaped baguette seam-side up in a floured couche (a linen cloth designed for baguettes) or a banneton lined with parchment. The couche prevents loaves from spreading sideways while supporting their weight during final proofing.
Final Proof and Scoring: Precision Matters
The final proof is your last opportunity to develop volume and flavor before baking. This phase lasts 2-4 hours at room temperature, or overnight in the refrigerator (my preferred method for superior flavor and scoring control).
Cold Retard Benefits: Refrigerating shaped baguettes overnight (12-16 hours) at 38-40°F dramatically improves flavor through extended fermentation and makes scoring significantly easier. The cold dough doesn’t spring back as aggressively, allowing clean, controlled cuts. Additionally, cold fermentation develops organic acids that create deeper, more complex flavor.
Poke Test: Whether proofing at room temperature or cold, test readiness with the poke test. Gently press your finger into the dough; if it springs back slowly but leaves a slight indentation, it’s ready. If it springs back immediately, it needs more time. If it doesn’t spring back at all, it’s over-proofed.
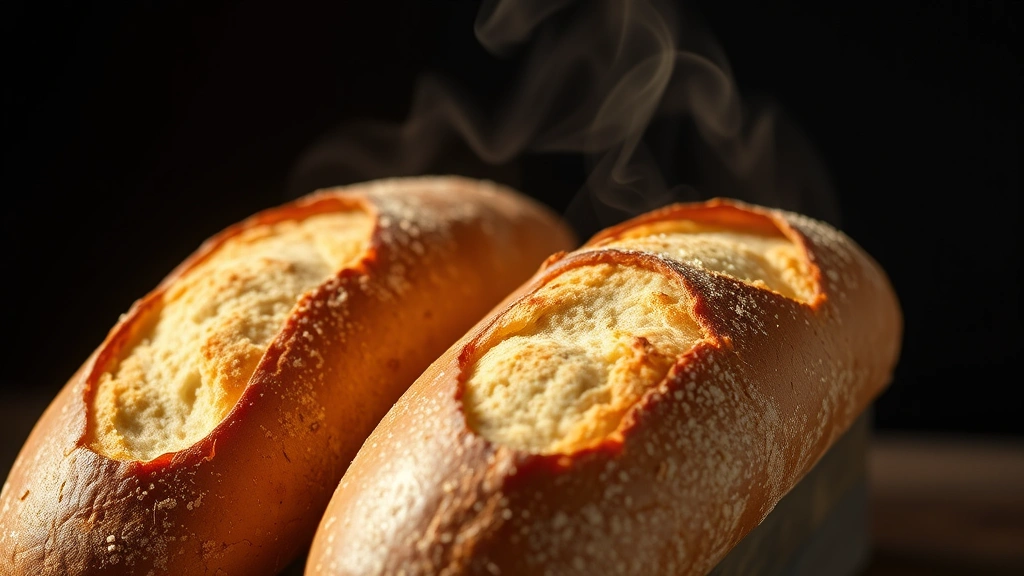
Scoring Technique: Scoring controls where your baguette expands during baking. Using a sharp lame (razor blade) or bread knife, make 4-5 diagonal cuts at 30-45-degree angles along the baguette’s length. Cuts should be ¼-inch deep—deep enough to guide oven spring but not so deep that the loaf separates. Confidence and a sharp blade are essential; hesitant, dull-blade scoring produces ragged ears.
Many bakers prefer scoring cold loaves directly from the refrigerator, as the dough’s firmness allows precise cuts. If your loaves warm to room temperature before baking, they’ll be softer and harder to score cleanly.
Baking for Exceptional Crust and Crumb Development
The baking phase—just 25-35 minutes—transforms your carefully developed dough into finished bread. Temperature, steam, and timing all influence the final result.
Oven Preparation: Preheat your oven to 475-500°F with a baking stone or steel on the middle rack. A Dutch oven works excellently for home bakers, trapping steam during the initial phase. Allow 45-60 minutes for thorough preheating; a properly heated stone is crucial for oven spring.
Steam Generation: Steam during the first 15-20 minutes of baking keeps the crust flexible, allowing maximum oven spring. Professional ovens have steam injection; home bakers can create steam by placing a preheated cast iron skillet on the oven’s lower rack and pouring boiling water into it immediately after loading bread. Alternatively, use a Dutch oven to trap the dough’s own steam.
Baking Timeline: Load your baguettes onto the preheated stone (or into a Dutch oven) and bake for 15-20 minutes with steam. Then remove steam (open the Dutch oven or stop adding water), reduce heat to 450°F, and bake 10-15 minutes until deep golden brown. The loaves should sound hollow when tapped on the bottom—a reliable doneness indicator.
Internal Temperature: Professional bakers use an instant-read thermometer to verify doneness. Target 205-210°F internal temperature at the loaf’s center. This ensures complete starch gelatinization and proper crust formation.
Cooling Completely: Resist the urge to slice immediately. The crumb continues to set as bread cools. Allow at least 1 hour of cooling on a wire rack before slicing. Cutting into warm bread compresses the crumb and produces a gummy texture.
Troubleshooting Common Sourdough Baguette Issues
Dense, Gummy Crumb: This indicates insufficient fermentation or under-baking. Extend bulk fermentation by 30-60 minutes, ensure your starter is truly at peak activity, and verify internal temperature reaches 205-210°F. Also check that your oven temperature is accurate using an oven thermometer.
Flat Loaves with Poor Oven Spring: Over-fermentation is the primary culprit. Shorten bulk fermentation by 30-45 minutes, or reduce room temperature. Additionally, ensure adequate shaping tension and that your oven is fully preheated. Insufficient steam also limits oven spring—verify your steam generation method is working effectively.
Pale, Soft Crust: Insufficient steam or baking time causes this. Extend baking duration by 5 minutes and ensure steam is present for the first 15-20 minutes. A darker, crispier crust requires slightly higher heat (500°F) and proper steam.
Tough, Chewy Crumb: Over-fermentation or over-hydration produces this texture. Reduce hydration by 2-3% (if using 75% hydration, try 72%), shorten bulk fermentation, and ensure your starter is appropriately fed and active.
Sour Flavor Too Intense: Extended fermentation develops acidity. If your baguettes taste overly sour, reduce cold retard time from 16 hours to 8-10 hours, or proof at slightly warmer temperatures. Conversely, if your bread lacks sour flavor, extend cold retard or proof at cooler temperatures.
Uneven Crumb Structure: Large, irregular holes indicate over-fermentation or improper degassing during shaping. During final shaping, gently pre-shape and bench rest to evenly redistribute gas. Avoid aggressive handling that creates large pockets.
These issues often overlap. Keep detailed baking notes recording fermentation times, temperatures, and results. Over several bakes, patterns emerge that guide adjustments toward your ideal loaf.
Frequently Asked Questions About Sourdough Baguettes
How long does it take to make a sourdough baguette from start to finish?
From mixing to cooled loaf typically requires 12-18 hours. This includes autolyse (1 hour), bulk fermentation (4-6 hours), shaping (15 minutes), and final proof (2-4 hours at room temperature or 12-16 hours cold). Baking adds 30 minutes. Most home bakers prefer overnight cold fermentation, spreading the process across two days for convenience.
Can I make sourdough baguettes without a Dutch oven?
Yes, though a Dutch oven simplifies steam generation. Alternatives include placing a preheated cast iron skillet on the oven’s lower rack and pouring boiling water into it, or using a spray bottle to mist the oven and loaves (though this is less effective). Professional bakers often use baker’s peels to load loaves directly onto preheated stones, relying on your own steam generation.
What’s the difference between sourdough baguettes and regular baguettes?
Traditional baguettes use commercial yeast for rapid fermentation (4-6 hours total). Sourdough baguettes use wild yeast starters, requiring 12-18 hours and developing complex, sour flavors from organic acids produced during extended fermentation. Sourdough typically has a more open, irregular crumb and thicker, crispier crust. The extended fermentation also improves digestibility and shelf-life.
Why does my sourdough starter sometimes fail to rise my dough?
An inactive or weakly active starter is the primary cause. Ensure your starter doubles within 4-8 hours of feeding before using it. If it’s sluggish, feed it more frequently (twice daily) for 3-5 days at warm room temperature (75-78°F). Additionally, verify you’re using adequate starter—less than 15% starter by weight may produce insufficient rise.
How should I store my baked sourdough baguettes?
Store completely cooled baguettes in a paper bag at room temperature for 1-2 days. The crust will soften slightly; to re-crisp, wrap in foil and warm in a 350°F oven for 10 minutes. For longer storage (up to 1 month), slice and freeze in an airtight container. Thaw at room temperature or toast directly from frozen.
Can I use a stand mixer instead of hand-mixing?
Absolutely. Use the dough hook attachment at low-medium speed for 5-6 minutes until the dough reaches medium gluten development. Monitor closely to avoid over-mixing, which can overdevelop gluten and reduce extensibility. Many professional bakers prefer hand-mixing for better dough feel and control, but stand mixers produce excellent results when used properly.
What hydration percentage should I use?
Traditional French baguettes use 65-70% hydration (water weight as percentage of flour weight). This produces an open crumb and proper crust development. Higher hydration (72-75%) yields more open crumb but requires stronger technique and better fermentation control. Begin at 70% and adjust based on results.
How do I know if my dough is properly fermented?
Visual and tactile cues matter more than time. Your dough should increase 50-75% in volume, show visible bubbles throughout and at the surface, and jiggle slightly when the bowl is shaken. The poke test is reliable: gently press your finger into the dough; proper fermentation leaves a slow-spring-back indentation. Over-fermented dough doesn’t spring back; under-fermented dough springs back immediately.


