Chick-fil-A Waffle Fries Copycat Recipe: Crispy, Golden, and Homemade
There’s something irresistible about Chick-fil-A’s signature waffle fries—those perfectly seasoned, crispy-on-the-outside, tender-on-the-inside potato cuts that keep customers coming back for more. But what if you could recreate that iconic fast-food favorite right in your own kitchen? This copycat recipe delivers the same satisfying crunch and flavor profile without the drive-through line. Whether you’re looking for a fun easy dinner recipe for beginners or simply craving these beloved fries, this guide walks you through every step to achieve restaurant-quality results at home.
Making waffle fries from scratch might seem intimidating, but with the right technique and ingredients, anyone can master this crispy side dish. The secret lies in understanding the proper potato selection, cutting method, cooking temperature, and seasoning approach. This recipe combines traditional deep-frying methods with insider tips that rival the fast-food chain’s version. You’ll discover exactly how to achieve that golden exterior and fluffy interior that makes Chick-fil-A waffle fries so addictively delicious.
What Makes Chick-fil-A Waffle Fries Special
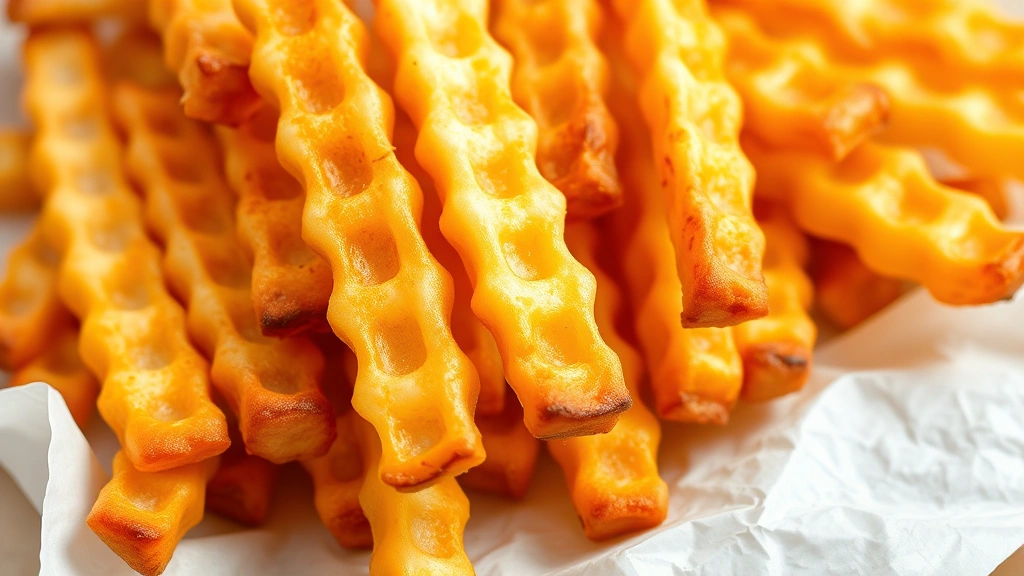
Chick-fil-A’s waffle fries have earned legendary status among fast-food enthusiasts for good reason. Unlike standard straight-cut fries, waffle fries feature a crosshatch pattern created by rotating the potato between cuts on a specialized mandoline or waffle fry cutter. This unique shape offers several advantages: increased surface area for crispiness, enhanced seasoning distribution, and a visually appealing presentation that makes them instantly recognizable.
The signature taste comes from a combination of factors. First, Chick-fil-A uses a proprietary blend of seasonings that includes salt, paprika, and other spices that coat the fries during cooking. Second, the fries are cooked in 100% refined peanut oil, which imparts a subtle flavor and creates that characteristic golden-brown color. Third, the double-fry method—cooking at a lower temperature first, then a higher temperature for the final crisp—ensures the inside stays fluffy while the outside becomes crunchy.
Understanding these elements is crucial for replicating the experience at home. This copycat recipe focuses on matching these key characteristics: the waffle cut shape, the seasoning blend, the proper cooking temperatures, and the use of quality peanut oil. When you combine these elements correctly, you’ll produce fries that taste remarkably similar to the restaurant version, making this an exciting addition to your collection of best breakfast food recipes or lunch sides.
Ingredients You’ll Need
For the Fries:
- 4 large russet potatoes (about 2 pounds), unpeeled
- 2 quarts peanut oil for frying (or vegetable oil as alternative)
- 2 teaspoons salt
- 1 teaspoon paprika
- ½ teaspoon garlic powder
- ½ teaspoon onion powder
- ¼ teaspoon cayenne pepper (optional, for subtle heat)
- ¼ teaspoon black pepper
- Water for soaking
Selecting the right potatoes is essential for this recipe. Russet potatoes are ideal because they have a high starch content and lower moisture content compared to other varieties. This composition allows them to crisp up beautifully on the outside while maintaining a fluffy interior. Avoid waxy potatoes like red or fingerling varieties, as they won’t achieve the same texture.
For the oil, peanut oil is the traditional choice used by Chick-fil-A and provides the best flavor profile. However, if you have a peanut allergy, vegetable oil or canola oil work as acceptable substitutes. The oil’s smoke point should be at least 400°F to safely reach the frying temperatures required for this recipe.
Essential Equipment and Tools
Success with this copycat recipe depends heavily on having the right equipment. Here’s what you’ll need:
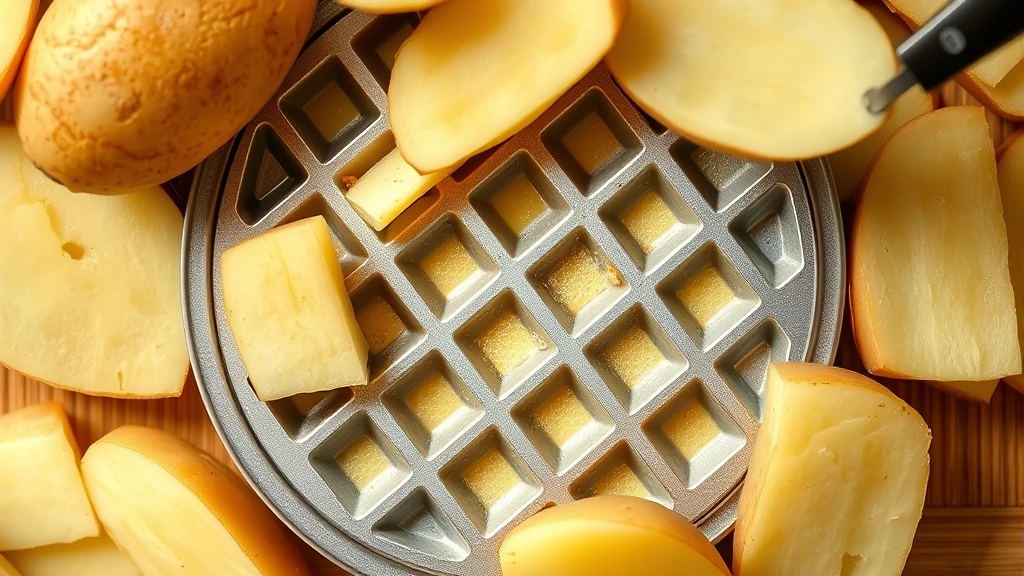
- Waffle Fry Cutter: This is the most crucial tool. You can find manual waffle fry cutters (look for mandoline-style cutters with waffle settings) or electric versions. Manual cutters typically cost $15-30 and work well for home cooking. They feature a crinkle-cut or waffle blade that creates the signature crosshatch pattern.
- Deep Fryer or Heavy-Bottomed Pot: A countertop deep fryer with temperature control is ideal, but a heavy stainless steel or cast-iron pot (at least 5 quarts) works well too. The depth prevents oil splatter and maintains consistent temperature.
- Candy or Deep-Fry Thermometer: Temperature accuracy is non-negotiable. An instant-read thermometer or clip-on deep-fry thermometer ensures your oil reaches and maintains the correct temperatures.
- Slotted Spoon or Fry Basket: Use this to safely remove fries from the hot oil and drain excess oil.
- Paper Towels and Wire Rack: These allow fries to drain and cool properly after cooking, preventing them from becoming soggy.
- Mixing Bowls: One for soaking potatoes, another for mixing your seasoning blend.
Step-by-Step Cooking Instructions
Preparation Phase (30 minutes ahead):
- Cut your russet potatoes lengthwise into quarters, leaving the skin on. This helps maintain structural integrity during cutting and adds a rustic element to the fries.
- Using your waffle fry cutter, carefully cut each potato quarter into waffle fries. Work slowly and steadily to ensure uniform thickness, which promotes even cooking. Aim for fries about ¼-inch thick at their widest point.
- Place all cut fries into a large bowl filled with cold water. This is a critical step—soaking removes excess starch from the potato surface, which would otherwise cause excessive browning and prevent crispiness. Soak for at least 20 minutes, preferably 30 minutes.
- Drain the fries thoroughly and pat them completely dry with paper towels or a clean kitchen towel. Moisture is the enemy of crispiness, so take time to remove all water.
Seasoning Preparation:
- In a small bowl, combine salt, paprika, garlic powder, onion powder, cayenne pepper (if using), and black pepper. Mix thoroughly to ensure even distribution. This seasoning blend is what gives Chick-fil-A waffle fries their distinctive taste.
Cooking Phase:
- Heat your peanut oil to 325°F in your deep fryer or pot. Use your thermometer to verify the temperature. This lower temperature is for the initial cook, which partially cooks the potato interior without browning the exterior excessively.
- Working in batches to avoid crowding the oil (which lowers temperature and causes uneven cooking), carefully add fries to the hot oil. Fry for 5-7 minutes until the fries are soft but still pale in color. They should not be golden yet.
- Using a slotted spoon or basket, remove the fries from the oil and place them on a wire rack lined with paper towels. Let them rest for 2-3 minutes. This resting period allows the interior to set slightly.
- Increase your oil temperature to 375°F for the final fry. This higher temperature creates the crispy exterior.
- Once the oil reaches 375°F, carefully place the partially cooked fries back into the oil in batches. Fry for 2-3 minutes until they achieve a deep golden-brown color.
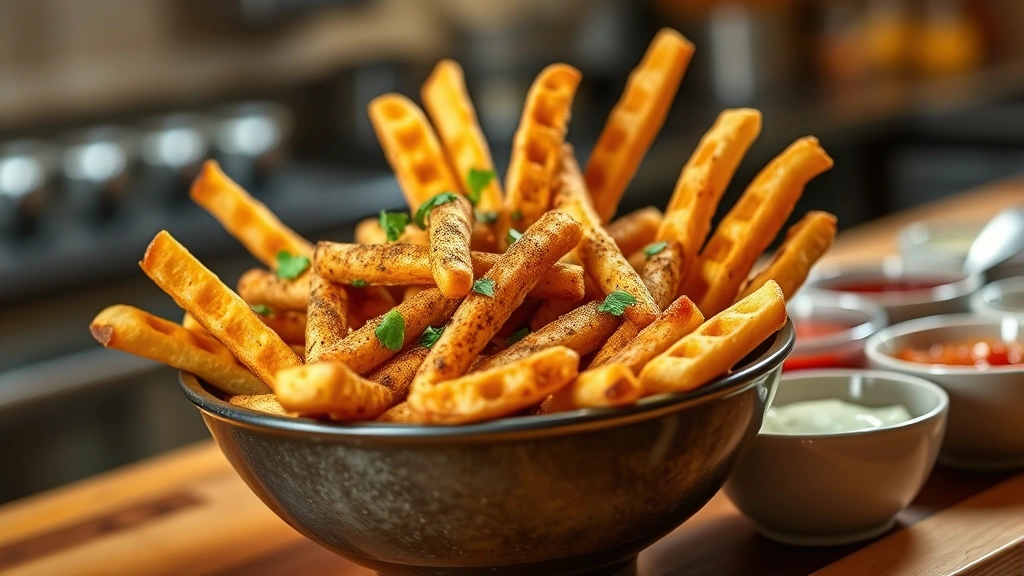
- Remove the fries and place them on fresh paper towels. Immediately sprinkle your seasoning blend over the hot fries while they’re still steaming—this helps the seasonings adhere to the surface.
This double-fry method is the secret behind achieving that perfect texture: crispy outside, fluffy inside, just like the restaurant version.
Pro Tips for Perfect Results
Temperature Management: Maintaining accurate oil temperature throughout the cooking process is absolutely critical. If your oil is too cool, fries absorb excess oil and become greasy. If it’s too hot, they brown too quickly before the inside cooks through. Invest in a reliable thermometer and check the temperature frequently, adjusting your heat source as needed.
Batch Cooking: Never overcrowd your fryer. Each fry needs space to cook evenly. Generally, cook about 1-2 cups of cut fries per batch. Overcrowding causes the oil temperature to drop significantly, resulting in soggy, greasy fries instead of crispy ones.
Potato Selection and Storage: Buy russet potatoes that are firm with no soft spots or sprouting. Store them in a cool, dark place (not the refrigerator) to maintain their starch content. Using older potatoes (stored for a week or two) actually produces better fries because some of the moisture has evaporated.
Oil Reuse: Peanut oil can be reused multiple times for frying. After cooking, let the oil cool completely, then strain it through a fine-mesh strainer or cheesecloth to remove food particles. Store it in a sealed container in a cool place. Quality oil can typically be reused 8-10 times before it breaks down. This practice aligns with food waste reduction tips and saves money on oil costs.
Thickness Consistency: The more uniform your fry thickness, the more evenly they’ll cook. Take your time with the waffle cutter and aim for consistent results. Thicker fries take longer to cook but stay fluffier inside; thinner fries crisp up faster but can become brittle if overcooked.
Seasoning Timing: Always season the fries immediately after removing them from the oil while they’re still hot and slightly damp. The heat helps the seasonings stick, and the moisture creates a light adhesive layer. Seasoning cold fries results in uneven distribution and poor flavor.
Seasoning Variations and Dipping Sauces
While the classic Chick-fil-A seasoning blend is delicious, you can experiment with variations to create exciting new flavors:
- Cajun Style: Add ½ teaspoon smoked paprika, ¼ teaspoon thyme, and a pinch of cayenne for a bold, smoky kick.
- Parmesan Herb: Mix ¼ cup grated Parmesan cheese, 1 teaspoon dried Italian seasoning, and ½ teaspoon garlic powder. Toss with warm fries.
- Spicy Chili Lime: Combine your base seasoning with ½ teaspoon chili powder, zest of one lime, and a sprinkle of lime juice.
- Truffle Parmesan: After seasoning with the base blend, drizzle with truffle oil and top with shaved Parmesan for a gourmet twist.
For dipping sauces, consider these options that pair beautifully with homemade waffle fries:
- Classic Chick-fil-A Style Sauce: Mix ½ cup mayo, 2 tablespoons ketchup, 1 tablespoon honey, and ½ teaspoon paprika. This replicates their signature sauce.
- Garlic Aioli: Combine ½ cup mayo, 2 minced garlic cloves, 1 tablespoon lemon juice, and salt to taste.
- Sriracha Mayo: Mix ½ cup mayo with 2-3 tablespoons sriracha and 1 teaspoon rice vinegar for a spicy kick.
- Ranch Dip: Use store-bought or homemade ranch dressing as a classic pairing.
These sauces complement your homemade waffle fries perfectly and add variety to your meal preparations, making them excellent additions to your best healthy food recipes rotation when served with grilled proteins.
Storage and Reheating Guide
Immediate Storage: Freshly cooked waffle fries are best enjoyed immediately while still warm and crispy. However, if you have leftovers, store them in an airtight container at room temperature for up to 2 hours. Beyond this timeframe, they’ll begin to soften and lose their appeal.
Refrigerator Storage: For longer storage, place cooled fries in an airtight container or resealable plastic bag and refrigerate for up to 3 days. The cold temperature slows moisture loss and prevents them from becoming stale quickly.
Freezing: You can freeze cooked waffle fries for up to 2 months. Spread cooled fries on a baking sheet in a single layer and freeze until solid (about 2 hours), then transfer to freezer bags. Alternatively, freeze them uncooked after the first fry for best results—this allows you to prepare fresh fries quickly by simply doing the final fry when needed.
Reheating Methods:
- Oven Method (Best for Crispiness): Preheat your oven to 375°F. Spread fries on a baking sheet and bake for 8-10 minutes until heated through and crispy. This method restores much of the original texture.
- Air Fryer Method: Place fries in your air fryer basket at 375°F for 5-7 minutes, shaking the basket halfway through. This produces excellent results comparable to freshly fried fries.
- Microwave Method (Quick but Less Ideal): While convenient, microwaving makes fries soggy. Place on a microwave-safe plate and heat for 1-2 minutes, but expect reduced crispiness.
- Stovetop Method: Heat a skillet over medium-high heat with a small amount of oil. Add fries and cook for 3-5 minutes, stirring occasionally, until warmed and crispy.
For best results, avoid storing fries in the refrigerator if you plan to reheat them within a few hours—keeping them at room temperature maintains better texture for immediate reheating.
FAQ
Can I make waffle fries without a deep fryer?
Yes! A heavy-bottomed pot or Dutch oven works perfectly. Ensure it’s at least 5 quarts to safely accommodate the oil volume and provide enough space for fries without crowding. Use a reliable thermometer to maintain temperature control, and be extra cautious when adding and removing fries to prevent splashing hot oil.
What’s the best substitute for peanut oil?
Vegetable oil, canola oil, or sunflower oil are excellent substitutes with similar smoke points (400°F+). Avoid olive oil, which has a lower smoke point and imparts a flavor that doesn’t match the original. Avoid coconut oil, which solidifies at room temperature and creates a different texture.
Why are my homemade waffle fries greasy?
Greasiness typically results from one of three issues: oil temperature too low (fries absorb excess oil), overcrowding the fryer (temperature drops), or insufficient draining after cooking. Verify your oil temperature with a thermometer, cook in smaller batches, and drain fries thoroughly on fresh paper towels immediately after cooking.
Can I prepare waffle fries ahead of time?
Absolutely! Cut and soak your potatoes several hours ahead, then pat them dry and refrigerate in an airtight container until you’re ready to fry. You can also complete the first fry several hours ahead, then finish with the second fry just before serving. Alternatively, freeze partially cooked fries and complete the final fry when needed.
How do I prevent waffle fries from sticking together?
Ensure fries are completely dry before frying—moisture causes sticking. During the first fry, gently separate any fries that touch using your slotted spoon. Don’t overcrowd the fryer, which causes fries to clump together. After cooking, spread fries on paper towels in a single layer to prevent them from sticking as they cool.
What’s the difference between waffle fries and crinkle-cut fries?
Waffle fries feature a crosshatch pattern created by rotating the potato 90 degrees between cuts, creating a true waffle appearance. Crinkle-cut fries have parallel diagonal ridges without the crosshatch pattern. Both use specialized cutters, but waffle fries have more surface area and appear more textured than crinkle-cut varieties.
Can I bake waffle fries instead of frying them?
While you can bake waffle fries at 425°F for 25-30 minutes with a light oil spray, they won’t achieve the same crispy exterior as deep-fried versions. Baking produces a softer texture more similar to regular baked potatoes. For the authentic Chick-fil-A experience, deep frying is essential.


