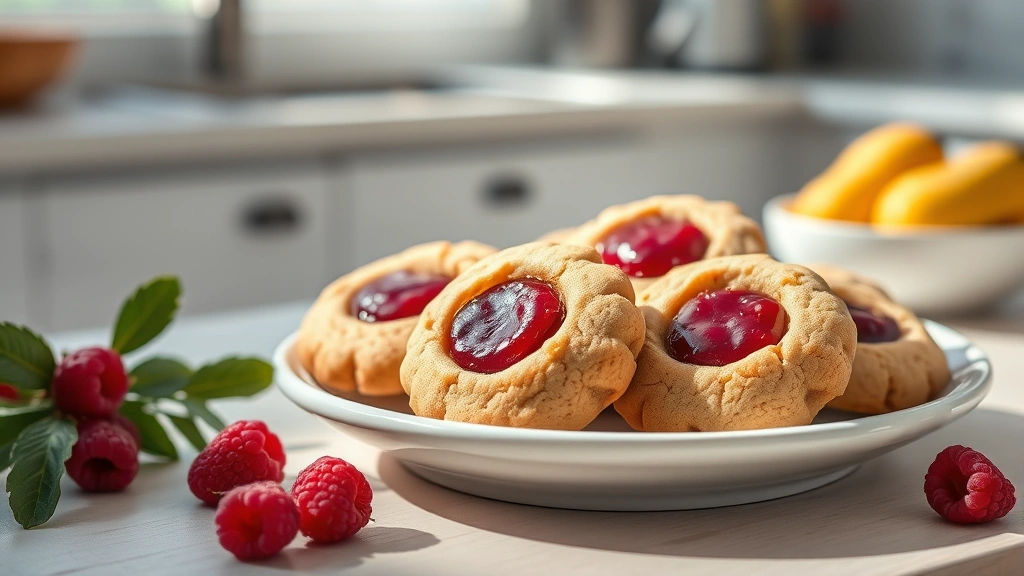
Best Thumbprint Cookies? Grandma’s Secret Recipe!
There’s something magical about thumbprint cookies that takes us back to simpler times, warm kitchens, and the comforting presence of someone we love. These delightful little treats have been passed down through generations, and today I’m sharing my grandmother’s closely guarded secret recipe that will have your family asking for more. Thumbprint cookies are the perfect combination of buttery, tender cookie dough with a jewel-like center of jam or filling—they’re simple enough for beginners but impressive enough to serve at any gathering.
What makes these cookies truly special isn’t just the recipe itself, but the memories attached to it. My grandmother made these every holiday season, and the aroma of vanilla and butter would fill her entire house. She taught me that the secret to perfect thumbprint cookies lies in three things: using quality butter, not overbaking, and selecting the right jam or filling. Whether you’re baking for a special occasion or simply want to recreate those cherished memories, this guide will walk you through every step to achieve bakery-quality results in your own kitchen.
Understanding Thumbprint Cookies
Thumbprint cookies are a classic butter cookie that originated in Scandinavian and Central European baking traditions. The name comes from the distinctive indentation made by pressing your thumb into the center of each cookie before baking. This simple technique creates the perfect pocket for jam, chocolate, or other delicious fillings. Unlike more complex cookies that require intricate shaping or decorating skills, thumbprint cookies are forgiving and accessible to bakers of all levels.
The beauty of this thumbprint cookie recipe lies in its versatility. The basic dough can be customized with different extracts, spices, or even citrus zest. You can fill them with traditional fruit jams, chocolate ganache, caramel, or even cream cheese frosting. This makes them perfect for various occasions—they’re elegant enough for weddings and sophisticated enough to serve alongside coffee at a dinner party, yet homey enough for casual family gatherings.
My grandmother always said that thumbprint cookies represent the personal touch in baking. Each cookie bears the unique imprint of the baker’s thumb, making every batch slightly different and wonderfully authentic. This imperfection is actually what makes them so charming and memorable. Unlike mass-produced cookies with perfect uniformity, homemade thumbprint cookies have character and warmth.
Essential Ingredients Explained
Before diving into the recipe, let’s discuss each ingredient and why it matters. Understanding the role of each component will help you make informed substitutions if needed and achieve the best possible results.
Butter: Use unsalted, high-quality butter at room temperature. This is non-negotiable for thumbprint cookies. Room temperature butter creams better with sugar, creating a lighter, airier dough. Cold butter will result in dense, tough cookies. My grandmother always let her butter sit out for at least an hour before baking.
Sugar: Granulated white sugar provides sweetness and helps create the cookie’s structure. Some bakers prefer a combination of white and brown sugar for added depth and chewiness, but traditional thumbprint cookies use white sugar exclusively. The sugar helps the cookies spread slightly during baking, creating that tender, delicate crumb.
Egg Yolk: We use only the yolk, not the whole egg. The yolk adds richness and helps bind the ingredients together without making the dough too wet. This is another secret my grandmother shared—the yolk creates a more luxurious texture than whole eggs.
Vanilla Extract: Pure vanilla extract is essential for authentic flavor. Avoid imitation vanilla, which can taste artificial and bitter. If you can find specialty vanilla extracts or vanilla bean paste, they’ll elevate your cookies even further.
Flour: All-purpose flour works perfectly for this recipe. Make sure to spoon and level your flour rather than scooping directly from the bag, which can pack too much flour into your measuring cup and result in dry dough.
Salt: A pinch of salt enhances the other flavors and balances sweetness. Never skip this ingredient.
Jam or Filling: Choose high-quality jam with good flavor. Your favorite varieties work—raspberry, strawberry, apricot, or even homemade preserves. If you’re making homemade fillings, ensure they’re thick enough not to run during baking.
Step-by-Step Recipe Instructions
Ingredients:
- 1 cup (2 sticks) unsalted butter, room temperature
- ½ cup granulated sugar
- 1 large egg yolk
- 1 teaspoon pure vanilla extract
- 2 cups all-purpose flour
- ¼ teaspoon salt
- ½ cup jam or filling of choice
Step 1: Cream Butter and Sugar
In a large mixing bowl, combine room temperature butter and sugar. Using an electric mixer on medium speed, beat for 3-4 minutes until the mixture is light, fluffy, and pale in color. This creaming process incorporates air into the dough, which is crucial for achieving tender cookies. You’ll notice the mixture becoming lighter in color and noticeably fluffier—this is exactly what you want.
Step 2: Incorporate Egg and Vanilla
Add the egg yolk and vanilla extract to the creamed mixture. Beat on medium speed for about 1 minute until well combined. The mixture should look smooth and uniform. Scrape down the sides of the bowl with a spatula to ensure everything is fully incorporated.
Step 3: Combine Dry Ingredients
In a separate bowl, whisk together flour and salt. This ensures even distribution of salt throughout the dough and helps incorporate air.
Step 4: Mix Wet and Dry
Gradually add the flour mixture to the butter mixture, mixing on low speed until just combined. Don’t overmix—as soon as you don’t see any white streaks of flour, stop mixing. Overmixing can develop gluten, making cookies tough rather than tender.
Step 5: Chill the Dough
Wrap the dough in plastic wrap and refrigerate for at least 30 minutes. This resting period is essential—it allows the gluten to relax and prevents the cookies from spreading too much during baking. My grandmother would often chill her dough overnight, which she said made the dough easier to handle and improved the flavor.
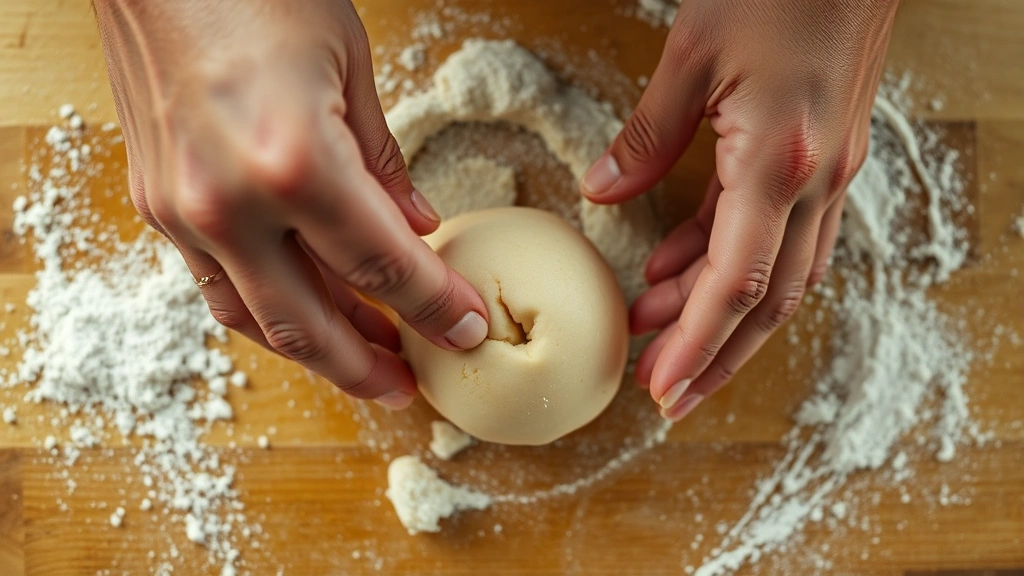
Step 6: Shape the Cookies
Preheat your oven to 350°F (175°C). Line baking sheets with parchment paper. Remove dough from the refrigerator and roll into 1-inch balls. Place them about 2 inches apart on the prepared baking sheets. Using your thumb, gently press an indentation into the center of each cookie, being careful not to press all the way through to the bottom.
Step 7: Fill the Cookies
Spoon about ¼ teaspoon of jam into each indentation. Don’t overfill—too much jam will run out during baking. A conservative amount is better than generous.
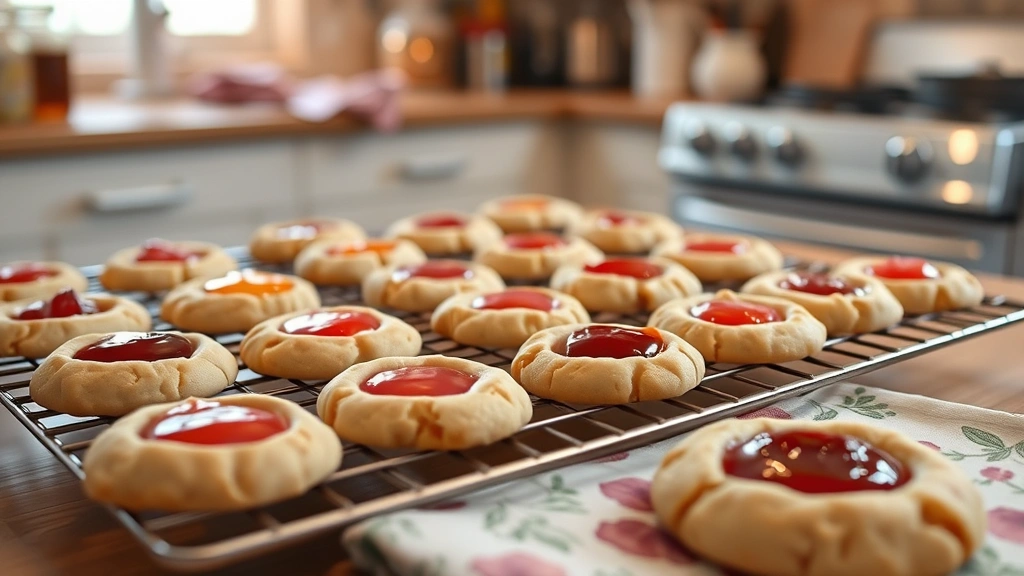
Step 8: Bake
Bake for 12-15 minutes, until the edges are very lightly golden. The centers should still look slightly underbaked. This is the key to achieving tender cookies—they continue cooking on the hot baking sheet after removal from the oven. Remove from the oven and let cool on the baking sheet for 5 minutes before transferring to a wire rack.
Perfecting Your Baking Technique
Achieving perfect thumbprint cookies requires attention to detail and understanding how different factors affect your final product. Here are the techniques that will make the difference between good cookies and extraordinary ones.
Temperature Control: Room temperature butter is absolutely critical. If your butter is too cold, it won’t cream properly and your dough will be dense. If it’s too warm, the cookies will spread too much and lose their shape. The ideal butter should be soft enough to leave a slight indentation when pressed but still hold its shape.
Oven Temperature: Invest in an oven thermometer to verify your oven’s actual temperature. Many home ovens run hot or cold, which significantly affects baking time and results. A slightly cooler oven (around 325°F) will give you more time to achieve that perfect golden edge with a tender center.
Baking Sheet Selection: Use heavy-duty baking sheets, preferably light-colored aluminum or steel. Dark baking sheets absorb more heat and can cause over-browning on the bottom. Insulated or double-layered baking sheets are excellent choices for preventing the bottoms from burning.
The Thumbprint Technique: When making your indentations, press gently but firmly, creating a well that’s about ½ inch deep. Rotate your thumb slightly as you press—this creates a better pocket for the jam. If you accidentally press through to the bottom, it’s fine; the jam will just bake into the cookie instead of sitting on top.
Jam Selection: Different jams have different water contents. If your chosen jam is very runny, strain it through a fine mesh sieve to remove excess liquid. Alternatively, simmer it gently in a saucepan for a few minutes to reduce its moisture content. Thicker jams like preserves or curds work beautifully in thumbprint cookies.
Understanding the science behind baking helps you troubleshoot issues. If your cookies spread too much, your butter was too warm or you didn’t chill the dough long enough. If they’re too dense, you either overmixed the dough or used cold butter. If the edges are dark but the center is undercooked, your oven temperature is too high.
Creative Filling Ideas
While traditional fruit jam is always wonderful, there are countless delicious ways to fill your thumbprint cookies. Here are some of my favorite variations that will keep your cookie jar exciting:
Classic Fruit Jams: Raspberry, strawberry, apricot, and blueberry are timeless choices. Raspberry pairs beautifully with the vanilla butter cookie, while apricot adds a sophisticated tartness.
Chocolate Fillings: Fill the indentation with a small piece of dark chocolate before baking, or use chocolate ganache after baking. For a more decadent option, try Nutella or chocolate hazelnut spread.
Caramel: Dulce de leche or homemade caramel sauce creates a luxurious filling. Caramel pairs wonderfully with sea salt sprinkled on top before baking.
Lemon Curd: Tangy and bright, lemon curd adds sophistication to your cookies. It pairs particularly well with cookies made with lemon zest in the dough.
Cream Cheese Frosting: For a different approach, bake the cookies plain and top with a small dollop of cream cheese frosting and jam after they’ve cooled. This creates a more frosted-cookie experience.
Almond or Peanut Butter: Use natural nut butters for a protein-packed filling. These work especially well if you add a pinch of almond extract to the dough.
Honey and Cinnamon: Mix warm honey with ground cinnamon for a filling that’s both comforting and unique. This works beautifully if you’ve added cinnamon to the dough itself.
Experimenting with different fillings is part of the joy of making thumbprint cookies. Don’t be afraid to try combinations that appeal to your palate. Some of my favorite discoveries have come from happy accidents in the kitchen.
Storage and Make-Ahead Tips
Room Temperature Storage: Store cooled thumbprint cookies in an airtight container at room temperature for up to 5 days. Place parchment paper between layers to prevent sticking. They taste best eaten within the first 2-3 days while the cookies are still at their crispiest and the jam is at its most flavorful.
Refrigerator Storage: If you need to store them longer, refrigerate in an airtight container for up to 1 week. Allow them to come to room temperature before eating for the best texture and flavor.
Freezing Baked Cookies: Fully baked thumbprint cookies freeze beautifully for up to 3 months. Freeze them in a single layer on a baking sheet before transferring to a freezer-safe container. This prevents them from sticking together. Thaw at room temperature for about 30 minutes before serving.
Freezing Dough: You can also freeze the shaped, unfilled dough. Arrange balls on a baking sheet, freeze until solid, then transfer to a freezer bag. When ready to bake, thaw slightly, make your indentations, add jam, and bake as directed. This is incredibly convenient for having fresh-baked cookies whenever you want them.
Make-Ahead Strategy: For parties or gatherings, prepare the dough 2-3 days ahead and refrigerate it. On baking day, simply shape, fill, and bake. Alternatively, bake the cookies 1-2 days ahead and store them in an airtight container. They’ll taste just as delicious and you’ll have less stress on the day of your event.
My grandmother’s approach was to always have a batch of dough in her freezer. This way, she could have homemade cookies ready in less than 30 minutes whenever guests arrived. It’s a practice I’ve adopted and highly recommend.
Shipping Thumbprint Cookies: If you’re shipping these cookies to friends or family, they travel better than many delicate cookies due to their compact size and sturdy construction. Wrap each cookie individually in parchment paper, arrange in a single layer in a box with padding, and ship in a padded Priority Mail box. They’ll arrive in excellent condition.
FAQ
Can I use salted butter instead of unsalted?
While you technically can, I don’t recommend it. Salted butter contains varying amounts of salt depending on the brand, which makes it difficult to control the salt content in your recipe. Unsalted butter gives you precise control over seasoning. If you only have salted butter available, simply reduce the salt in the recipe by half.
Why did my cookies spread too much?
Over-spreading usually indicates one of three issues: butter that was too warm, dough that wasn’t chilled long enough, or oven temperature that’s too low. Ensure your butter is room temperature (not warm), chill the dough for at least 30 minutes, and verify your oven temperature with a thermometer. You can also try refrigerating the shaped cookies for 15 minutes before baking.
Can I make these cookies without eggs?
The egg yolk serves as a binder and adds richness. For an eggless version, you can try substituting with 2 tablespoons of applesauce or a commercial egg replacer, though the texture will be slightly different. The cookies may be a bit more crumbly and less tender.
What’s the best jam to use?
Any jam you love will work! However, thicker jams like preserves, curds, or compotes work better than thin jams because they won’t run during baking. Avoid very runny jams unless you strain them first to remove excess liquid.
How do I prevent the jam from burning?
If your jam tends to burn or darken significantly during baking, you can add it after the cookies have baked and cooled slightly. This is especially useful for delicate jams or when using very dark jam. Simply bake the cookies with empty indentations and fill them while they’re still warm.
Can I add flavoring to the dough?
Absolutely! Try adding almond extract, lemon zest, orange zest, or even a pinch of cardamom to the dough. These additions complement the butter flavor beautifully. Keep the vanilla extract at 1 teaspoon and reduce it slightly if adding other extracts.
Why are my cookies too dense?
Dense cookies usually result from overmixing the dough or using cold butter. The creaming step is crucial—beat the butter and sugar for a full 3-4 minutes until very light and fluffy. Also, avoid overmixing once you add the flour. Mix only until the white streaks of flour disappear.
Can I double this recipe?
Yes! Doubling works perfectly. Just double all the ingredients and follow the same instructions. You may need to bake in multiple batches depending on your oven and baking sheet size.
How do I make these cookies gluten-free?
Substitute the all-purpose flour with a high-quality gluten-free flour blend that includes xanthan gum. Use a 1:1 ratio. Be aware that gluten-free cookies may have a slightly different texture—often more tender and crumbly. You might need to add 1-2 tablespoons of water to the dough if it seems too dry.
What if I don’t have parchment paper?
Parchment paper isn’t absolutely necessary, but it does help prevent sticking and makes cleanup easier. If you don’t have it, you can use a silicone baking mat or simply grease your baking sheets lightly with butter or cooking spray.


