Homemade Wheat Bread? Expert-Approved Guide
Making homemade wheat bread from scratch transforms your kitchen into an artisan bakery. The aroma alone justifies the effort, but the real reward is pulling a golden-brown loaf from your oven—one you created entirely by hand. This expert-approved guide walks you through every step, from mixing your first batch of dough to mastering advanced techniques that professional bakers use.
Whether you’re a complete beginner or someone who’s tried bread baking before, this comprehensive guide demystifies the wheat bread recipe process. You’ll learn why certain ingredients matter, how temperature affects your dough, and troubleshooting tips that prevent common mistakes. By the end, you’ll have the confidence to bake consistently excellent wheat bread that rivals any bakery.
Why Bake Wheat Bread at Home
Commercial wheat bread often contains preservatives, added sugars, and dough conditioners that extend shelf life but compromise flavor and nutrition. When you bake at home, you control every ingredient. Whole wheat flour provides superior nutrition compared to refined white flour—it contains more fiber, minerals, and B vitamins that processing removes.
Homemade wheat bread tastes dramatically different from store-bought versions. The complex flavors that develop during slow fermentation simply don’t exist in mass-produced loaves. Additionally, fresh bread costs significantly less per loaf when you make it yourself, especially if you buy flour in bulk. Beyond economics and taste, there’s genuine satisfaction in creating something substantial with your own hands—it’s a meditative, rewarding process that many bakers describe as therapeutic.
Essential Ingredients Explained
A basic wheat bread recipe requires just four ingredients: flour, water, salt, and yeast. However, understanding each component ensures better results.
Whole Wheat Flour: This is your foundation. Whole wheat flour contains the bran and germ, making it denser and more nutritious than all-purpose flour. It absorbs more water, so you may need to adjust hydration. Many bakers blend whole wheat with bread flour to achieve better rise while maintaining wheat flavor. For your first attempt, try a 50/50 blend, then adjust based on results.
Water: Temperature matters tremendously. Cold water slows fermentation, warm water accelerates it. Most recipes call for 80-90°F water to activate yeast properly. Hard water with high mineral content actually benefits bread development, while distilled water sometimes produces weak gluten.
Salt: Never skip salt—it’s not optional. Salt strengthens gluten, controls fermentation speed, and enhances flavor. Use 1.5-2% of your flour weight. It also prevents over-fermentation by slowing yeast activity.
Yeast: Active dry yeast and instant yeast (bread machine yeast) work interchangeably, though instant yeast ferments slightly faster. Fresh yeast requires different measurements. Store yeast in cool, dry conditions; refrigeration extends its life significantly. Always check expiration dates—dead yeast means no rise.
Optional Additions: Many bakers add a small amount of honey, sugar, or diastatic malt powder to feed yeast and develop color. Olive oil improves texture and adds richness. Some recipes include vital wheat gluten to strengthen dough, especially important when using 100% whole wheat flour.
Equipment You’ll Need
Professional-quality bread doesn’t require expensive equipment. A few basics transform your results:
- Digital Scale: Measure ingredients by weight, not volume. Cups vary wildly in accuracy—a cup of flour can weigh 120-150 grams depending on how you scoop it. Scales eliminate guesswork and ensure consistency.
- Mixing Bowl: Use a large bowl (at least 4-quart capacity) for comfortable mixing and dough expansion during fermentation.
- Dutch Oven: This enclosed vessel traps steam during baking, creating the crispy crust characteristic of artisan bread. A 5-6 quart capacity works perfectly for standard loaves.
- Banneton or Proofing Basket: This supports dough during final rise, preventing spreading. You can DIY one using a bowl lined with a floured kitchen towel.
- Bread Lame or Sharp Knife: A lame (razor blade on a handle) creates clean scoring marks. A very sharp knife works similarly.
- Thermometer: An instant-read thermometer measures dough temperature and doneness. Internal temperature should reach 205-210°F when fully baked.
- Kitchen Towels: Use lint-free towels for covering dough and lining proofing baskets.
Step-by-Step Baking Process
This basic wheat bread recipe yields one large loaf or two smaller ones. All measurements are by weight for accuracy.
Ingredients:
- 500 grams bread flour (or 250g whole wheat + 250g bread flour)
- 350 grams water (70% hydration)
- 10 grams salt
- 7 grams instant yeast (about 2 teaspoons)
Day 1: Mixing and Autolyse
Combine 500 grams flour and 350 grams water in your mixing bowl. Mix until no dry flour remains—this is called the autolyse. Let it rest 30-60 minutes. This rest period allows flour to fully hydrate and begins gluten development naturally, requiring less aggressive mixing.
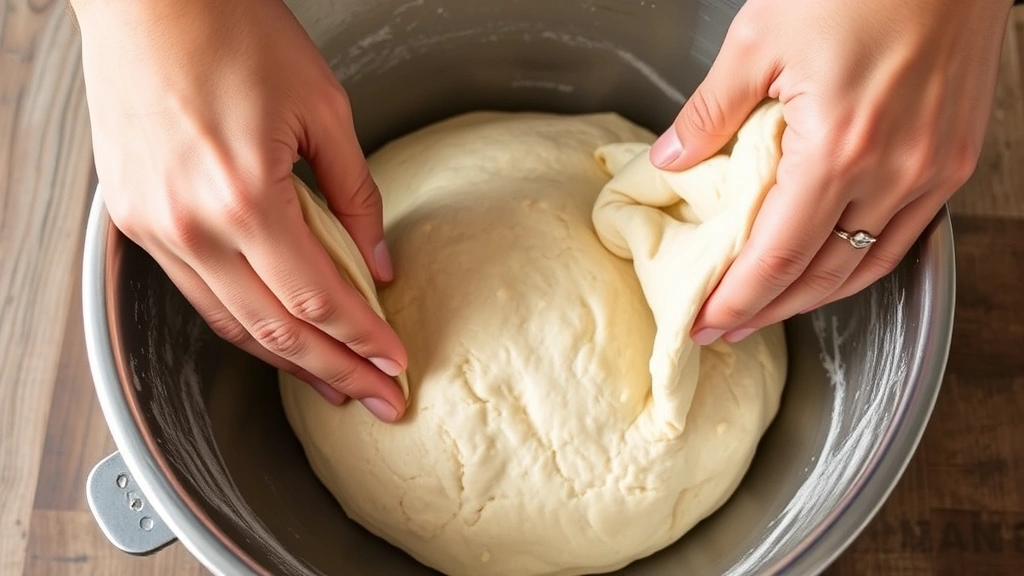
After autolyse, sprinkle 10 grams salt and 7 grams yeast over the dough. Wet your hand and squeeze these ingredients into the dough for 3-5 minutes until fully incorporated. The dough should feel slightly sticky but cohesive.
Bulk Fermentation
Place dough in a lightly oiled container. Cover loosely and let it ferment at room temperature (68-72°F is ideal). Over 4-6 hours, perform 4-6 “stretch and folds.” Every 30 minutes for the first 2 hours, wet your hand and grab one side of the dough, stretch it up and fold it over itself. Rotate the bowl 90 degrees and repeat from all four sides. This builds strength without aggressive kneading.
After 4-6 hours, the dough should increase in volume by 50-75% (not doubling—that’s overfermentation). It should feel airy with visible bubbles on the surface. If your kitchen is cool, fermentation takes longer; in warm conditions, it’s faster. Watch the dough, not the clock.
Pre-shape and Rest
Turn dough onto a lightly floured surface. Gently pre-shape into a round by folding edges toward the center. Let it rest 20-30 minutes—this relaxation prevents tearing during final shaping.
Mastering Dough Fermentation
Fermentation is where bread magic happens. During this phase, yeast consumes sugars and produces carbon dioxide (creating rise) and alcohol (developing flavor). Temperature dramatically affects fermentation speed: every 10°F increase roughly doubles fermentation rate.
Understanding Bulk Fermentation
Bulk fermentation is your first long rise. The goal is developing flavor through slow fermentation while building enough strength through stretch-and-folds. Cold fermentation (using refrigerated dough) extends this phase, developing deeper flavors—some bakers refrigerate for 12-48 hours. This method is forgiving and fits busy schedules perfectly.
Cold Fermentation Method
After bulk fermentation, shape your dough and place it in a floured banneton. Cover with plastic and refrigerate for 8-16 hours (even up to 48 hours). Cold fermentation develops complex flavors impossible to achieve with room-temperature fermentation alone. When ready to bake, score the cold dough and bake directly from the refrigerator—no additional rise needed.
Recognizing Proper Fermentation
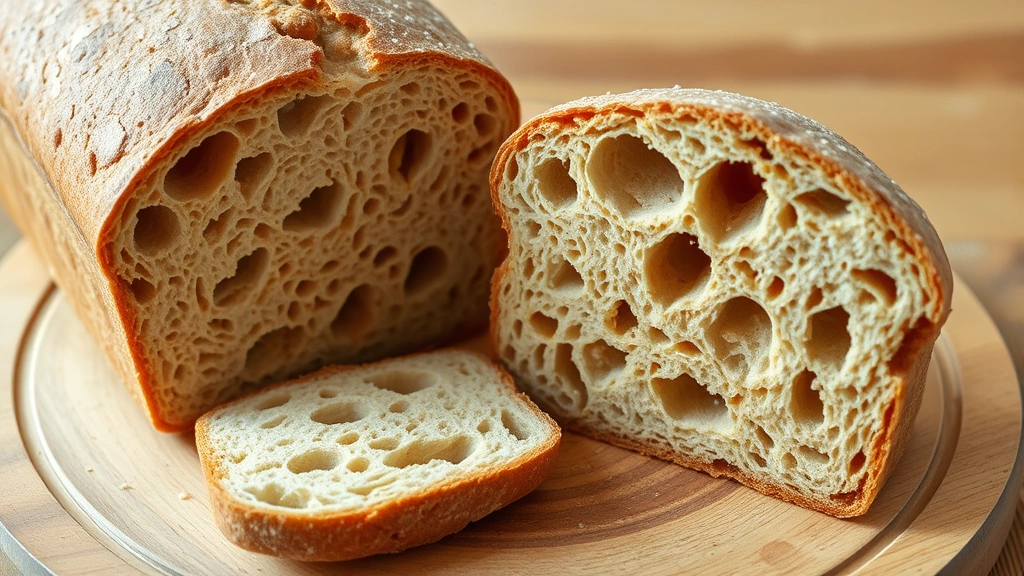
Underfermented dough lacks flavor and doesn’t rise properly in the oven. Overfermented dough spreads excessively and bakes flat. The sweet spot is when dough increases 50-75% in volume, feels pillowy with slight resistance when poked, and shows bubbles at the surface. The “poke test” helps: gently poke the dough. It should spring back slowly, not immediately or not at all.
Shaping and Scoring Techniques
Final Shaping
After the 20-30 minute rest, flip pre-shaped dough seam-side up. Fold the top third down, pressing gently. Fold the sides in slightly. Then fold the bottom up and roll toward you, creating tension on the surface. The seam should be sealed on the bottom. Place seam-side up in your floured banneton—the flour prevents sticking and creates a beautiful pattern on the crust.
Scoring Your Loaf
Scoring (slashing the dough before baking) controls expansion and creates that professional appearance. A single long slash down the center is classic. Hold your lame or knife at 45 degrees and cut ¼-½ inch deep, about 8 inches long. Some bakers prefer a cross pattern or multiple parallel slashes. Scoring must be decisive—hesitant cuts don’t open properly during baking.
Cold dough from the refrigerator is easier to score than room-temperature dough. The surface is firmer and less likely to drag.
Baking and Cooling
Oven Setup
Place your Dutch oven (with lid) in a 500°F oven for at least 45 minutes. It must be screaming hot. This initial heat creates “oven spring”—rapid expansion in the first 10-15 minutes of baking, when yeast is most active before dying from heat.
Loading the Dough
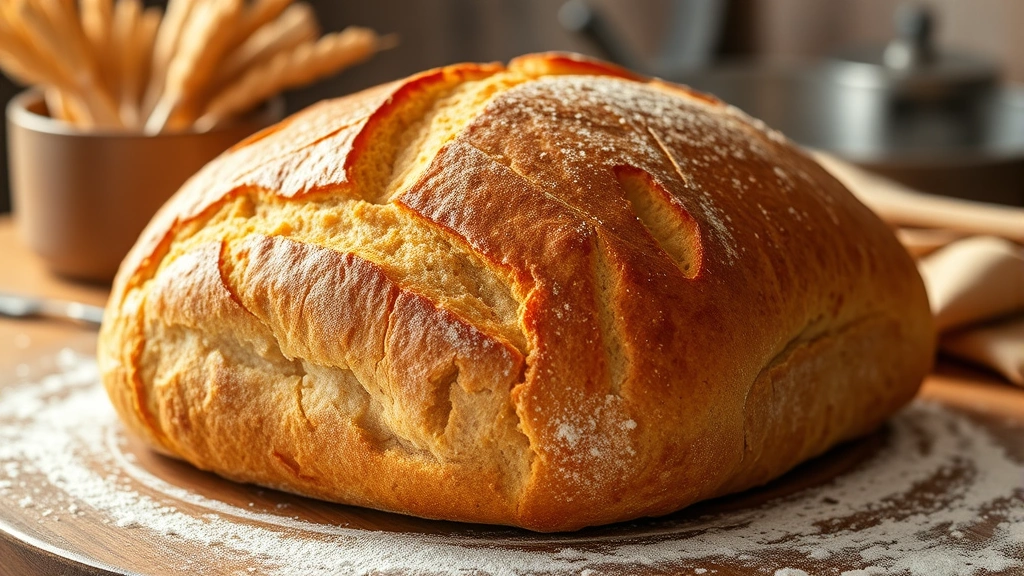
Carefully remove the Dutch oven. Flip your banneton onto parchment paper. The dough slides onto the parchment, which then goes into the Dutch oven. Score your dough quickly. Cover with the lid and bake at 500°F for 20 minutes with the lid on. This traps steam, creating a crispy crust.
After 20 minutes, remove the lid and reduce temperature to 450°F. Bake 25-30 minutes until deep golden brown. Internal temperature should reach 205-210°F. The bottom should sound hollow when tapped.
Cooling
This step is crucial—don’t skip it. Remove bread from the Dutch oven and place on a wire rack. The interior is still cooking as it cools. Cutting into warm bread releases steam and creates a gummy crumb. Wait at least 1 hour, preferably 2-3 hours, before slicing. This patience allows the crumb structure to set properly.
Troubleshooting Common Issues
Dense, Gummy Crumb
This usually means underfermentation or underbaking. Ensure your dough ferments until it passes the poke test. Check oven temperature with a thermometer—ovens are often inaccurate. Bake until internal temperature reaches 210°F. Also, slice only after complete cooling.
Flat Loaf with Little Rise
Overfermentation is the likely culprit. Reduce bulk fermentation time or use cooler temperatures. Alternatively, your yeast may be dead—check the expiration date and ensure water temperature wasn’t too hot (above 110°F kills yeast).
Overly Sour Taste
Long fermentation develops sourness. If you prefer milder flavor, reduce fermentation time or use warmer temperatures for faster fermentation. Conversely, if bread tastes bland, extend bulk fermentation or use cold fermentation.
Crust Too Thick or Too Soft
A thick crust results from too much steam or baking too long. Remove the Dutch oven lid earlier (around 15 minutes instead of 20). A soft crust means insufficient steam or humidity. Ensure your Dutch oven is properly preheated and sealed.
Uneven Crumb Structure
Large holes with a dense section indicates uneven fermentation or improper degassing during shaping. Be gentler when shaping—you want to remove excess gas, not all of it. Ensure your bulk fermentation is even; turn your dough occasionally if your kitchen has hot spots.
For more easy dinner recipes for beginners, check out our collection. Homemade bread pairs beautifully with healthy crockpot recipes for a complete meal. For breakfast applications, explore our best breakfast food recipes. If you enjoy making things from scratch, you might also love how to make homemade pasta, another rewarding kitchen project.
FAQ
Can I use all whole wheat flour?
Yes, but whole wheat flour absorbs more water and produces denser bread. Increase water by 10-15% and expect less rise. Many bakers prefer blending whole wheat with bread flour for balance. If using 100% whole wheat, consider adding vital wheat gluten (1-2% of flour weight) to strengthen the dough and improve rise.
How long does homemade wheat bread stay fresh?
Properly cooled bread stays fresh 3-4 days at room temperature in a paper bag or bread box. Plastic bags trap moisture and soften the crust. Freeze bread up to 3 months; thaw at room temperature or toast directly from frozen. Don’t refrigerate—it accelerates staling.
What’s the difference between bread flour and all-purpose flour?
Bread flour contains 12-14% protein, while all-purpose flour has 10-12%. Higher protein develops stronger gluten, resulting in better rise and chewier texture. For wheat bread, bread flour produces superior results, though all-purpose works acceptably. Whole wheat flour is lower in protein, which is why blending with bread flour helps.
Can I use instant yeast and active dry yeast interchangeably?
Mostly yes. Instant yeast (also called bread machine yeast) ferments slightly faster because particles are smaller. Use the same weight, though instant yeast may finish 10-15 minutes earlier. Fresh yeast requires different measurements—use 3 times the weight of instant yeast. Always check expiration dates.
Why is my dough too sticky to handle?
Whole wheat flour absorbs more water, making dough stickier than white flour dough. This is normal—use wet hands instead of floured hands for handling. Reduce water by 10-15 grams if stickiness is extreme. Also, ensure your kitchen isn’t too warm; temperature affects hydration needs.
Is sourdough starter necessary for wheat bread?
No. Commercial yeast works perfectly well. Sourdough starter develops different flavors through wild fermentation and takes 5-7 days to maintain. For beginners, instant yeast is simpler and more reliable. After mastering basic wheat bread, exploring sourdough is a natural next step.
Can I make wheat bread without a Dutch oven?
Dutch ovens are ideal because they trap steam, but you can substitute. Place a baking stone or steel in the oven and preheat to 500°F. Slide dough onto it and spray the oven walls with water several times during the first 15 minutes to create steam. Results won’t be quite as crispy, but acceptable bread develops.
What temperature should my kitchen be for baking?
68-72°F is ideal for consistent results. Cooler kitchens require longer fermentation; warmer kitchens ferment faster. If your kitchen is cold, place dough in a turned-off oven with the light on, or use a proofing box. In summer heat, use cooler water and consider overnight refrigeration.


