Burnt ends are one of the most coveted BBQ delicacies, originating from Kansas City’s legendary barbecue scene. These caramelized, crispy cubes of brisket point are the holy grail for pitmasters and backyard grillers alike. The technique transforms the toughest part of the brisket into tender, sticky, deeply flavored morsels that rival any premium cut. Whether you’re smoking your first brisket or refining your competition techniques, mastering burnt ends will elevate your barbecue game to professional levels.
This comprehensive guide will walk you through every step of creating authentic burnt ends, from selecting the right meat to achieving that perfect bark and sauce-coated exterior. You’ll learn the exact temperatures, timing, and techniques used by award-winning pitmasters, plus troubleshooting tips for common mistakes. By the end, you’ll understand why burnt ends command premium prices at BBQ joints and how to replicate that restaurant-quality result in your own backyard.
What Are Burnt Ends and Why They Matter
Burnt ends represent a brilliant culinary solution to a common barbecue challenge. The brisket point—also called the deckle or second muscle—is naturally fattier and less tender than the flat. Traditional whole brisket smoking can leave this section chewy and undesirable. Enter burnt ends: by removing the point after the initial smoke and cubing it, pitmasters discovered they could maximize surface area for bark development and sauce absorption.
The term “burnt ends” refers to the heavily caramelized, almost blackened exterior that develops during the finishing phase. This isn’t actual burning but rather the Maillard reaction at its most aggressive—complex flavor compounds forming through high-heat interaction between proteins, fats, and sugars. The result is an addictive combination of crispy exterior, tender interior, and intense umami depth. The caramelization process creates beneficial compounds that contribute to the rich flavor profile barbecue enthusiasts crave.
Burnt ends also represent resourcefulness in BBQ culture. Rather than discarding or repurposing the point, Kansas City pitmasters created a premium product that often sells out first at restaurants. This technique demonstrates how understanding meat science and cooking methods can transform economical cuts into luxury items.
Selecting and Preparing Your Brisket Point
Success begins with choosing the right brisket point. You’ll want a whole packer brisket (12-16 pounds) rather than pre-separated muscles. This allows you to smoke the entire brisket initially, then separate the point for burnt ends while the flat continues cooking separately. Look for marbling throughout the point—visible fat lines running through the meat. This fat is essential for tenderness and flavor during the long smoking process.
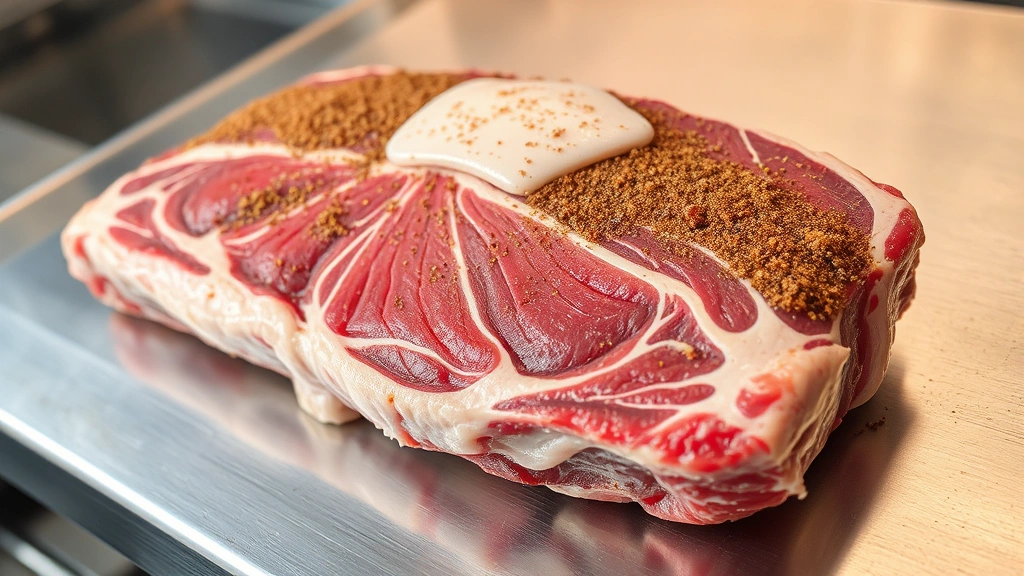
When selecting at the butcher counter, choose a point with a thick fat cap (at least ¼ inch) on top. Avoid any with gray discoloration or off odors. The meat should be bright red, not brown. Ask your butcher to leave the fat cap intact; you’ll trim it during preparation but want maximum protection during smoking.
Preparation begins the day before smoking. Remove the brisket from refrigeration 30 minutes before trimming to make the fat easier to work with. Using a sharp boning knife, trim the fat cap to approximately ¼ inch thickness, leaving enough for protection but removing excessive hard fat that won’t render. Remove any silver skin (the thin membrane) on the underside by sliding your knife under it at a slight angle and pulling as you cut. This membrane prevents seasoning penetration and sauce absorption.
After trimming, pat the entire brisket completely dry with paper towels. Moisture is the enemy of bark development. Some pitmasters apply a light coating of mustard as a binder for the dry rub, while others skip this step. Both methods work; mustard adds subtle tang, while omitting it lets pure meat and spice flavors dominate.
The Dry Rub Foundation
Your dry rub is the foundation of burnt ends flavor. The classic Kansas City approach emphasizes a simple, balanced blend that lets the meat shine through. Professional pitmasters often use the same rub for brisket that they use for other meats, prioritizing consistency and refinement over complexity.
Here’s a proven burnt ends dry rub formula:
- Brown sugar: 3 tablespoons (provides sweetness for caramelization)
- Paprika: 2 tablespoons (adds color and mild pepper flavor)
- Kosher salt: 2 tablespoons (essential for seasoning depth)
- Black pepper: 1 tablespoon (freshly ground for maximum impact)
- Garlic powder: 1 tablespoon (savory umami element)
- Onion powder: 1 tablespoon (adds sweetness and depth)
- Cayenne pepper: ½ teaspoon (optional, for heat)
- Smoked paprika: 1 teaspoon (enhances smoke flavor perception)
Combine all ingredients in a small bowl, breaking up any brown sugar clumps. Apply the rub generously to all surfaces of the brisket, working it into crevices and ensuring even coverage. Many pitmasters apply rub 12-24 hours before smoking, allowing it to penetrate the meat. This dry brining effect enhances tenderness and flavor development. Alternatively, apply rub immediately before smoking for a fresher spice profile.
The key to perfect rub application is pressure and coverage. Use your hands to really work the seasoning into the meat, making sure you’re not just sprinkling but pressing it into place. Pay special attention to the edges and corners where bark will develop most aggressively.
Smoking Technique for Perfect Burnt Ends
Burnt ends require a two-phase smoking approach. The first phase smokes the entire brisket until the point reaches optimal tenderness. The second phase focuses exclusively on the point, transforming it into burnt ends.
Phase 1: Full Brisket Smoking
Prepare your smoker for a 225-250°F cook. Offset smokers, drum smokers, and pellet smokers all work excellently; the key is consistent temperature and smoke quality. Use premium hardwood—oak, hickory, or a blend of oak with milder fruitwoods like apple or cherry. Avoid mesquite for brisket as it can produce bitter flavors in long cooks.
Place the seasoned brisket on the smoker fat-cap up, which allows rendered fat to baste the meat continuously. Insert a reliable meat thermometer into the thickest part of the flat, avoiding bone contact. Smoke until the flat reaches 165°F internal temperature, typically 6-8 hours depending on size and smoker characteristics. This temperature is crucial—it’s when the flat is stable enough for the next phase while the point is still in the optimal tenderness window.
During smoking, maintain consistent temperature and avoid opening the smoker unnecessarily. Every time you open the door, you reset the cooking process slightly. Many pitmasters follow the “stall” protocol: when the brisket reaches 160°F, wrap it tightly in butcher paper (the “Texas Crutch”) to push through the stall—a temperature plateau caused by evaporative cooling. This typically saves 1-2 hours of smoking time.
Phase 2: Point Separation and Burnt Ends Smoking
Once the flat reaches 165°F, remove the entire brisket from the smoker. Using a sharp knife, carefully separate the point from the flat by following the natural seam between the two muscles. This is easier than it sounds—the meat naturally wants to separate at this juncture.
Return the flat to the smoker to continue cooking until it reaches 203°F (the target for maximum tenderness). Meanwhile, cube the point into approximately 1-1.5 inch pieces. Larger cubes retain more juice; smaller pieces develop more bark. Arrange the cubes on a disposable aluminum pan, making sure they’re in a single layer with minimal overlapping.
Place the pan of point cubes back on the smoker at the same 225-250°F temperature. Continue smoking for 45 minutes to 1 hour, allowing the cubes to develop initial bark. The meat will shrink slightly and the exterior will darken. This is exactly what you want—the foundation of burnt ends flavor.
The Signature Butter Sauce Process
This is where burnt ends transform from good to legendary. The butter sauce is the secret weapon that creates the sticky, caramelized coating and infuses the meat with rich, savory-sweet flavor.
Classic Kansas City Burnt Ends Sauce:
- Unsalted butter: 6 tablespoons
- Brown sugar: ¼ cup (packed)
- Honey: 3 tablespoons
- BBQ sauce: ½ cup (your favorite brand or homemade)
- Apple cider vinegar: 2 tablespoons
- Worcestershire sauce: 1 tablespoon
- Garlic powder: ½ teaspoon
- Black pepper: ¼ teaspoon
In a small saucepan, melt the butter over medium heat. Add brown sugar and honey, stirring until fully dissolved. This should take 2-3 minutes. Add the remaining ingredients and whisk until smooth. The sauce should be pourable but with noticeable body. Simmer for 2-3 minutes to marry the flavors, then remove from heat. Let cool for 5 minutes before applying.
After the point cubes have smoked for their initial 45-60 minutes, remove the pan from the smoker. Carefully pour approximately two-thirds of the sauce over the cubes, tossing gently to coat all surfaces. Return the pan to the smoker and continue cooking for another 30-45 minutes, stirring occasionally to prevent sticking and ensure even sauce coating.
The cubes will continue shrinking as they render fat and release moisture. This is normal and desired. The sauce will begin to caramelize and stick to the meat, creating that signature glossy, deeply browned exterior. If the sauce is cooking off too quickly, reduce smoker temperature by 25°F. If it’s not concentrating enough, increase temperature slightly.
Finishing and Caramelization
The final phase of burnt ends preparation determines whether they’re merely good or absolutely exceptional. After the second smoking phase (30-45 minutes with sauce), the cubes should be very tender and coated with darkened sauce. Now comes the aggressive caramelization that gives burnt ends their signature appearance and texture.
Transfer the pan to a 300°F oven or increase your smoker temperature to 275-300°F. Continue cooking for 15-20 minutes, stirring every 5 minutes. The sauce will become darker and stickier, and the edges of the meat will develop charring. This is the “burnt” in burnt ends—the visible dark brown to almost black coating that indicates maximum Maillard reaction and caramelization.
Watch carefully during this phase. The line between perfectly caramelized and actually burnt is narrow. You want the sauce to look almost blackened, with the meat cubes appearing to have a dark, crusty exterior, but the interior should still be moist and tender. If pieces are starting to look dry or the sauce is smoking excessively, remove the pan immediately.
Some advanced pitmasters add a final touch: a light drizzle of additional sauce and a brief blast at 350°F for the last 5 minutes, creating an almost candy-like glaze. This is optional but creates an impressive presentation and additional flavor complexity.
Let the burnt ends rest in the pan for 5 minutes after removing from heat. This allows residual heat to finish cooking the sauce slightly and lets the meat retain maximum juices. Transfer to a serving platter, scraping any stuck pieces and sauce from the pan bottom—this concentrated sauce is liquid gold for plating.
Serving and Storage Tips
Burnt ends are best served immediately while still warm and the sauce is tacky. Serve them as a standalone appetizer, as a BBQ platter component alongside brisket and ribs, or even on sandwiches. A single serving is typically 6-8 cubes, though enthusiasts often exceed this.
Pair burnt ends with classic BBQ sides: coleslaw (try our summer salad recipes for inspiration), baked beans, cornbread, or pickles and onions for acidity contrast. The sweetness and richness of burnt ends pair beautifully with acidic accompaniments. Consider making homemade salad dressings with vinegar bases to cut through the richness.
Burnt ends store excellently, making them ideal for meal prep. Refrigerate cooled burnt ends in an airtight container for up to 4 days. Reheat gently in a 275°F oven for 15-20 minutes, covered with foil to prevent drying. The sauce will re-soften and the meat will regain tenderness. Alternatively, reheat in a skillet over medium-low heat with a splash of water, stirring occasionally for 8-10 minutes.
For longer storage, freeze burnt ends in an airtight container or vacuum-sealed bag for up to 3 months. Thaw overnight in the refrigerator before reheating using the oven method above. Many pitmasters make burnt ends in large batches specifically for freezing, allowing them to serve restaurant-quality BBQ on busy weeknights. This approach aligns with food waste reduction tips by maximizing use of the entire brisket.
If you’re hosting a gathering and want to serve easy dinner recipes for beginners in the BBQ category, burnt ends are perfect—they’re forgiving, impressive, and require minimal last-minute attention once in the smoker.
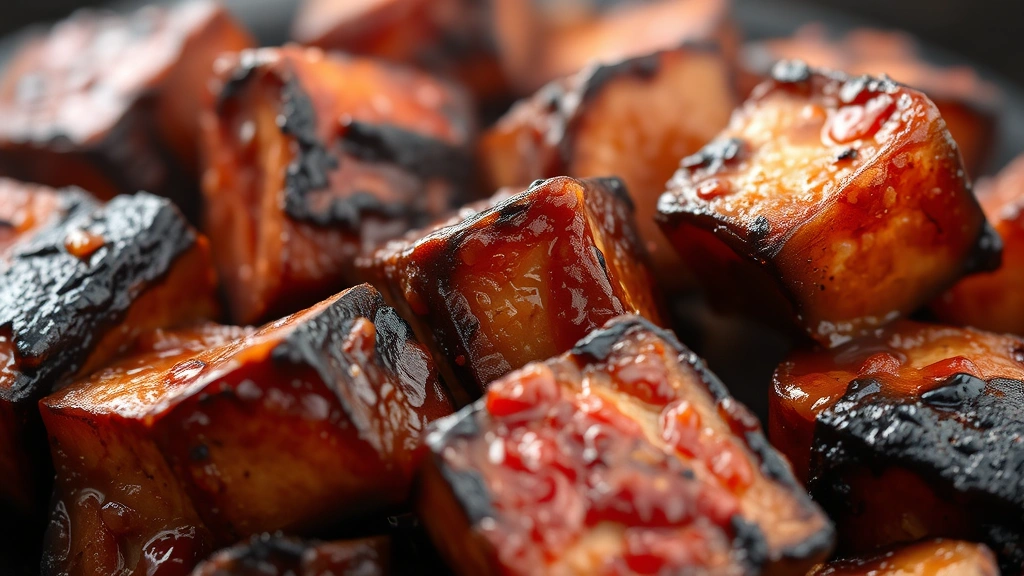
” alt=”Burnt ends cubes glistening with caramelized sauce and dark bark exterior, close-up showing texture”>
The visual appeal of properly executed burnt ends is undeniable. The glossy, deeply caramelized exterior should have a subtle sheen from the sauce, with visible charring on the edges. The color spectrum ranges from dark mahogany to nearly black, indicating thorough caramelization. When you bite into a piece, the exterior should crack slightly from the caramelized sauce crust, then give way to tender, juicy meat inside. The flavor should be intensely savory with prominent sweetness, balanced acidity, and subtle smoke notes.
Common mistakes include under-saucing (resulting in dry, under-flavored burnt ends), over-saucing (creating a soggy exterior that won’t caramelize), insufficient initial smoking (leaving the meat tough rather than tender), and rushing the final caramelization phase (not achieving the signature dark exterior). Avoid these by following timing guidelines closely and tasting components as you progress.
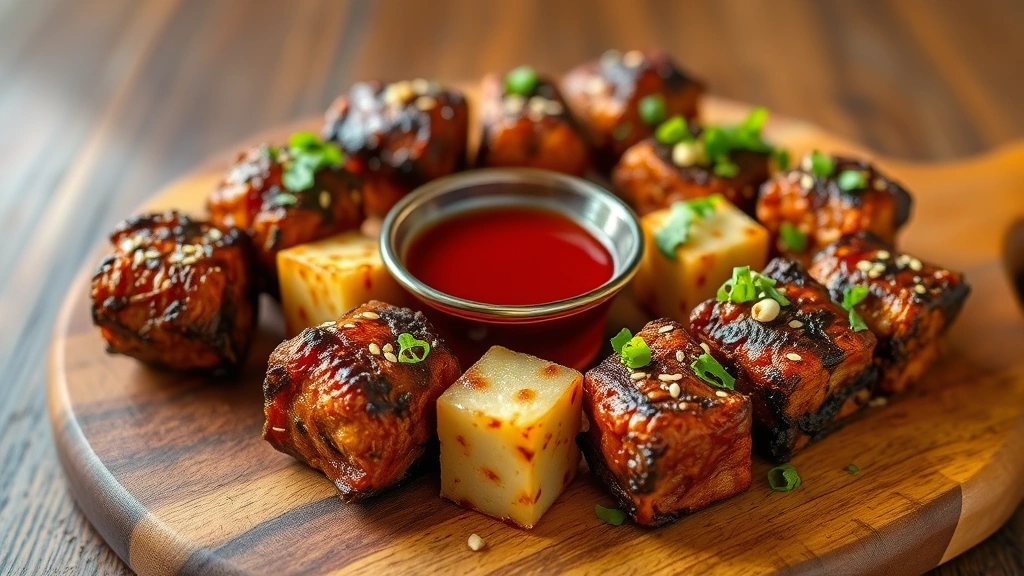
” alt=”Burnt ends arranged on wooden cutting board with sauce pooling, garnished with fresh herbs”>
FAQ
How long does a burnt ends recipe typically take from start to finish?
Plan for 10-12 hours total: 6-8 hours for full brisket smoking, 1.5-2 hours for point cubing and burnt ends-specific smoking and saucing, plus resting time. Many pitmasters start before dawn to have burnt ends ready by mid-afternoon.
Can I make burnt ends without a smoker?
Yes, though results differ slightly. Smoke the brisket point in a 225°F oven with a pan of soaked wood chips placed on the lowest rack (creating smoke), then follow the saucing and caramelization process. The bark won’t develop identically to smoker-cooked burnt ends, but the flavor and tenderness will still be excellent. Use a comprehensive cooking science resource for oven-smoking techniques.
What’s the difference between burnt ends and brisket burnt ends?
Authentic burnt ends specifically use the brisket point. Some BBQ joints use flat trimmings or other cuts, which technically aren’t true burnt ends. The point’s higher fat content and specific texture are what create the signature result.
Should I wrap the point cubes during smoking?
No. Unlike whole brisket, point cubes benefit from direct smoke and heat exposure to develop bark. Wrapping would prevent bark formation. Keep them unwrapped throughout the process.
Can I prepare the sauce ahead of time?
Absolutely. Make the sauce up to 2 days ahead and refrigerate in an airtight container. Reheat gently in a saucepan over low heat before applying to the cubes. This is helpful for large gatherings or meal prep scenarios.
What if my burnt ends are too dry?
This typically results from oversaucing combined with excessive high-heat cooking. On the next attempt, reduce the final high-heat phase duration or lower the temperature. If already cooked, serve with extra sauce on the side or reheat with a splash of beef broth.
Are there regional variations in burnt ends preparation?
Kansas City style (described here) is the original and most common. Texas versions sometimes skip the sweet sauce, using only spices and smoke. Memphis-style burnt ends incorporate more vinegar-based sauce. Experiment to find your preference, but Kansas City is the traditional starting point.
Can I use a charcoal grill instead of a dedicated smoker?
Yes. Set up a two-zone fire (coals on one side, meat on the other) and maintain 225-250°F. Add soaked wood chips to coals regularly. This requires more attention than a smoker but produces excellent results. Check comprehensive BBQ equipment guides for specific charcoal grill smoking techniques.
How do I know when the brisket point is done smoking initially?
The point should probe tender (a thin skewer slides through with minimal resistance) and reach 203°F internal temperature. However, for burnt ends, you can remove the point earlier (around 190°F) since additional cooking during the saucing phase will tenderize it further.


