Flaky Puff Pastry? Chef’s Secret Tips for Perfect Results Every Time
Puff pastry is the holy grail of pastry baking—those delicate, shattered layers that seem to defy gravity as they puff up in the oven. Yet many home bakers struggle to achieve that signature flakiness, often ending up with dense, greasy results instead. The truth is, making exceptional puff pastry isn’t about magic; it’s about understanding the science behind lamination and mastering a few critical techniques that professional chefs have perfected over decades.
In this comprehensive guide, we’ll reveal the insider secrets that separate mediocre puff pastry from show-stopping creations. Whether you’re crafting vol-au-vents, danish pastries, or elegant mille-feuille, these expert tips will transform your puff pastry game and help you achieve consistent, restaurant-quality flakiness that will impress everyone at your table.
Understanding Puff Pastry Science
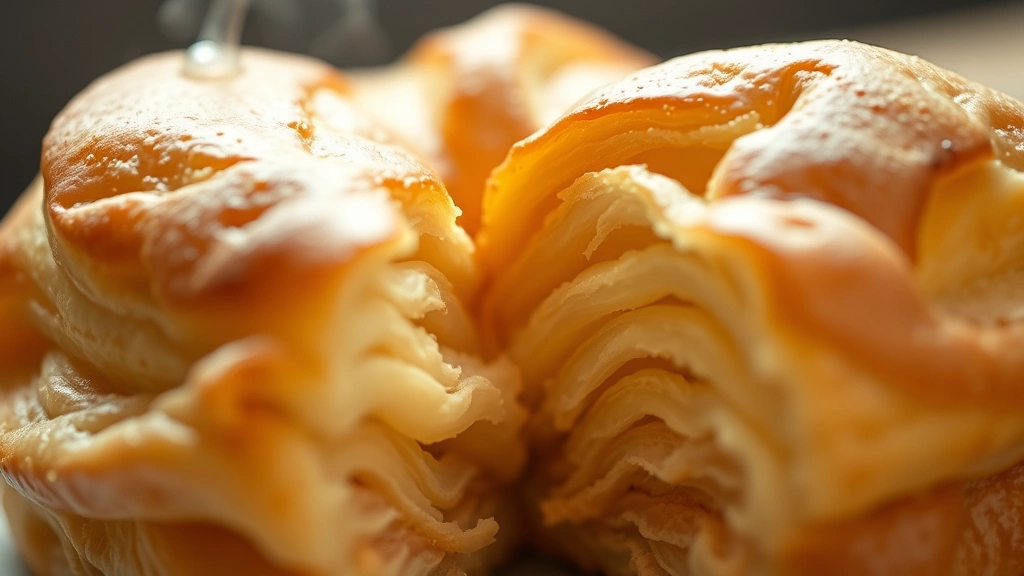
The magic of puff pastry lies in a process called lamination—the creation of hundreds of thin layers of dough separated by butter. When heat is applied in the oven, two things happen simultaneously: water in the butter converts to steam, creating lift and separation between layers, while the gluten in the dough provides structure to hold these layers intact.
Most home bakers don’t realize that puff pastry’s flakiness depends entirely on the ratio of butter to dough and how evenly those layers are distributed. Professional pastry chefs understand that every fold, every temperature adjustment, and every resting period serves a specific purpose in creating those coveted crispy, shattered layers. The dough itself is relatively simple—just flour, water, salt, and a small amount of butter—but the technique is where true expertise shines.
The lamination process creates what food scientists call “structural lipid layers.” These butter layers prevent gluten strands from bonding too tightly, allowing the dough to puff dramatically when steam develops. This is why precision matters at every step: too much mixing develops too much gluten, while uneven butter distribution creates inconsistent layers.
Essential Ingredients and Their Roles
Before diving into techniques, let’s examine each ingredient in a puff pastry recipe and understand why quality matters tremendously.
Flour: Use all-purpose flour with approximately 10-12% protein content. Bread flour, while higher in protein, creates excessive gluten development that inhibits flakiness. Pastry flour, conversely, lacks sufficient structure. All-purpose provides the perfect balance for laminated dough.
Butter: This is non-negotiable—use European-style butter with at least 82% butterfat. Standard American butter contains more water, which interferes with proper lamination. The butter must be cold but pliable enough to fold without shattering. Many chefs recommend keeping butter at precisely 65-68°F during the lamination process.
Water: Use ice water exclusively. Cold water prevents premature gluten development and keeps the dough workable. The amount varies slightly based on humidity and flour type, but typically ranges from 50-55% of the flour weight.
Salt: Salt strengthens gluten and enhances flavor. It also helps control fermentation if your puff pastry sits for extended periods. Use approximately 1-2% salt by flour weight.
Acid: Many professional recipes include a small amount of lemon juice or vinegar (about 1 tablespoon per pound of dough). This relaxes gluten, making the dough easier to fold and reducing shrinkage during baking. This technique is often overlooked by home bakers but makes a noticeable difference.
Temperature Control: The Game Changer
Temperature is absolutely the most critical factor in achieving flaky puff pastry, yet it’s often underestimated by home bakers. The ideal working temperature for puff pastry dough is 65-68°F. Above 70°F, the butter begins softening and integrating into the dough prematurely, destroying the distinct layers. Below 60°F, the butter becomes too hard to fold without tearing the dough.
Professional pastry kitchens maintain temperature-controlled environments precisely because of this sensitivity. If your kitchen is warm, work in shorter intervals and chill your dough more frequently. Consider these temperature-management strategies:
- Chill all equipment—bowls, rolling pins, work surfaces—for at least 30 minutes before starting
- Use ice water and keep a bowl of ice nearby to adjust ambient temperature
- Work during cooler parts of the day, preferably in early morning or evening
- Place your work surface over a bowl of ice if your kitchen runs warm
- Use a kitchen thermometer to monitor dough temperature throughout the process
- Rest your dough in the refrigerator for extended periods between folds
The fundamentals of dough handling apply here as well—patience and consistency yield superior results.
The Lamination Process Explained
Lamination is the core technique that creates puff pastry’s characteristic layers. The process involves folding butter into dough repeatedly, creating exponentially more layers with each fold.
Creating the Détrempe (Base Dough): Mix flour, salt, cold water, and your acid of choice until just combined. The dough should be shaggy and slightly sticky. Knead minimally—just enough to bring it together. Over-mixing develops gluten too much, making the dough tough and difficult to fold. Rest this dough for at least 30 minutes wrapped in plastic.
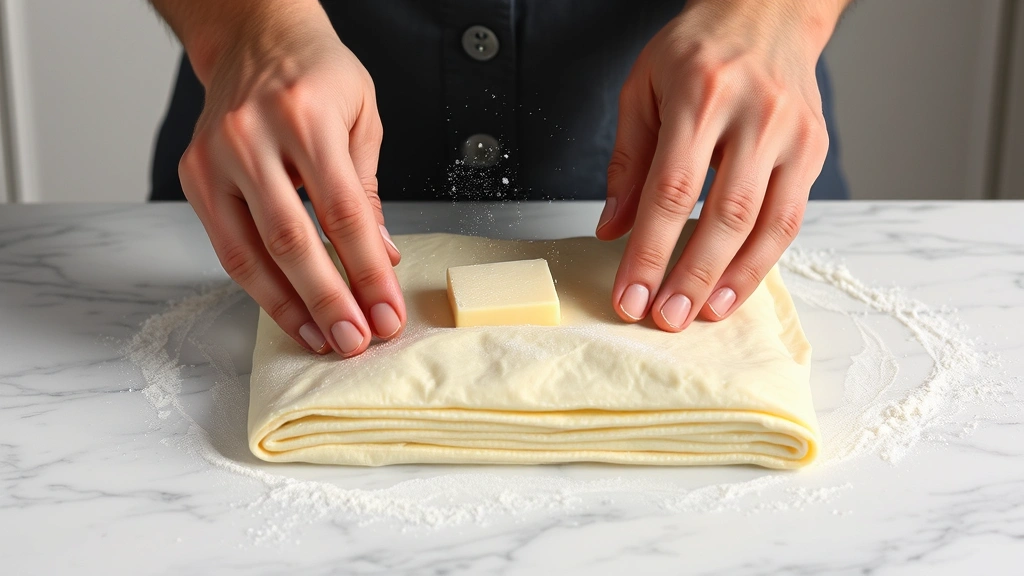
Preparing the Beurrage (Butter Block): Place cold butter between two sheets of plastic wrap and pound it with a rolling pin until it forms a ½-inch thick square. The butter should be cold but slightly pliable—not rock-hard or soft. This step ensures even distribution during folding.
The First Envelope Fold: Roll your rested détrempe into a thin rectangle roughly twice the size of your butter block. Place the butter block in the center and fold the dough corners over it like an envelope, sealing it completely. Roll this package into a rectangle about ¼-inch thick, working gently to maintain even thickness.
Executing the Folds: The most common folding method for puff pastry is the “book fold” or “letter fold.” Fold one short end of the rectangle one-third of the way across, then fold the opposite end over it like closing a book. You’ve now completed one “turn.” Rotate the dough 90 degrees, mark it with one finger indentation to track your progress, wrap it, and refrigerate for 30 minutes.
Repeat this process five to six times total. After three turns, you’ll have 729 layers. After six turns, you’ll have 729 layers if using letter folds (or 2,187 with book folds). Each rest period between turns is crucial—it allows the gluten to relax and prevents butter from warming excessively.
Common Mistakes and How to Avoid Them
Understanding what goes wrong helps you prevent problems before they start. Here are the most frequent mistakes professional pastry chefs see home bakers make:
Uneven Folds: If your folds aren’t precise, some areas will have more layers than others, resulting in inconsistent puffing. Use a ruler and make light score marks to ensure straight, even folds. Consistency matters more than speed.
Butter Breaking Through: This happens when butter warms too much or dough isn’t rolled evenly. If you see butter peeking through, stop immediately. Dust the area lightly with flour and chill the dough before continuing. If butter fully breaks through, that section is compromised.
Insufficient Resting: Rushing through the resting periods is the most common error. Gluten needs time to relax, and butter needs to firm up. Each 30-minute rest is non-negotiable. Many professionals rest overnight between the third and fourth turns for superior results.
Overworking the Dough: Every time you handle the dough, gluten develops slightly. Minimize unnecessary manipulation. Work efficiently, fold carefully, and resist the urge to re-roll or adjust folds multiple times.
Incorrect Water Content: Too much water makes dough sticky and difficult to fold; too little creates a dry, crumbly texture that won’t hold together. Start with 50% water by weight and adjust minimally based on humidity.
Professional Folding Techniques
The way you fold dramatically impacts your final product. Professional pastry chefs use specific techniques refined through years of practice.
The Book Fold Method: This creates six layers per turn. Fold one short end one-third across, fold the opposite end over it. Rotate 90 degrees and repeat. This is the most forgiving method and ideal for beginners.
The Letter Fold Method: This creates nine layers per turn. Fold both long sides toward the center, then fold in half. This requires more precision but creates more layers faster, reducing the total number of turns needed.
Maintaining Even Pressure: Roll with consistent, even pressure. Start from the center and work outward. Use a light touch—aggressive rolling warms the dough unnecessarily and can break the butter. Your rolling pin should glide smoothly across the dough, not press forcefully.
Directional Rolling: Always roll perpendicular to your previous fold direction. This ensures even gluten development and prevents the dough from developing a “grain” that causes it to puff unevenly.
Many chefs recommend using a pastry cloth and rolling pin cover—these prevent sticking without requiring additional flour, which can toughen the dough.
Resting and Chilling Strategies
Patience truly is a virtue in puff pastry making. Strategic resting periods are where much of the magic happens.
Between-Turn Resting: After each fold, wrap your dough tightly in plastic and refrigerate for at least 30 minutes. This allows gluten to relax, preventing the dough from shrinking excessively when rolled. It also ensures butter firms up, preventing it from blending into the dough.
Overnight Resting: Many professional pastry chefs rest their dough overnight after the third turn. This extended rest produces noticeably superior flakiness and is worth the extra time investment.
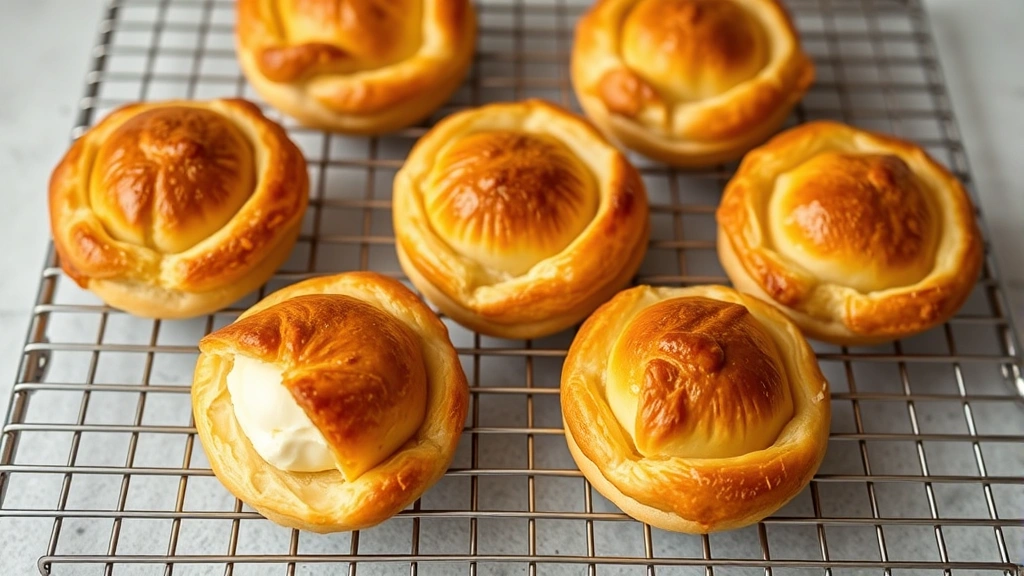
Pre-Baking Rest: Once you’ve shaped your puff pastry (croissants, danish, vol-au-vents), rest it in the refrigerator for at least 2 hours, preferably overnight. This is crucial—it allows the shaped pieces to relax and puff more dramatically in the oven. Baking cold dough produces better oven spring and more distinct layers.
Freezer Storage: Puff pastry freezes beautifully. After completing all folds, wrap tightly in plastic and freeze for up to three months. Thaw in the refrigerator before using. You can also freeze shaped pieces and bake directly from frozen, adding just a few minutes to baking time.
This approach aligns with smart food waste reduction strategies—make puff pastry when you have time and use it throughout the week.
Baking for Maximum Flakiness
All your careful work during lamination pays off during baking. Even small adjustments to oven temperature and placement significantly impact your results.
Oven Temperature: Preheat your oven to 400-425°F. The exact temperature depends on your oven’s characteristics and what you’re baking. Higher temperatures (425°F) create more dramatic oven spring and crispier exteriors, ideal for vol-au-vents and savory applications. Lower temperatures (400°F) work better for danish and items with fillings that need time to set.
Egg Wash Application: An egg wash recipe applied before baking creates a gorgeous golden color. Use one egg yolk mixed with one tablespoon water. Apply lightly with a pastry brush—heavy egg wash can seal the edges and prevent proper puffing. Apply only to the exterior, avoiding the cut edges where steam needs to escape.
Oven Placement: Place puff pastry on the middle rack for even heat distribution. Avoid positioning near heating elements. If the top browns too quickly, place a foil tent loosely over the pastry for the final few minutes.
Steam Development: Some professional bakers place a pan of hot water on the bottom rack during baking to create steam, which enhances oven spring. This is optional but produces noticeably better results.
Cooling: Allow baked puff pastry to cool completely on a wire rack before serving. This allows steam to escape and the structure to set. Serving warm puff pastry that hasn’t fully cooled results in a soggy, less crispy texture.
Timing: Most puff pastry items bake for 20-30 minutes depending on size and thickness. Look for deep golden-brown color and listen for a slight crackle when tapped—this indicates proper flakiness. Underbaked puff pastry will be greasy and dense; overbaked becomes too dark and loses its delicate structure.
FAQ
Can I make puff pastry in a warm kitchen?
Yes, but it’s more challenging. Work in shorter intervals (15-20 minutes instead of 30), chill between every fold, and consider making puff pastry during cooler months. Some bakers place a bowl of ice under their work surface or work in an air-conditioned room.
What’s the difference between puff pastry and croissant dough?
Croissant dough (laminated dough) contains yeast and egg, allowing it to rise. Puff pastry relies entirely on steam for lift. Croissants are richer and more bread-like; puff pastry is crisper and more delicate.
Why does my puff pastry shrink during baking?
Excessive gluten development or insufficient resting causes shrinkage. Ensure you’re resting adequately between folds and before baking. If you’ve over-mixed the initial dough, the gluten is too tight. Additionally, make sure your oven temperature is accurate—an oven that’s too cool won’t set the structure quickly enough, allowing the dough to shrink.
Can I use margarine or vegetable shortening instead of butter?
Technically yes, but results won’t be as good. Butter has a specific melting point that creates the ideal flakiness. Margarine contains water that interferes with lamination, and shortening lacks butter’s flavor. Use real butter for best results.
How do I know when my puff pastry is properly laminated?
When you bake a test piece, it should puff dramatically (at least tripling in height), have distinct, crispy layers when broken, and sound slightly crunchy. If it’s dense and greasy, you need more folds or better temperature control. If it’s tough, you’ve developed too much gluten.
Can I make puff pastry ahead of time?
Absolutely. Complete all folds, wrap tightly, and refrigerate up to 3 days or freeze up to 3 months. Thaw in the refrigerator before shaping and baking. Many professional bakers make puff pastry several days in advance.
What’s the best way to store baked puff pastry?
Store in an airtight container at room temperature for up to 2 days. Refrigerating causes it to lose crispness. For longer storage, freeze baked pieces up to one month and refresh in a 350°F oven for 5 minutes before serving.
For more pastry inspiration, explore our thumbprint cookie recipe and visit the Fresh Plated Daily Blog for additional baking guides.


