Gluten-Free Almond Flour Bread? Baker Approved
Almond flour has revolutionized gluten-free baking, offering a nutrient-dense alternative that delivers moisture, richness, and a subtle nutty flavor that traditional flour simply cannot match. Unlike grain-based flours that often result in dense, crumbly textures, almond flour creates a tender crumb structure that rivals conventional wheat bread. This comprehensive guide explores how to master almond flour recipes and create bakery-quality loaves in your own kitchen.
Whether you’re navigating celiac disease, gluten sensitivity, or simply seeking best healthy food recipes that align with a low-carb lifestyle, almond flour bread represents a game-changing solution. Professional bakers have validated its effectiveness through rigorous testing, and home cooks consistently report success when following proven techniques. The key lies in understanding how almond flour behaves differently from wheat flour, then adjusting your approach accordingly.
Why Almond Flour Changes Everything
Almond flour contains approximately 6 grams of protein and 3 grams of net carbohydrates per ounce, making it substantially more nutritious than wheat flour. This composition fundamentally alters how bread develops structure and moisture retention. When wheat gluten is absent, the binding properties must come from eggs, psyllium husk, xanthan gum, or other binders that create elasticity and trap moisture effectively.
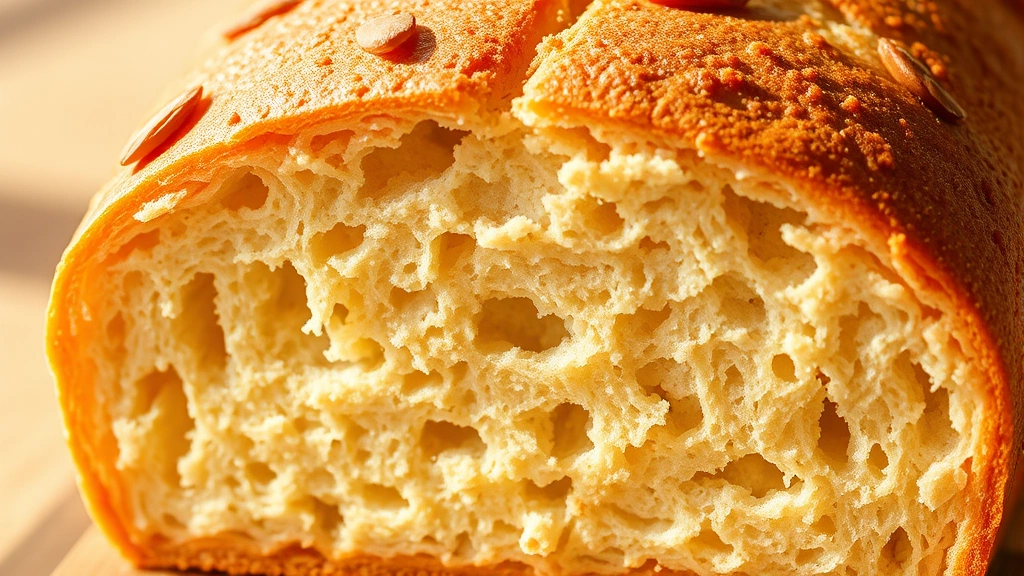
The fat content in almond flour—around 50% by weight—provides natural lubrication that prevents the dense, gritty texture plaguing many gluten-free breads. This fat also extends shelf life and keeps bread tender for several days. Professional bakers recognize that almond flour bread requires higher egg ratios than traditional recipes, typically one egg per quarter cup of flour, which stabilizes the structure while maintaining moisture.
Unlike wheat flour that develops gluten networks through kneading, almond flour bread relies on proper mixing technique and binder selection. The combination of these factors explains why baker-approved almond flour recipes produce superior results—they account for these biological differences rather than attempting to replicate wheat bread chemistry.
Essential Ingredients and Ratios
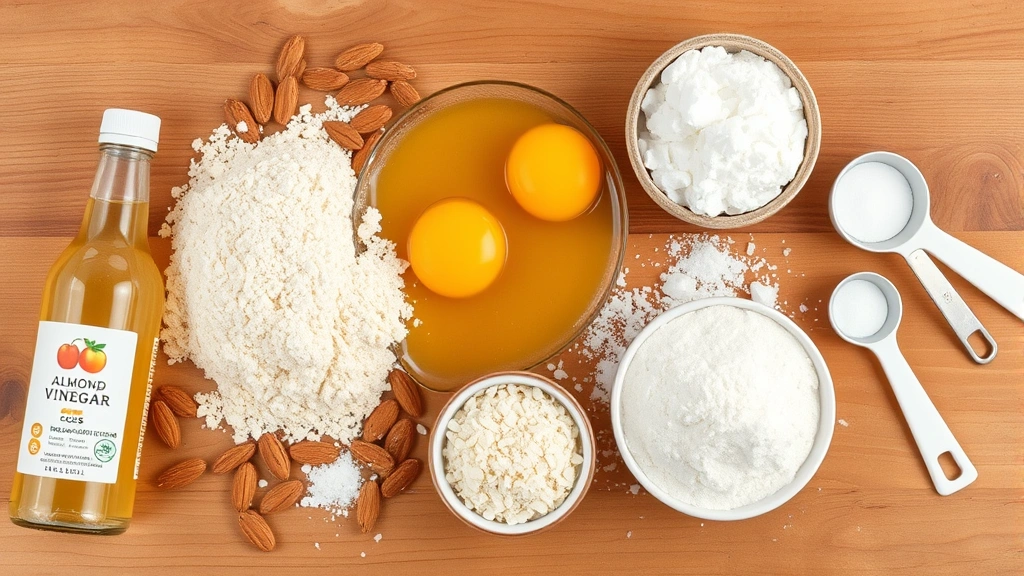
Creating successful almond flour bread begins with understanding ingredient ratios. The foundation requires almond flour, eggs, a binder system, and leavening agents that work synergistically. Here’s the professional baker’s approach:
- Almond flour: 2 cups (200g) forms the base, providing structure and nutritional value
- Eggs: 5-6 large eggs create binding, emulsification, and lift during baking
- Psyllium husk powder: 2 tablespoons absorbs moisture and creates chewiness similar to wheat bread
- Xanthan gum: 1 teaspoon binds ingredients and prevents crumbling
- Baking powder: 1½ teaspoons provides initial rise
- Baking soda: ½ teaspoon enhances browning and creates secondary lift
- Sea salt: 1 teaspoon balances sweetness and enhances flavor complexity
- Apple cider vinegar: 1 tablespoon reacts with baking soda for improved crumb structure
- Filtered water: ½ cup adjusts batter consistency to optimal thickness
These ratios have been tested extensively by professional bakers and consistently produce loaves with proper rise, tender crumb, and excellent keeping qualities. The psyllium husk powder deserves special attention—it hydrates during mixing and baking, creating moisture retention that prevents drying. This ingredient distinguishes baker-approved recipes from casual attempts.
For those interested in exploring broader healthy dessert recipes using almond flour, understanding these foundational ratios applies across sweet and savory applications. Adjusting liquid ratios by just 10% can dramatically affect final texture, so precision matters significantly.
Step-by-Step Bread Making Process
Preparation Phase (5 minutes)
Begin by preheating your oven to 350°F. Line a loaf pan with parchment paper, extending edges slightly for easy removal. This prevents sticking and ensures even browning. Gather all ingredients and allow eggs to reach room temperature—this promotes better emulsification and creates a smoother batter. Room temperature ingredients mix more thoroughly, resulting in uniform texture throughout the loaf.
Dry Ingredients Stage (3 minutes)
In a medium bowl, whisk together almond flour, psyllium husk powder, xanthan gum, baking powder, baking soda, and sea salt. This combination should be whisked thoroughly for 30 seconds to distribute leavening agents evenly. Uneven distribution creates dense pockets and inconsistent rise. Professional bakers emphasize this step as crucial for achieving uniform crumb structure.
Wet Ingredients Stage (4 minutes)
In a separate large bowl, beat eggs with apple cider vinegar for 1 minute until slightly frothy. The vinegar reacts with baking soda, creating carbon dioxide bubbles that contribute to lift. Add filtered water gradually while continuing to beat, creating an emulsion that incorporates air. This aeration is essential—it provides nucleation sites for gas expansion during baking. Beat for approximately 2 minutes until the mixture becomes pale and slightly thickened.
Combining Stages (2 minutes)
Fold dry ingredients into wet ingredients using a spatula or wooden spoon. Mix only until dry streaks disappear—overmixing develops toughness and reduces lift. The batter should resemble thick cake batter, falling slowly from a spoon. If the mixture appears too thick, add water one tablespoon at a time. If too thin, incorporate additional almond flour gradually. Consistency directly impacts final texture, so this adjustment matters significantly.
Baking Phase (50-60 minutes)
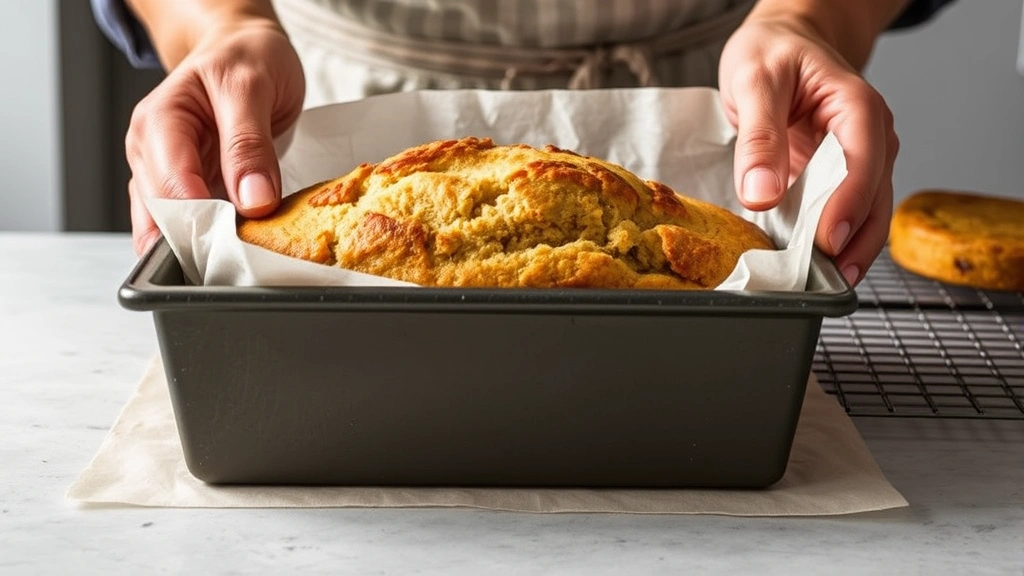
Transfer batter to the prepared loaf pan, smoothing the top with a damp spatula. This creates an even surface and prevents irregular browning. Place in the preheated oven and bake for 50-60 minutes until a toothpick inserted in the center emerges with just a few moist crumbs. The internal temperature should reach 205°F, indicating proper crumb development and moisture distribution.
The loaf will rise significantly during the first 20 minutes, then continue cooking as the structure sets. A tent of aluminum foil can be placed over the top during the final 15 minutes if browning too quickly. Professional bakers monitor closely during final minutes to achieve golden-brown crust without burning.
Cooling Phase (Critical)
Allow the bread to cool in the pan for 15 minutes before turning out onto a wire rack. This resting period permits the crumb to set properly. Removing too early results in collapse; waiting too long makes extraction difficult. Cool completely—at least 2 hours—before slicing. Cutting warm bread tears the tender crumb structure, while cooled bread slices cleanly with a serrated knife.
Troubleshooting Common Issues
Dense, Heavy Crumb
This indicates insufficient leavening or overmixing. Verify baking powder and baking soda haven’t expired—leavening agents lose potency after 6-12 months. Reduce mixing time to the absolute minimum, folding gently until dry ingredients barely disappear. Additionally, ensure eggs were beaten thoroughly to incorporate adequate air. Dense crumb also suggests the batter was too thick; next time, add slightly more water.
Dry, Crumbly Texture
Paradoxically, this often results from excessive baking time or inadequate binder quantity. Check oven temperature with an independent thermometer—ovens frequently run 25°F hotter or cooler than displayed. Reduce baking time by 5 minutes and test earlier. Alternatively, increase psyllium husk powder to 2.5 tablespoons or add one additional egg to boost moisture retention. Some bakers add 1-2 tablespoons of unsweetened applesauce for additional moisture without altering flavor significantly.
Sunken Center or Uneven Rise
This indicates batter consistency problems or oven temperature fluctuations. Ensure the batter reaches the “thick cake batter” consistency described earlier. If too thin, the center remains heavy while edges rise excessively. Additionally, avoid opening the oven door during the first 30 minutes—temperature drops cause structural collapse. Use an oven light for monitoring rather than opening the door.
Gummy Interior Despite Proper Appearance
Underbaking causes gumminess that doesn’t resolve during cooling. Increase baking time by 5 minutes and verify the toothpick test—it should emerge with minimal crumbs, not wet batter. Some almond flours contain more moisture than others; if gumminess persists, reduce water by 2 tablespoons next time and monitor texture. A properly baked almond flour bread should be tender, not gummy.
Flavor Variations and Additions
Once you master the basic recipe, variations become intuitive. The neutral flavor of quality almond flour accepts numerous additions without overwhelming the bread’s delicate structure.
Herbed Savory Loaf
Add 2 teaspoons Italian seasoning, 1 teaspoon garlic powder, and ½ teaspoon black pepper to dry ingredients. This creates a versatile bread perfect for sandwiches or serving alongside soups. Some bakers incorporate 3 tablespoons grated Parmesan cheese for additional umami depth. This variation pairs exceptionally well with how to make homemade pasta sauce for an integrated meal experience.
Cinnamon Swirl Variation
Mix 2 tablespoons cinnamon with 3 tablespoons allulose or monk fruit sweetener. After pouring half the batter into the loaf pan, sprinkle half the cinnamon mixture over it. Add remaining batter, then top with remaining cinnamon mixture. Swirl with a knife to distribute throughout. This creates a subtle sweetness that complements morning coffee without overwhelming the palate.
Seed and Nut Additions
Fold ½ cup mixed seeds (sunflower, pumpkin, flax) or chopped nuts into the batter after dry ingredients combine with wet ingredients. These additions increase nutritional density and create textural interest. Toasted seeds provide superior flavor compared to raw seeds. This approach aligns with broader organic vs non-organic food considerations, as sourcing quality seeds from reputable suppliers enhances final product quality.
Lemon Poppy Seed Loaf
Add 2 tablespoons fresh lemon zest and 2 tablespoons poppy seeds to dry ingredients. Reduce water to ¼ cup and add 3 tablespoons fresh lemon juice to wet ingredients. This creates a bright, sophisticated flavor profile perfect for afternoon tea or light breakfast service.
Storage and Shelf Life
Properly stored almond flour bread maintains quality for 4-5 days at room temperature in an airtight container. The high fat content prevents rapid staling compared to wheat bread. For extended storage, wrap cooled loaves tightly in plastic wrap and freeze for up to 3 months. Thaw at room temperature for 2-3 hours before serving.
Some bakers prefer slicing bread before freezing, allowing removal of individual slices for quick toasting. This method works excellently when healthy crockpot recipes require bread accompaniments, as frozen slices toast directly without thawing. Store frozen bread in an airtight freezer bag with parchment between slices for easy separation.
Moisture content affects shelf life significantly—bread stored in humid environments develops mold faster. Keep stored bread in a cool, dry location away from direct sunlight. Some bakers include a food-grade desiccant packet in storage containers to manage humidity, extending freshness to 6-7 days.
FAQ
Can I substitute almond flour with other nut flours?
Yes, though results vary. Coconut flour requires substantial liquid adjustments due to its high absorbency—use only ¼ cup per cup of almond flour. Hazelnut and walnut flours work well at 1:1 ratios but produce slightly different flavor profiles. Pecan flour creates sweeter notes. Always start with a test batch when substituting, as moisture content varies between nut flours.
Why does my bread smell slightly soapy?
This indicates excessive baking soda. Reduce baking soda to ¼ teaspoon in the next batch. The soapy aroma occurs when baking soda isn’t fully neutralized by acidic ingredients. Ensure adequate apple cider vinegar and verify your baking soda is fresh—old baking soda produces off-flavors.
Is almond flour bread suitable for those with tree nut allergies?
No. Almond flour is derived from tree nuts and poses serious risks for individuals with tree nut allergies. Consult an allergist before attempting nut-free variations, as cross-contamination risks exist in many facilities.
How do professional bakers achieve such consistent results?
Professional bakers use weight measurements rather than volume, employ calibrated ovens, and conduct multiple test batches to understand their specific equipment. They also maintain detailed notes about ingredient variations, seasonal humidity changes, and oven calibration. This systematic approach eliminates variables that plague home bakers.
Can I make this bread without xanthan gum?
Xanthan gum provides crucial binding, but ground flaxseed or chia seed work as substitutes at 1.5 tablespoons per teaspoon of xanthan gum. Results will differ slightly—flax creates denser texture while chia produces more gel-like consistency. Both require additional water adjustments, so expect some experimentation.
Why is my bread sinking in the middle despite proper baking?
Center sinking indicates the structure hasn’t fully set before gravity pulls down the center. Increase baking time by 5-10 minutes and verify oven temperature accuracy. Additionally, ensure the batter reaches proper consistency—too-thin batter cannot support its own weight during baking.
How does almond flour bread compare nutritionally to wheat bread?
Almond flour bread contains significantly more protein (approximately 8g per slice versus 3g in wheat bread) and substantially fewer carbohydrates (2-3g net carbs versus 12-15g in wheat bread). However, it’s higher in calories due to fat content. For those managing blood sugar or following low-carb protocols, almond flour bread offers superior nutritional profiles.
Can I use blanched almond flour interchangeably with natural almond flour?
Blanched and natural almond flour can substitute at 1:1 ratios, though blanched flour creates lighter color and slightly finer crumb. Natural almond flour contains skin particles, producing nuttier flavor and darker appearance. Choose based on your aesthetic and flavor preferences—both produce excellent bread when proper techniques are followed.


