Boneless Wings Recipe: Chef’s Proven Method for Crispy, Flavorful Results
Boneless wings have become a beloved appetizer and main course staple, offering all the satisfaction of traditional chicken wings without the mess of bones. This boneless wings recipe uses a chef-tested technique that delivers incredibly crispy exteriors with tender, juicy chicken inside. Whether you’re preparing them for game day, a casual dinner, or impressing guests at a gathering, mastering this method will make you the go-to cook in your circle.
The secret to exceptional boneless wings lies in three critical elements: proper chicken preparation, an expertly crafted coating, and precise cooking temperature. Many home cooks struggle with soggy or bland boneless wings, but understanding the science behind each step transforms ordinary chicken into restaurant-quality appetizers. This comprehensive guide walks you through every stage, from ingredient selection to plating, ensuring consistent results every single time.
Selecting and Preparing Your Chicken
The foundation of any exceptional boneless wings recipe starts with choosing the right chicken. Boneless, skinless chicken breasts are the standard choice, offering a lean canvas for your coating and sauce. Look for breasts that are relatively uniform in thickness—ideally between one-half and three-quarter inches thick. Thicker pieces take longer to cook and may remain undercooked inside, while thinner pieces dry out quickly.
Begin by patting your chicken breasts completely dry with paper towels. Moisture is the enemy of crispiness; excess water prevents the coating from adhering properly and creates steam during cooking, resulting in a soggy exterior. Many chefs overlook this crucial step, but it makes an enormous difference in your final product.
Next, cut each chicken breast into bite-sized pieces, roughly 1.5 to 2 inches in length. These smaller portions cook evenly and provide the ideal size for dipping in sauce. For uniform cooking, aim for consistent sizing—this ensures everything finishes at the same time. If you have particularly large breasts, consider butterflying them first to create more uniform thickness before cutting into pieces.
Some chefs prefer to pound their chicken pieces gently to ensure even thickness throughout. Use a meat mallet with the flat side, applying gentle pressure rather than aggressive pounding. This technique helps the pieces cook uniformly and creates a slightly larger surface area for that coveted crispy coating.
Season your prepared chicken pieces generously with salt and black pepper at least 15 minutes before coating. This allows the seasoning to penetrate the meat, enhancing flavor throughout rather than just on the surface. Some cooks add garlic powder, paprika, or onion powder to this initial seasoning for extra depth.
The Coating Technique
A superior coating is what separates restaurant-quality boneless wings from mediocre versions. This proven method uses a double-dredging technique that creates an incredibly crispy exterior while keeping the inside moist and tender. The key is using a combination of wet and dry ingredients strategically layered.
Dry Coating Base: Start with one cup of all-purpose flour mixed with one teaspoon of salt, one-half teaspoon of black pepper, one teaspoon of garlic powder, one teaspoon of paprika, and one-half teaspoon of cayenne pepper for subtle heat. Some chefs add one-quarter teaspoon of onion powder and one-quarter teaspoon of dried thyme for additional complexity. Sift these ingredients together to break up any lumps and ensure even distribution.
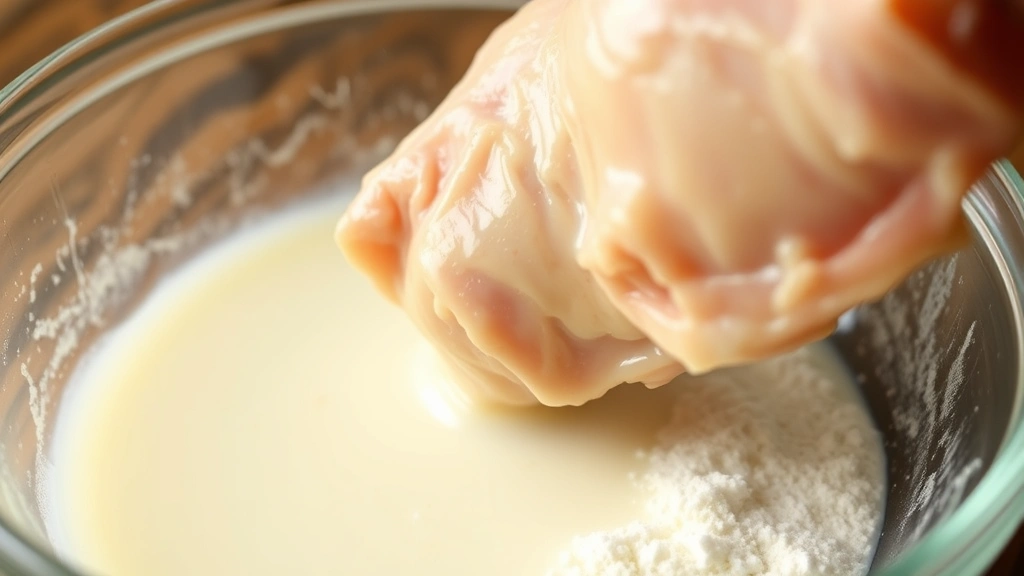
Wet Coating Base: In a separate bowl, whisk together one cup of buttermilk or regular milk mixed with one egg and one tablespoon of hot sauce or Worcestershire sauce. The acid in buttermilk helps tenderize the chicken while creating a flavorful base for your coating. If you don’t have buttermilk, mix regular milk with one tablespoon of lemon juice and let it sit for five minutes to curdle slightly.
Now comes the double-dredging magic: Coat each piece of chicken thoroughly in the wet mixture, then immediately dredge in the dry coating, pressing gently so the coating adheres. Here’s the crucial part—place the coated piece on a clean plate and let it rest for two to three minutes. Then, dip it back into the wet mixture briefly (just two to three seconds), and immediately coat it again in the dry mixture. This second layer creates pockets of texture that fry up incredibly crispy.
Arrange your double-coated pieces on a baking sheet lined with parchment paper. Allow them to rest for at least 15 minutes before cooking—this helps the coating set and adhere properly. Many chefs refrigerate their coated pieces for 30 minutes or even several hours, which further improves the final texture. Cold coating contracts slightly, creating a tighter seal around the chicken.
For an extra-crispy version, some chefs add one-quarter cup of cornstarch to their dry coating mixture. The cornstarch fries up incredibly crispy and adds a pleasant textural contrast. You can also add one tablespoon of baking powder to your dry coating for additional lift and crispiness, though this creates a lighter, more delicate crust.
Cooking Methods Explained
Deep Frying Method (Most Authentic): Heat a large, heavy-bottomed pot or Dutch oven filled with neutral oil (vegetable, canola, or peanut oil works well) to 350°F. Use a reliable culinary thermometer to monitor temperature precisely—this is non-negotiable for consistent results. Working in small batches to avoid overcrowding, carefully place your coated chicken pieces into the hot oil.
Fry for approximately 4 to 5 minutes, turning halfway through, until the coating is golden brown and the internal temperature reaches 165°F. The chicken should float to the surface and the coating should sound crispy when tapped with a fork. Remove with a slotted spoon and drain on paper towels.
Baked Method (Healthier Alternative): For a lighter version, preheat your oven to 400°F. Arrange your coated chicken pieces on a wire rack set over a baking sheet lined with foil. Lightly spray the chicken with cooking oil—this helps the coating brown and crisp up significantly. Bake for 15 to 18 minutes, stirring halfway through, until the coating is golden brown and the internal temperature reaches 165°F.
While baked boneless wings won’t achieve quite the same crispiness as deep-fried versions, this method produces respectable results with a fraction of the oil. The wire rack is essential—it allows hot air to circulate underneath, preventing soggy bottoms.
Air Fryer Method (Quick and Convenient): Preheat your air fryer to 380°F. Arrange coated chicken pieces in a single layer in the basket without crowding. Spray lightly with cooking oil and cook for 10 to 12 minutes, shaking the basket halfway through. This method produces surprisingly crispy results with minimal oil and cooks faster than both other methods.
Regardless of cooking method, never skip the temperature check. Insert a meat thermometer into the thickest piece to confirm it reaches 165°F throughout. Undercooked chicken is unsafe, while overcooked chicken becomes dry and unpleasant.
Sauce Pairings and Flavors
Plain boneless wings are delicious, but sauces elevate them to extraordinary. The beauty of this recipe lies in its versatility—the mild chicken and crispy coating pair beautifully with virtually any sauce you enjoy.
Classic Buffalo Sauce: Melt four tablespoons of butter with one-half cup of hot sauce (Frank’s RedHot is traditional), one tablespoon of Worcestershire sauce, one-quarter teaspoon of cayenne pepper, and one-quarter teaspoon of garlic powder. Toss your hot boneless wings in this sauce immediately after cooking. Serve with ranch dressing or cream cheese dip recipes for cooling contrast.
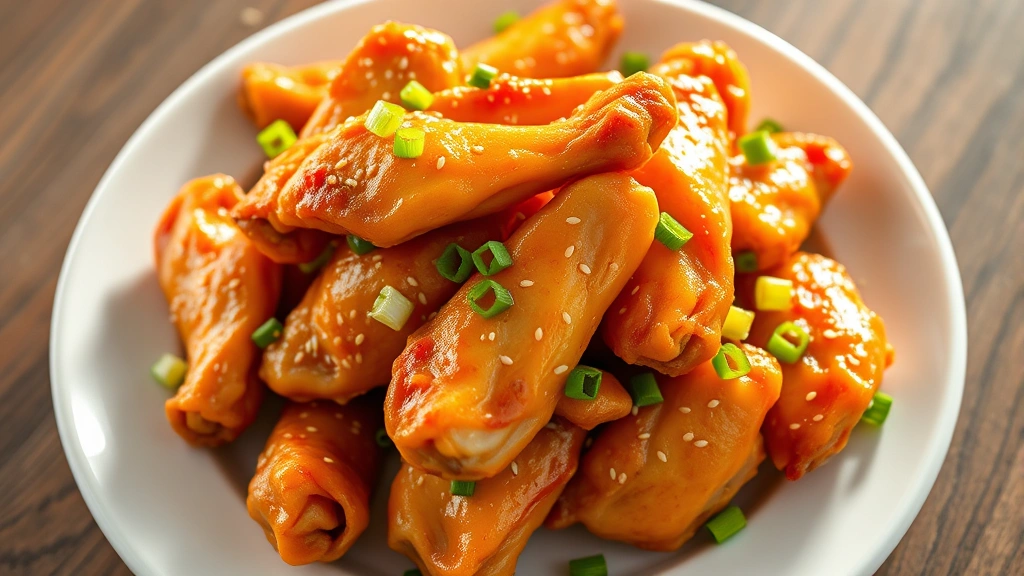
Honey Garlic Glaze: Combine one-third cup of honey, one-quarter cup of soy sauce, three minced garlic cloves, one tablespoon of rice vinegar, and one teaspoon of ginger. Simmer for three minutes, then toss with your cooked wings. Garnish with sesame seeds and sliced green onions for an elegant presentation.
Lemon Pepper Coating: Toss your hot wings with three tablespoons of melted butter, the zest of two lemons, two tablespoons of fresh lemon juice, one teaspoon of cracked black pepper, and one-half teaspoon of garlic powder. This lighter option showcases the chicken’s natural flavor.
BBQ Variation: Mix one cup of your favorite barbecue sauce with one tablespoon of honey and one-half teaspoon of smoked paprika. Toss with your wings for a smoky, slightly sweet profile.
Spicy Korean Style: Combine one-third cup of gochujang (Korean chili paste) with three tablespoons of honey, two tablespoons of soy sauce, three minced garlic cloves, and one teaspoon of sesame oil. This creates a complex, spicy-sweet sauce with incredible depth.
Pro tip: Always toss your boneless wings with sauce while they’re still hot. The warmth helps the sauce adhere and penetrate the coating, creating better flavor distribution than adding cold sauce to cooled wings.
Serving and Storage Tips
Boneless wings are best served immediately after cooking and saucing, while the coating remains at peak crispiness. However, life rarely allows for perfectly timed food service, so understanding proper storage extends your options considerably.
Make-Ahead Strategy: You can prepare coated chicken pieces up to 24 hours in advance. Store them in an airtight container in the refrigerator, and they’ll be ready to cook whenever you need them. This makes boneless wings perfect for entertaining—do your prep work the day before and simply fry or bake when guests arrive.
Leftover Storage: Cooked boneless wings keep refrigerated in an airtight container for three to four days. Reheat in a 350°F oven for five to eight minutes to restore crispiness, or use an air fryer at 350°F for three to four minutes. Avoid the microwave, which steams the coating and makes it soggy.
Freezing Cooked Wings: Fully cooked boneless wings freeze beautifully for up to three months. Cool completely, then arrange in a single layer on a baking sheet and freeze for two hours. Transfer to freezer bags to save space. Reheat from frozen in a 375°F oven for 12 to 15 minutes until warmed through and crispy.
Freezing Uncooked Wings: Double-coated, uncooked chicken pieces freeze exceptionally well for up to two months. Freeze on a baking sheet before transferring to freezer bags. Cook directly from frozen, adding just two to three minutes to your cooking time. This flexibility makes boneless wings perfect for meal prep.
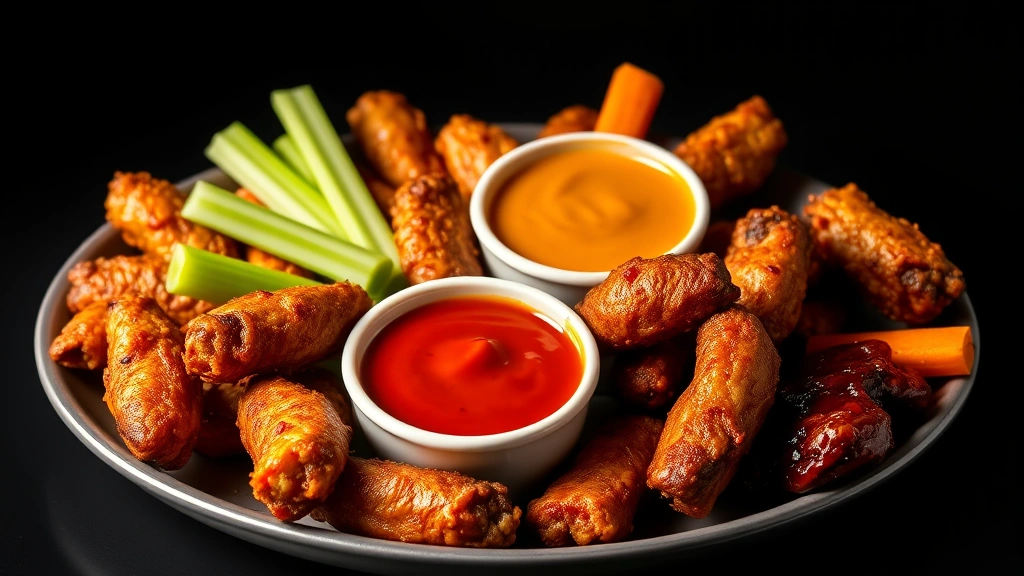
Serving presentation matters. Arrange your boneless wings on a platter with multiple sauce options for dipping. Include fresh vegetables like celery and carrot sticks for textural contrast. A simple white sauce recipe served alongside provides a cooling element that balances spicy sauces beautifully.
For complete meals, boneless wings pair wonderfully with classic sides. Serve with best mac and cheese recipe for a comforting combination, or offer stove top stuffing recipes for a heartier presentation. Even spaghetti casserole recipe options can complement boneless wings in creative entertaining scenarios.
FAQ
Can I make boneless wings without deep frying?
Absolutely. The air fryer method produces excellent results with minimal oil, while baking offers a lighter alternative. Both methods create respectable crispiness, though deep frying remains the gold standard for texture. The baking method works particularly well if you’re serving a crowd and don’t want to monitor oil temperature constantly.
Why are my boneless wings soggy?
Sogginess typically results from insufficient drying before coating, crowded frying (which lowers oil temperature), or storing them in non-breathable containers while still warm. Always pat chicken completely dry, fry in small batches, and cool on paper towels or wire racks rather than in sealed containers.
How do I know when boneless wings are fully cooked?
Use a meat thermometer to confirm the thickest piece reaches 165°F internally. This is the only reliable method. Alternatively, cut the largest piece open and verify no pink remains inside and juices run clear.
Can I use chicken thighs instead of breasts?
Yes, though results differ slightly. Chicken thighs contain more fat and stay juicier even if slightly overcooked, but they require longer cooking times due to higher density. Increase cooking time by two to three minutes and verify temperature carefully.
What oil temperature is best for frying?
350°F is ideal for boneless wings. This temperature cooks the chicken through while achieving golden-brown coating without burning the exterior. Use a reliable thermometer—eyeballing temperature leads to inconsistent results.
Can I use a different coating recipe?
Certainly. Panko breadcrumbs create extra crispiness, while crushed crackers or cornflakes offer interesting textures. Experiment with different spice combinations, but maintain the wet-dry-wet-dry double-dredging method for best results.
How far in advance can I prepare boneless wings?
Coated, uncooked pieces keep refrigerated for 24 hours, or frozen for up to two months. Cooked wings store for three to four days refrigerated or three months frozen. This flexibility makes them ideal for entertaining and meal planning.
What’s the best dipping sauce?
This depends on personal preference, but classic buffalo sauce remains the most popular. Ranch dressing, honey garlic glaze, and barbecue sauce are equally beloved. Offer multiple options to accommodate different tastes at gatherings.


