Brown Sugar Shaken Espresso Recipe: Barista-Approved Technique
The brown sugar shaken espresso has become a viral sensation in coffee shops worldwide, and for good reason. This beautifully layered drink combines bold espresso with creamy milk, sweet brown sugar syrup, and an elegant visual presentation that makes every sip feel like a café experience. Unlike complicated beverages that require specialized equipment, this recipe is surprisingly simple to master at home with just a few essential ingredients and proper technique.
What makes this drink truly special is the interplay between the rich, slightly caramelized notes of brown sugar and the sharp intensity of freshly pulled espresso. When you shake these elements together with ice, you create a perfectly chilled, frothy beverage with a luxurious mouthfeel. Whether you’re a coffee enthusiast or someone just discovering specialty beverages, learning to make a brown sugar shaken espresso will elevate your home barista skills and impress anyone you serve it to.
What Is a Brown Sugar Shaken Espresso?
A brown sugar shaken espresso is a chilled coffee beverage that combines freshly extracted espresso shots with cold milk, brown sugar syrup, and ice, all shaken together to create a frothy, well-blended drink. The signature characteristic of this beverage is its stunning visual presentation—the brown sugar syrup settles at the bottom, creating distinct layers that become visible as you drink. This drink gained massive popularity through social media platforms, particularly TikTok and Instagram, where baristas showcased its gorgeous aesthetics and delicious taste.
The drink differs from traditional iced lattes because of the shaking process, which incorporates air into the mixture and creates a light, fluffy foam on top. The brown sugar syrup adds complexity beyond standard sweeteners, offering notes of molasses and caramel that complement espresso’s natural bitterness. This beverage works perfectly for breakfast, afternoon pick-me-ups, or as a dessert-like treat after dinner.
The beauty of this recipe lies in its balance—it’s not overwhelmingly sweet, the espresso flavor remains prominent, and the milk provides a creamy texture that brings everything together harmoniously. Many coffee enthusiasts find this drink more satisfying than sugary frappuccinos or overly complicated seasonal beverages.
Essential Ingredients and Equipment
Creating an authentic brown sugar shaken espresso requires quality ingredients and the right tools. Here’s everything you need to get started:
Ingredients:
- Espresso: 2 shots (approximately 2 ounces) of freshly pulled espresso, ideally extracted within the last minute
- Brown Sugar Syrup: 2-3 tablespoons of homemade or store-bought brown sugar syrup
- Milk: 6-8 ounces of cold milk (whole milk creates the richest result, but 2% or plant-based alternatives work well)
- Ice: 1 cup of ice cubes, ideally medium-sized for optimal shaking
- Optional: Vanilla extract, cinnamon, or nutmeg for additional flavor dimensions
Equipment:
- Espresso Machine: For pulling quality shots; a manual or automatic machine works equally well
- Cocktail Shaker: A standard Boston shaker (two-piece metal shaker) is ideal, though a jar with a tight-fitting lid works in a pinch
- Strainer: A Hawthorne strainer for the shaker, or a fine-mesh strainer
- Measuring Cups and Spoons: For precise ingredient measurements
- Tall Glass: A 16-ounce glass is standard for serving
- Bar Spoon: For stirring and layering if needed
- Milk Thermometer: Optional, but helpful for temperature consistency
If you don’t have an espresso machine at home, many coffee shops will sell you shots of espresso to take away, making this recipe accessible to anyone interested in trying it.
Step-by-Step Recipe Instructions
Follow these detailed steps to create a café-quality brown sugar shaken espresso in your own kitchen:
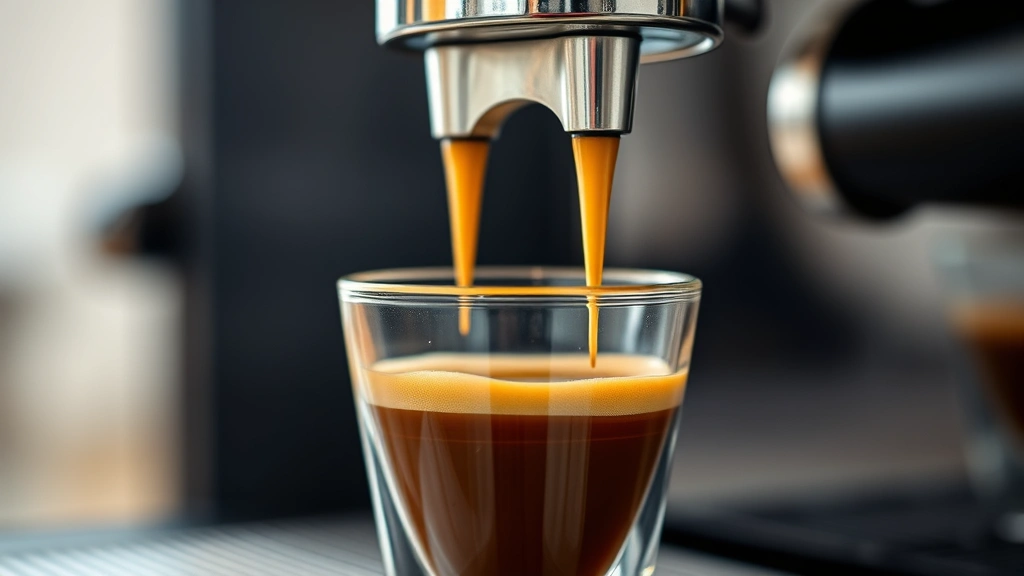
Step 1: Prepare Your Espresso
Start by pulling 2 shots of fresh espresso into a small cup or glass. The espresso should be extracted properly with a good crema layer on top—this indicates proper extraction and freshness. If using a manual espresso machine, ensure your grind is fine and evenly distributed in the portafilter. The extraction should take approximately 25-30 seconds. If your espresso tastes bitter or sour, adjust your grind size or extraction time accordingly. Fresh espresso is crucial because it provides the robust flavor foundation that defines this drink.
Step 2: Measure Your Brown Sugar Syrup
Add 2-3 tablespoons of brown sugar syrup to the bottom of your cocktail shaker. The amount depends on your sweetness preference—start with 2 tablespoons and adjust in future batches based on your taste. Brown sugar syrup is thicker than simple syrup, so it will coat the bottom of your shaker initially. This syrup will distribute throughout the drink during shaking, creating those beautiful layers that make this beverage visually stunning.
Step 3: Add Cold Milk
Pour 6-8 ounces of cold milk directly into the shaker with the brown sugar syrup. Cold milk is essential—using room temperature or warm milk will dilute the espresso’s flavor and prevent proper foam formation. If you prefer a stronger coffee flavor, use 6 ounces of milk; for a creamier, milder drink, use 8 ounces.
Step 4: Add Freshly Pulled Espresso
Pour the hot espresso shots into the shaker with the milk and brown sugar syrup. The hot espresso will slightly warm the milk, creating the ideal temperature for drinking. This temperature contrast is what creates the perfect drinking experience—not too hot to burn your mouth, but warm enough to enhance the flavors.
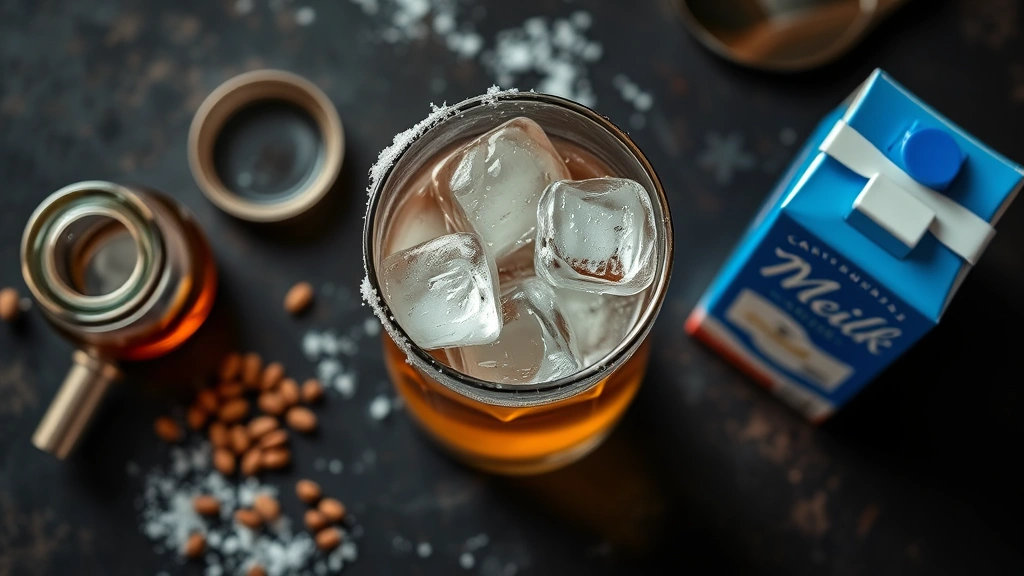
Step 5: Fill with Ice
Add approximately 1 cup of ice to the shaker. The ice will chill the mixture while the shaking action incorporates air, creating that signature fluffy foam. Don’t overfill with ice, as you need room for proper shaking motion.
Step 6: Shake Vigorously
Seal your shaker tightly and shake vigorously for 10-12 seconds. Use a firm, rhythmic motion, shaking from your elbow and wrist rather than just your wrist. You should hear the ice moving rapidly inside the shaker, and the outside should become frosty. This vigorous shaking is what creates the light, airy foam that distinguishes this drink from a regular iced latte.
Step 7: Strain Into Your Glass
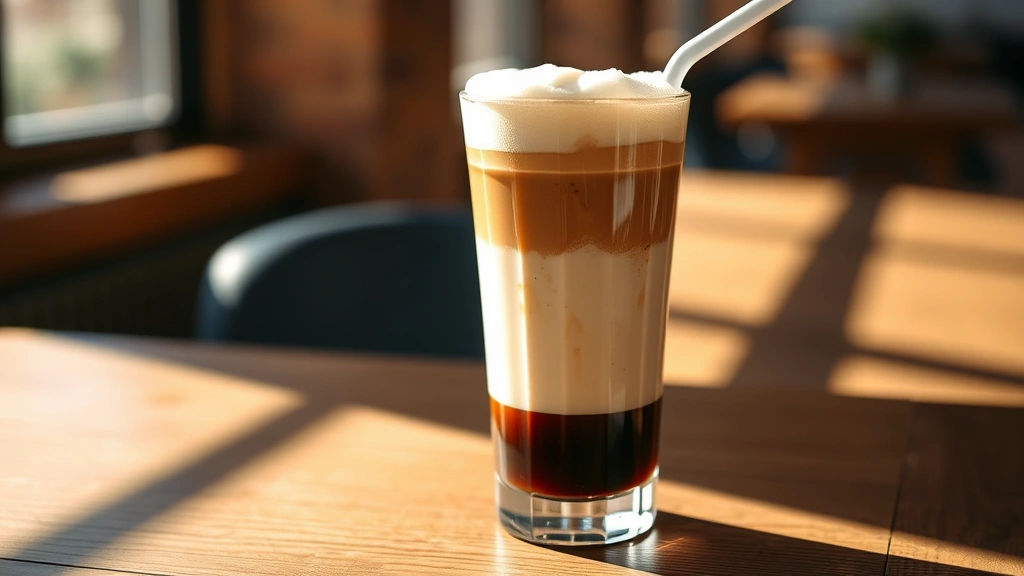
Place your strainer over the cocktail shaker and pour the contents into a tall glass filled with fresh ice. The strainer will catch the ice from the shaker while allowing the liquid and foam to flow into your glass. You’ll notice the beautiful layers forming as the drink settles—darker brown sugar syrup at the bottom, creamy milk in the middle, and light foam on top.
Step 8: Serve Immediately
Serve your brown sugar shaken espresso immediately while the foam is still fluffy and the drink is properly chilled. Use a wide straw or spoon to enjoy all the layers together, ensuring you get espresso, milk, and syrup in every sip.
Brown Sugar Syrup Preparation
Creating homemade brown sugar syrup elevates your drink significantly compared to using regular simple syrup. This syrup is easy to make and stores well in your refrigerator for up to two weeks.
Homemade Brown Sugar Syrup Recipe:
- Combine Ingredients: In a small saucepan, mix 1 cup of packed brown sugar with 1 cup of water
- Heat Slowly: Place the pan over medium heat, stirring occasionally until the brown sugar completely dissolves
- Simmer: Once dissolved, let the mixture simmer for 2-3 minutes without stirring. This allows the flavors to concentrate slightly
- Cool Completely: Remove from heat and let the syrup cool to room temperature before using
- Store Properly: Transfer to a glass jar and refrigerate. The syrup will thicken slightly as it cools
The brown sugar syrup you create will have a deeper, more complex flavor than white sugar syrup, with subtle notes of molasses that pair beautifully with espresso. If you prefer a thicker syrup that doesn’t dissolve as quickly in cold milk, use a 1:1 ratio of brown sugar to water instead. For a lighter syrup, use 1 cup brown sugar to 1.5 cups water.
You can also add vanilla extract, cinnamon, or a pinch of sea salt to your brown sugar syrup for additional flavor complexity. Some baristas add a splash of bourbon or rum extract for a sophisticated twist, though this is entirely optional.
Perfecting Your Shaking Technique
The shaking technique is what separates a mediocre brown sugar shaken espresso from a truly exceptional one. Professional baristas spend years perfecting this skill, but you can develop solid technique with practice.
Proper Shaker Positioning:
Hold your cocktail shaker at approximately a 45-degree angle to your body. Your dominant hand should grip the shaker firmly near the top, while your non-dominant hand stabilizes the bottom. This positioning allows for maximum control and proper shaking motion. Many beginners make the mistake of shaking vertically or horizontally without proper support, which reduces the effectiveness of the motion.
Shaking Motion:
Rather than moving your entire arm, initiate the shaking motion from your elbow and wrist. The movement should be smooth and rhythmic, almost like you’re conducting a small orchestra. Professional baristas use a specific tempo—approximately one shake per second—which creates optimal aeration and temperature reduction. Count to yourself or use music with a steady beat to maintain consistency.
Duration and Intensity:
Shake for exactly 10-12 seconds. Less time won’t create sufficient foam and won’t chill the drink adequately. More than 15 seconds can over-dilute the drink with melted ice water. The intensity should be vigorous—you want to hear the ice rattling actively inside the shaker. Listen for the characteristic sound of rapid ice movement; this auditory feedback tells you that proper aeration is occurring.
Temperature Monitoring:
After shaking, the outside of your shaker should feel very cold and frosty. This indicates that the drink inside has been properly chilled. If the shaker doesn’t feel significantly cold, you either didn’t shake long enough or with sufficient intensity. The ideal drinking temperature for this beverage is between 35-40°F (1.5-4°C).
Variations and Customizations
Once you’ve mastered the basic recipe, explore these exciting variations to keep your drink fresh and interesting:
Flavor Variations:
- Cinnamon Brown Sugar: Add ¼ teaspoon of ground cinnamon to your brown sugar syrup for warm spice notes
- Vanilla Brown Sugar: Incorporate ½ teaspoon of vanilla extract into your syrup for smooth, creamy undertones
- Honey Brown Sugar: Replace half the brown sugar with honey for a floral sweetness
- Sea Salt Brown Sugar: Add a tiny pinch of sea salt to your syrup to enhance the caramel notes and balance sweetness
Milk Alternatives:
While whole milk creates the richest flavor, experiment with different milk options. Oat milk provides a naturally sweet, creamy texture similar to whole milk. Almond milk offers a lighter option with subtle nuttiness. Coconut milk creates a tropical twist. 2% milk works perfectly if you prefer lower fat content. Each milk type will slightly alter the flavor profile and foam characteristics, so try a few to find your preference.
Strength Adjustments:
If you prefer a stronger coffee flavor, use 3 shots of espresso instead of 2, or reduce the milk to 5 ounces. For a milder, creamier drink, use only 1 shot of espresso and increase milk to 10 ounces. Some coffee lovers enjoy this drink as a single-shot version for afternoon consumption when they want caffeine without too much intensity.
Cold Brew Variation:
If you don’t have an espresso machine, you can substitute 2 ounces of concentrated cold brew coffee for the espresso shots. The flavor will be slightly different—less intense and with different flavor notes—but still delicious. Cold brew creates a smoother, less acidic version of this drink that some people prefer.
Pro Tips from Professional Baristas
Learn from experienced baristas who make these drinks daily. Their insights will help you achieve professional-quality results:
Espresso Quality Matters Most:
The foundation of an excellent brown sugar shaken espresso is fresh, properly extracted espresso. Invest in quality coffee beans and ensure your espresso machine is properly calibrated. If your espresso tastes off, no amount of milk or syrup will fix it. Many specialty coffee shops, including those affiliated with the Specialty Coffee Association, offer resources on proper espresso extraction.
Temperature Control:
The contrast between hot espresso and cold milk is crucial. Some baristas pull espresso directly into the shaker with room-temperature milk to avoid cooling the espresso too quickly before shaking. Others prefer letting the espresso cool slightly to room temperature before adding cold milk. Experiment to find the temperature that creates the best flavor and texture for your palate.
Syrup Distribution:
Always add syrup to the shaker first, before milk and espresso. This ensures the syrup distributes evenly throughout the drink rather than settling only at the bottom. Some baristas add a tiny bit of hot espresso to the syrup first to help it dissolve completely before adding the remaining ingredients.
Ice Selection:
Use medium-sized ice cubes rather than crushed ice or large cubes. Medium cubes provide optimal surface area for chilling while not melting too quickly into the drink. If your ice melts too fast, your drink becomes watered down. If your ice doesn’t melt enough, the drink won’t chill properly. Clear ice, made from filtered water, looks more professional and melts more slowly than cloudy ice.
Foam Technique:
The foam on top is created by incorporating air during shaking. To maximize foam, ensure your shaker is sealed tightly and shake with maximum vigor. Some baristas add a small splash of milk foam (created separately using a milk frother) on top for extra visual appeal and texture.
Timing is Everything:
Serve immediately after shaking. If you let the drink sit, the foam will dissipate and the temperature will rise. Professional baristas time their shaking so the drink is ready exactly when the customer is ready to drink it. At home, have your glass ready with fresh ice before you start the shaking process.
Consistency Practice:
Make this drink multiple times to develop muscle memory for the shaking technique. The first time will feel awkward; by the fifth time, you’ll find a comfortable rhythm. Professional baristas can make dozens of these drinks in an hour because they’ve practiced the technique until it becomes second nature.
For deeper learning about coffee science and extraction techniques, check out resources from the Barista Institute, which offers comprehensive training on espresso preparation and technique.
Customization for Preferences:
Pay attention to how different people enjoy this drink. Some prefer it sweeter, others want the espresso to shine through. Keep notes on syrup amounts, milk types, and espresso shots you use so you can recreate drinks that people love. This personalization is what makes baristas truly exceptional—they remember how each regular customer likes their drink.
FAQ
Can I make this drink without an espresso machine?
Yes! You can use strong brewed coffee, cold brew concentrate, or instant espresso powder mixed with hot water. The flavor won’t be identical to true espresso, but it will still be delicious. Many coffee shops will also sell you espresso shots to take away, which is a convenient option if you don’t have a home espresso machine. You could also explore home coffee brewing guides for alternative methods.
How much caffeine is in a brown sugar shaken espresso?
With 2 shots of espresso, this drink contains approximately 150-200mg of caffeine, depending on your espresso machine and beans. This is comparable to a standard cup of drip coffee. If you use 3 shots, the caffeine content increases to around 225-300mg.
Can I make this drink ahead of time?
No—this drink is best consumed immediately after shaking. The foam will dissipate, the temperature will rise, and the flavors won’t be as vibrant if you let it sit. You can prepare all your ingredients in advance, but shake and serve right before drinking.
What’s the difference between this and an iced latte?
The main differences are the shaking technique (which creates foam and better aeration), the brown sugar syrup (which adds complexity), and the immediate serving. An iced latte is typically stirred rather than shaken, resulting in a different texture and less integrated flavors. The shaking process is what creates the signature fluffy foam and perfectly blended drink.
Can I use regular white sugar instead of brown sugar?
Technically yes, but the drink won’t have the same depth of flavor. Brown sugar provides molasses notes that complement espresso beautifully. White sugar syrup creates a simpler, more one-dimensional sweetness. If you only have white sugar available, add a tiny splash of molasses or a pinch of vanilla extract to approximate the brown sugar flavor.
Why does my drink taste watery?
This usually happens from one of three reasons: not shaking long enough (so the drink doesn’t chill properly and ice melts too quickly), using too much ice in the serving glass, or letting the drink sit too long before serving. Ensure you shake for the full 10-12 seconds, use fresh ice in the serving glass, and serve immediately.
What type of milk creates the best foam?
Whole milk creates the most stable, luxurious foam due to its fat content. 2% milk works well too. Plant-based milks vary—oat milk froths beautifully, while almond milk creates less stable foam. Experiment to see which creates your preferred texture.
Can I make this drink hot instead of cold?
While possible, it’s not recommended. The drink is specifically designed to be cold and shaken, which creates its signature characteristics. A hot version would just be a regular latte with brown sugar syrup, which loses the appeal of the foam and layering. The cold temperature is essential to the drink’s identity.
How do I get the perfect layering effect?
The layering happens naturally when the drink settles—darker syrup sinks to the bottom, lighter milk stays on top, with foam floating on the surface. To enhance this visual effect, pour slowly into the glass and let it settle for a few seconds before serving. Some baristas use a bar spoon to gently guide the liquid into the glass to maximize layering clarity.
Is this drink suitable for people avoiding caffeine?
Not in its standard form, as it contains 2 shots of espresso. However, you could create a decaf version using decaffeinated espresso shots. The flavor will be similar, though some coffee enthusiasts find decaf espresso less flavorful than regular espresso. Talk to your local barista about their decaf espresso options.
Now that you understand the complete brown sugar shaken espresso recipe, you’re ready to create café-quality drinks at home. Remember that practice makes perfect—your first attempt might not be flawless, but each time you’ll develop better technique and intuition. Share your creations with friends and family, and enjoy the satisfaction of mastering this beautiful beverage. The combination of proper technique, quality ingredients, and attention to detail is what transforms a simple coffee drink into something truly special that rivals any professional café experience.


