Best Chicken Liver Pâté? Chef-Approved Recipe
Chicken liver pâté stands as one of the most elegant and surprisingly simple appetizers in classical French cuisine. This luxurious spread transforms humble poultry offal into a silky, sophisticated delicacy that graces charcuterie boards and fine dining tables worldwide. Whether you’re preparing for an intimate dinner party or seeking to master a fundamental culinary technique, homemade chicken liver pâté delivers restaurant-quality results in your own kitchen.
What makes pâté so remarkable is the contrast between its humble ingredients and its refined final product. Fresh chicken livers, butter, shallots, and aromatics combine through gentle cooking and careful blending to create a mousse-like texture that melts on the palate. Unlike many restaurant dishes that require specialized equipment or years of training, this chef-approved recipe proves entirely achievable for home cooks willing to follow proper technique and timing.
Understanding Chicken Liver Pâté Fundamentals
Chicken liver pâté belongs to the broader category of forcemeats—emulsified preparations that combine protein, fat, and binders to create smooth, spreadable textures. The science behind successful pâté involves understanding how proteins denature when heated, how fat distributes throughout the mixture, and how temperature control prevents curdling or separation. Professional chefs recognize that pâté quality depends entirely on respecting these fundamental principles.
The history of pâté traces back centuries to French culinary tradition, where skilled chefs developed techniques to preserve meats and create elegant presentations. Modern home cooks benefit from this accumulated knowledge, though we’ve simplified methods while maintaining classical standards. The basic concept remains unchanged: gentle cooking followed by smooth blending produces a refined appetizer that impresses guests and satisfies sophisticated palates.
Temperature control emerges as the single most critical factor in pâté success. Cooking chicken livers too quickly creates tough, grainy textures; cooking them too slowly risks bacterial contamination. The ideal internal temperature reaches 160°F (71°C), achieved through gentle simmering rather than aggressive boiling. This controlled approach ensures food safety while preserving the delicate flavor compounds that make pâté distinctive.
Essential Ingredients for Perfect Pâté
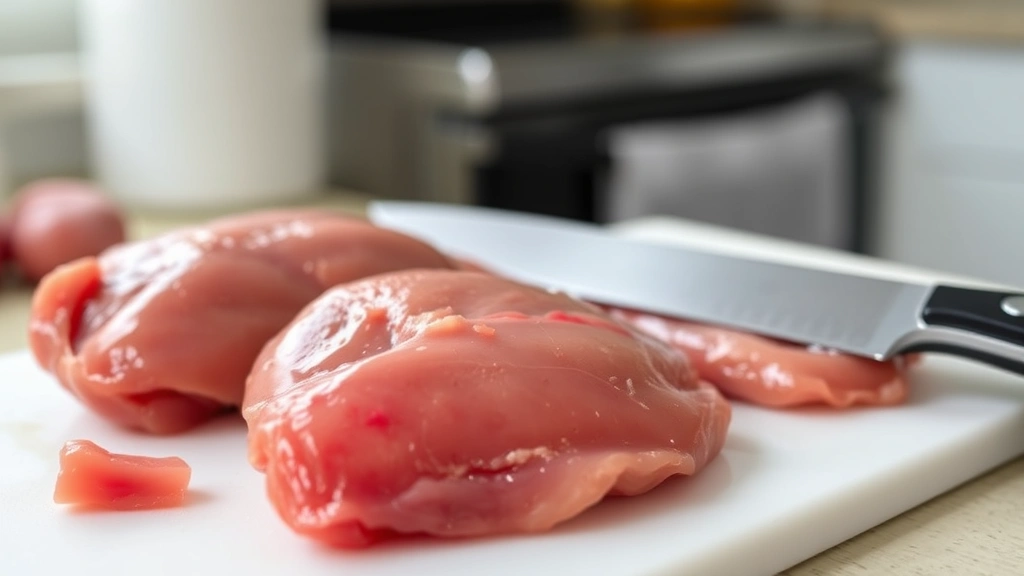
Quality ingredients determine pâté success more than any other factor. Fresh chicken livers represent the foundation—seek out livers with deep reddish-brown coloring and no off-odors. Many cooks prefer livers from specialty butchers or farms that raise birds specifically for pâté production, as these tend toward superior flavor and texture compared to mass-produced alternatives.
Butter serves as both flavoring agent and emulsifying medium, so use high-quality, unsalted butter that allows you to control total salt content. European-style butter with higher fat content produces noticeably silkier pâté than standard American butter. Cold butter incorporated at the end creates the characteristic mousse-like consistency that distinguishes pâté from simple liver spreads.
Shallots and garlic provide aromatic foundation without overwhelming delicate liver flavors. White wine or cognac adds complexity and brightness, cutting through richness while adding subtle depth. Fresh thyme and bay leaves contribute earthy notes that complement rather than dominate. Some recipes include cream or egg yolks for additional richness, though classical versions rely entirely on butter emulsification.
Salt and white pepper (preferred over black, which creates visible specks) require careful measurement since both are highly concentrated. Nutmeg appears in many traditional recipes—a small pinch adds warmth without detectability. Clarified butter for sealing the finished pâté provides protection during storage while adding richness to the final bites.
Step-by-Step Preparation Process
Begin by preparing your workspace and gathering all ingredients—professional chefs call this mise en place, and it prevents scrambling mid-recipe. Trim chicken livers carefully, removing any green-tinged portions (these indicate bile and taste bitter) and connective tissue. Rinse gently under cool water and pat completely dry with paper towels, as excess moisture interferes with proper cooking.
Dice shallots finely and mince garlic, keeping these aromatics separate for controlled cooking. Having ingredients prepped before heat application allows you to work efficiently once cooking begins. Pour your chosen wine or cognac into a small glass—you’ll add this at a precise moment for optimal flavor integration.
Use a heavy-bottomed saucepan or skillet, preferably stainless steel or enameled cast iron, to avoid reactive surfaces that might discolor the delicate livers. Avoid aluminum or bare cast iron, which can impart metallic flavors. Melt 2 tablespoons of butter over medium heat—the butter should foam gently but never brown, as browning creates bitter compounds.
Add diced shallots to the foaming butter, cooking gently for 2-3 minutes until they soften and become translucent. This initial cooking develops shallot sweetness while the butter carries fat-soluble aromatics. Add minced garlic and fresh thyme, stirring constantly for 30 seconds until fragrant. The brief garlic cooking prevents raw, harsh flavors while preserving its subtle sweetness.
Increase heat to medium-high and add prepared chicken livers in a single layer. This step requires attention—you want to achieve a gentle sear that creates a flavorful crust without cooking the interior beyond your target temperature. Sear for 1-2 minutes per side, working in batches if necessary to avoid overcrowding the pan. The livers should develop a golden-brown exterior while remaining slightly pink inside.
Pour in your wine or cognac carefully—it may flame briefly if the pan is very hot, which is normal and actually desirable as it burns off harsh alcohol while concentrating flavors. Add the bay leaf and reduce heat to low. Cover partially and cook gently for 3-5 minutes, until livers reach 160°F (71°C) internally when tested with a meat thermometer. Overcooking produces grainy, unpleasant textures, so precise temperature monitoring prevents disappointment.
Cooking Techniques That Matter
Professional pâté makers understand that cooking method directly impacts final texture. The gentle simmering approach outlined above differs fundamentally from boiling, which creates tough proteins and loses delicate flavors to steam. Maintaining low to medium heat throughout cooking ensures even doneness and preserves the tender quality essential to excellent pâté.
Some advanced techniques involve cooking livers in a water bath (bain-marie) for even more precise temperature control. This method requires placing the liver mixture in a terrine or mold, then setting that container in a larger pan filled with hot water. The water’s thermal mass prevents temperature spikes, producing exceptionally smooth, uniform texture. While more involved, this technique appeals to serious home cooks seeking restaurant-quality results.
Another consideration involves cooking time variations based on liver size and shape. Smaller livers cook more quickly and evenly than large ones, so consistent sizing before cooking pays dividends. If livers vary significantly in size, consider cutting larger ones in half to ensure even cooking and prevent some pieces from overdoing while others remain undercooked.
Understanding residual carryover cooking proves important—livers continue cooking slightly after removal from heat due to internal temperature redistribution. Experienced cooks pull livers from heat at 155-158°F (68-70°C), allowing carryover to reach the target 160°F without risking overcooking. This technique, common in professional kitchens, requires a reliable meat thermometer but produces noticeably superior results.
Blending and Texture Perfection
Once livers reach proper temperature, remove the pan from heat and let the mixture cool slightly—about 5 minutes—before blending. This brief rest allows proteins to relax slightly while the mixture remains warm enough for smooth blending. Transfer the liver mixture (including all cooking liquid and aromatics) to a food processor fitted with the standard blade.
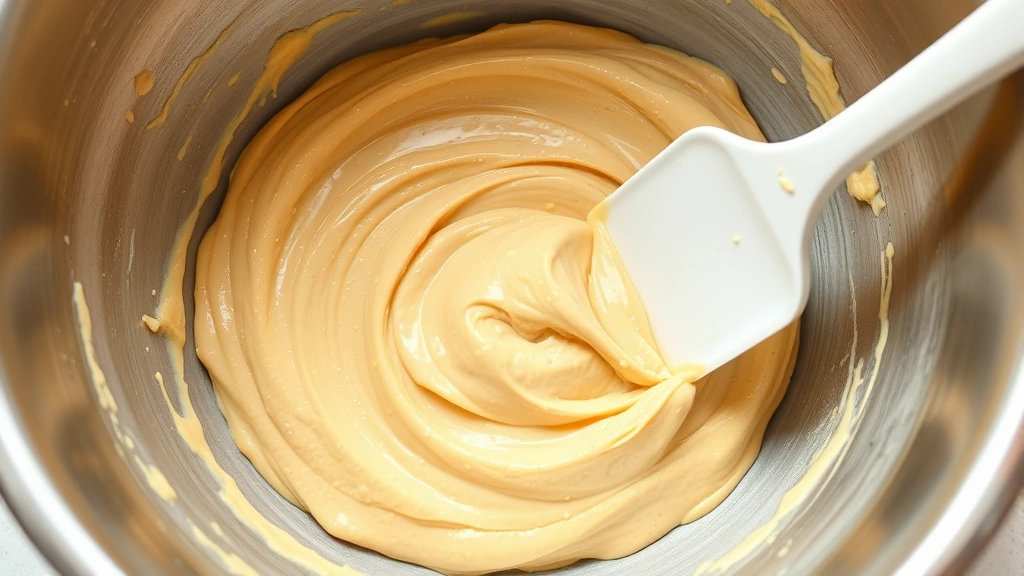
Process the mixture for 1-2 minutes, until completely smooth and no visible liver chunks remain. The mixture should resemble soft butter at this stage. If it appears grainy or chunky, continue processing in 30-second intervals, scraping down the bowl between pulses. Patience here produces noticeably superior texture compared to rushing the blending process.
Once the liver mixture achieves perfect smoothness, transfer it to a bowl and let it cool to room temperature—this usually requires 15-20 minutes. Cooling allows the mixture to set slightly while remaining workable. While cooling, cut cold butter into small cubes and bring them to room temperature by leaving them on the counter for 5-10 minutes—the butter should be soft but still hold its shape.
Once both the liver mixture and butter reach room temperature, add the butter gradually while folding gently with a rubber spatula. Work in three or four additions, folding thoroughly after each addition to incorporate the butter completely. This folding technique, rather than blending, preserves the airy quality that distinguishes proper pâté from dense liver spreads. The mixture should lighten noticeably in color and texture as butter incorporates.
At this stage, you can also fold in heavy cream (about 3-4 tablespoons) if desired, which creates additional lightness and richness. Some recipes include a raw egg yolk for additional richness, though modern food safety practices recommend avoiding raw eggs. If including cream, fold it in after the butter but before final seasoning.
Seasoning and Flavor Development
Proper seasoning distinguishes excellent pâté from merely adequate versions. Begin with a small taste test using a fresh spoon—never double-dip to avoid contamination. The pâté should taste rich and complex, with liver flavor balanced by butter, aromatics, and wine notes. Common seasoning mistakes include over-salting (which masks delicate flavors) and under-salting (which leaves the pâté tasting flat).
Add salt gradually in small pinches, tasting between additions. Start with 1/2 teaspoon and adjust upward based on preference and other ingredients. White pepper adds gentle heat without the visual distraction of black pepper specks—add 1/4 teaspoon initially, tasting and adjusting. A tiny pinch of nutmeg (about 1/8 teaspoon) adds warmth and complexity that many tasters cannot identify but notice as “something special.”
Some recipes include a small pinch of cayenne pepper for subtle heat, though this should remain barely detectable. Taste repeatedly as you season, remembering that flavors meld and intensify as pâté chills. It’s better to under-season slightly at this stage, knowing you can adjust after the pâté has chilled overnight and flavors have fully developed.
If you included wine or cognac during cooking, consider whether additional acidity would enhance the pâté. A tiny splash of lemon juice or sherry vinegar (about 1/4 teaspoon) can brighten flavors, though this should be barely noticeable. Some chefs add a touch of Dijon mustard for subtle complexity—start with 1/2 teaspoon and adjust based on preference.
Storage and Serving Suggestions
Transfer seasoned pâté to a serving terrine, ramekin, or small crock, smoothing the top with a warm spatula dipped in hot water. If desired, seal the surface with clarified butter—melt butter slowly, allowing milk solids to settle, then pour the clear golden liquid over the pâté surface to create a protective seal. This traditional technique extends shelf life while adding richness to the final presentation.
Cover the pâté loosely with plastic wrap and refrigerate for at least 8 hours, preferably overnight, before serving. This resting period allows flavors to meld and the texture to set completely. Properly made pâté will keep refrigerated for 5-7 days when sealed with clarified butter, or 3-4 days without the butter seal. Freezing is possible—wrap well and freeze for up to 3 months, though texture changes slightly upon thawing.
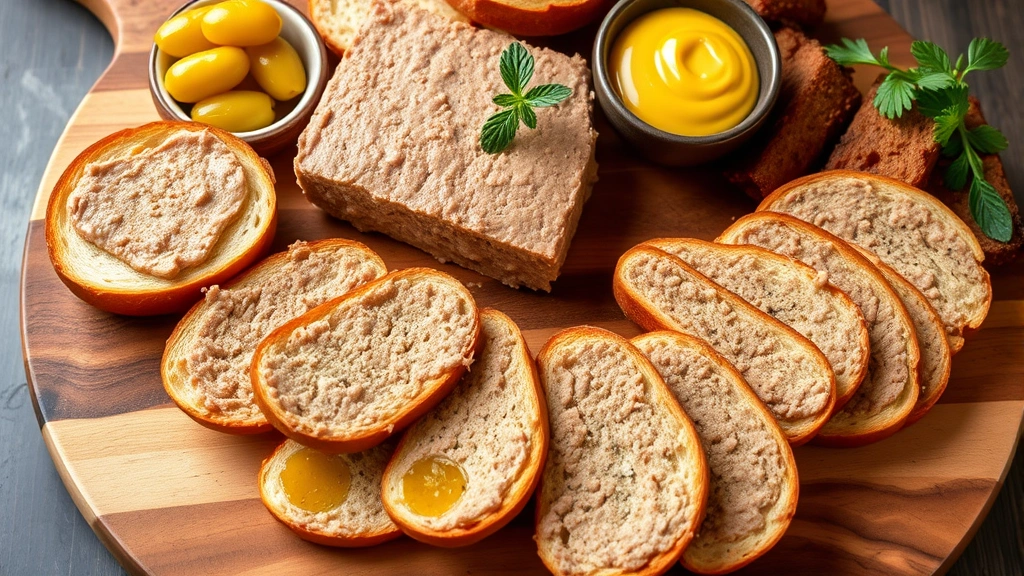
Serve pâté at cool room temperature (about 60-65°F) rather than directly from the refrigerator, as cold temperatures mute delicate flavors. Remove from the refrigerator 15-20 minutes before serving and arrange on a board with toasted baguette slices, crackers, or homemade pasta crisps. Cornichons (small pickled cucumbers), whole grain mustard, and fresh fig jam provide traditional accompaniments that complement pâté’s richness.
For elegant plating, serve small portions on crostini or crackers, garnishing with microgreens, a cornichon slice, or a tiny dollop of fig jam. The contrast of textures and flavors creates memorable bites that showcase your pâté’s quality. Pâté pairs beautifully with dry white wines, light reds, or champagne—the acidity cuts through richness while enhancing savory flavors.
Variations and Creative Twists
Once you’ve mastered the basic recipe, endless variations allow creative expression. A Cognac Pâté increases brandy content and reduces wine, creating deeper, more complex flavors favored in traditional French preparations. A Mushroom Pâté incorporates finely minced cremini or porcini mushrooms, adding earthiness and umami depth that complement liver beautifully.
For Herb-Forward Versions, increase fresh thyme and add tarragon, chervil, or chives—these brighter herbs create lighter, more spring-like pâtés. A Truffle Pâté incorporates truffle oil or finely minced fresh truffles for luxury presentation, though quality truffle oil varies significantly. A Port Wine Pâté substitutes port for cognac, creating slightly sweeter, more rounded flavors.
Some cooks create Pâté Terrines by layering pâté with aspic (meat jelly) and vegetables for impressive presentations. This technique requires additional preparation but produces stunning visual results suitable for special occasions. A Chicken Liver and Pork Pâté blends chicken livers with ground pork for additional richness and different textural quality.
For those seeking lighter versions, reduce butter content and increase cream, creating a mousse-like texture that’s less dense but still luxurious. A Spiced Pâté incorporates warming spices like cinnamon, clove, and allspice in small quantities for complexity that works particularly well during cooler months. Consider pairing your pâté with white sauce recipe components for interesting serving presentations.
For those interested in broader culinary applications, explore how pâté techniques apply to other preparations. Chicken and gravy recipe foundations share similar flavor-building principles, while burger sauce recipe emulsification techniques parallel the butter-folding method used in pâté. Check out best healthy food recipes for alternative approaches to classic French techniques, and visit Fresh Plated Daily Blog for additional inspiration.
FAQ
Can I make pâté without a food processor?
Yes, though the texture will be different. Traditionally, pâté was made by pushing cooked livers through a fine-mesh sieve repeatedly, creating smooth texture through mechanical work rather than blade processing. This method requires patience but produces exceptional results. Alternatively, use an immersion blender, though this requires working in smaller batches and may not achieve perfect smoothness without a proper food processor.
Why is my pâté grainy?
Graininess typically indicates overcooking, which causes liver proteins to tighten and separate from fat. Ensure your internal temperature reaches exactly 160°F (71°C), no higher. If you’re using a food processor, inadequate blending also creates graininess—process longer until completely smooth. Finally, if butter was too cold when folded in, it may not incorporate fully, creating a grainy appearance.
Can I make pâté ahead for entertaining?
Absolutely—pâté actually improves with a day or two of refrigeration as flavors develop and meld. Make it 2-3 days before your event, store it covered in the refrigerator, and remove 15-20 minutes before serving. This advance preparation allows you to focus on other dishes while your pâté reaches peak flavor and texture.
What should I do if my pâté is too salty?
If oversalted, you can partially salvage it by folding in additional unsalted butter or cream, which dilutes salt concentration. Alternatively, serve with unsalted crackers or bread that balance the saltiness. For future batches, remember that salt concentration intensifies as pâté chills, so under-season slightly during preparation and adjust after overnight refrigeration.
Is homemade pâté safe to eat?
Yes, when prepared following proper food safety guidelines. Ensure livers reach 160°F (71°C) internally, use clean equipment, and refrigerate properly. The combination of high fat content, acid (from wine), and proper cooking creates an inhospitable environment for harmful bacteria. If you have concerns about raw eggs, omit them entirely—the pâté will be excellent without this optional ingredient.
What’s the difference between pâté and terrine?
Technically, pâté refers to the forcemeat preparation itself, while terrine describes the dish or mold in which pâté is served. In practice, many cooks use these terms interchangeably. A formal terrine often includes aspic (meat jelly) and multiple layers, while pâté typically refers to the smooth spread alone.
Can I use frozen chicken livers?
While fresh livers produce superior results, frozen livers work acceptably if properly thawed. Thaw in the refrigerator overnight rather than at room temperature to minimize bacterial growth. Frozen livers may have slightly different texture than fresh, but quality pâté remains achievable. Avoid thawing in warm water, which can create uneven thawing and potential food safety issues.


