Chocolate Crinkle Cookies? Baker Approved Recipe
There’s something undeniably magical about biting into a chocolate crinkle cookie—that perfect combination of a fudgy, almost brownie-like center with crackled, powdered sugar-dusted edges that creates the most satisfying textural contrast. These beloved cookies have graced bakery displays and home kitchen countertops for decades, and for good reason. They’re the kind of treat that makes people pause mid-conversation and ask for the recipe, convinced that only a professional pastry chef could achieve such perfection.
The truth? Chocolate crinkle cookies are surprisingly accessible for home bakers of all skill levels. What makes them appear so professional is understanding a few key techniques and ingredient ratios that ensure the signature crackled appearance every single time. Whether you’re preparing them for a holiday gathering, a bake sale, or simply because you deserve something chocolate and delicious, this baker-approved recipe will deliver consistent, impressive results that taste like they came straight from a gourmet bakery.
Ingredients You’ll Need
Creating exceptional chocolate crinkle cookies starts with quality ingredients. This recipe yields approximately 24 cookies and requires careful attention to measurements.
- 2 cups all-purpose flour – provides structure and ensures proper spread during baking
- ¾ cup unsweetened cocoa powder – delivers intense chocolate flavor without excess sugar
- 1 teaspoon baking powder – gives cookies their characteristic lift and texture
- ½ teaspoon baking soda – enhances browning and helps activate the cocoa
- ½ teaspoon salt – balances sweetness and amplifies chocolate notes
- 4 ounces semi-sweet chocolate, chopped – melts into the dough for fudgy richness
- 4 ounces dark chocolate, chopped – adds depth and complexity to the flavor profile
- ¾ cup granulated sugar – sweetens and helps create the crackled exterior
- ¼ cup vegetable oil – keeps cookies moist and tender
- 2 large eggs – binds ingredients and adds structure
- 1 teaspoon vanilla extract – enhances overall flavor complexity
- ½ cup powdered sugar – the essential coating that creates the signature crinkle effect
The Secret to Perfect Crinkles
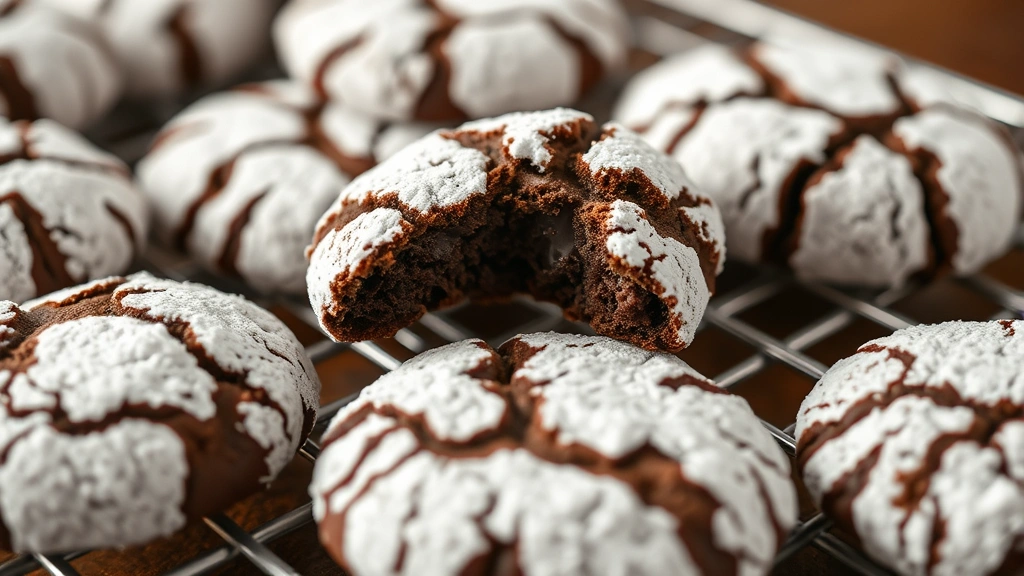
The hallmark of chocolate crinkle cookies is that gorgeous, cracked exterior with its snowy white powdered sugar coating contrasting against dark chocolate. This visual appeal isn’t accidental—it results from understanding how the dough’s temperature, moisture content, and coating interact during baking.
The primary secret lies in chilling the dough thoroughly before rolling and coating. When you chill chocolate cookie dough for at least two hours (or up to 24 hours), you accomplish several crucial things. First, the fats in the dough solidify, preventing excessive spreading during baking. Second, the flavors meld and intensify. Third, when you roll these chilled dough balls in powdered sugar and they hit the hot oven, the exterior sets quickly while the interior remains soft, creating that signature crackle as the dough expands beneath the powder coating.
Another critical element is using both oil and chocolate rather than relying on butter alone. Oil creates a denser, fudgier crumb structure compared to butter, which produces a more cake-like texture. This recipe balances oil with melted chocolate to achieve that perfect brownie-like consistency that makes these cookies so irresistible.
Temperature control throughout the baking process matters enormously. Your oven should be preheated to exactly 325°F (163°C)—slightly lower than many cookie recipes. This gentler heat allows the powdered sugar coating to set and crack beautifully while the interior reaches that ideal fudgy consistency without the edges becoming too crispy.
Step-by-Step Instructions
Prepare Your Dry Ingredients (5 minutes)
Begin by whisking together flour, cocoa powder, baking powder, baking soda, and salt in a medium bowl. This pre-mixing ensures even distribution of leavening agents and prevents lumps of cocoa powder from appearing in the finished cookies. Set this mixture aside.
Melt Your Chocolates (3-5 minutes)
Combine chopped semi-sweet and dark chocolate in a microwave-safe bowl. Heat in 30-second intervals, stirring between each interval, until completely melted and smooth. This gentle heating method prevents seizing. Allow the melted chocolate to cool for approximately 2 minutes before proceeding.
Create the Wet Mixture (4 minutes)
In a large mixing bowl, whisk together granulated sugar, oil, and eggs until well combined. The mixture should appear slightly pale and thick. Add vanilla extract and stir to incorporate. This creates an emulsified base that will hold the flour and chocolate together beautifully.
Combine Wet and Dry Elements (2 minutes)
Gently fold the cooled melted chocolate into the wet mixture using a spatula, stirring until no streaks remain. Gradually add the flour mixture, folding gently to combine. Avoid overmixing, which can develop gluten and create tough cookies. The dough should come together smoothly but shouldn’t be beaten.
Chill the Dough (Minimum 2 hours)
Cover your dough bowl with plastic wrap and refrigerate for at least 2 hours, preferably overnight. This crucial step cannot be skipped if you want authentic crinkle formation. The cold dough will be firm enough to scoop and roll easily.
Prepare for Baking (5 minutes)
Preheat your oven to 325°F (163°C). Line baking sheets with parchment paper. Pour powdered sugar into a shallow dish.
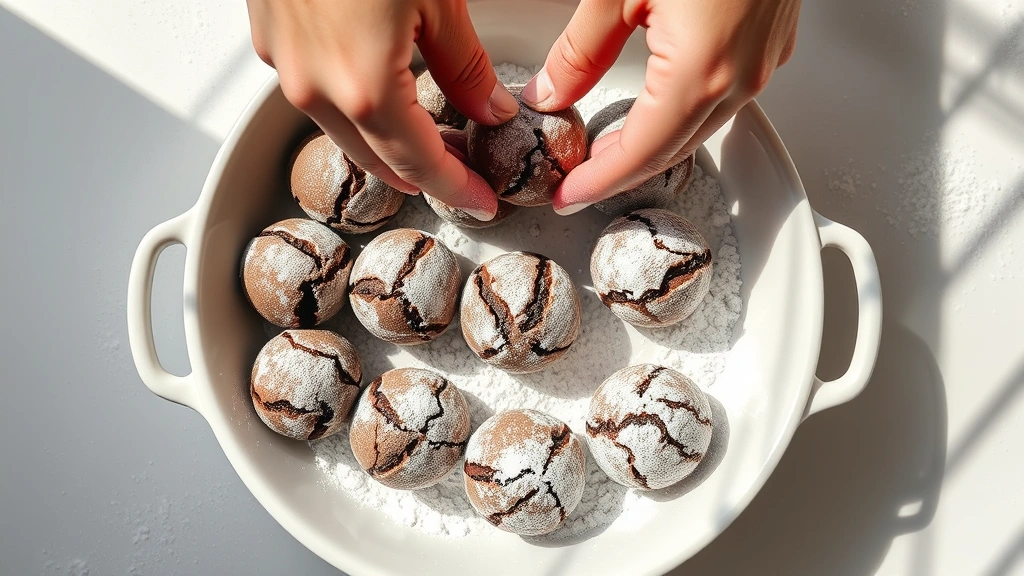
Shape and Coat (8-10 minutes)
Using a 1.5-tablespoon cookie scoop or your hands, form dough into 1-inch balls. Working with 3-4 balls at a time, roll each ball thoroughly in powdered sugar until completely coated. The coating should be generous—don’t be shy here. Place coated balls on prepared baking sheets, spacing them about 2 inches apart.
Bake to Perfection (11-13 minutes)
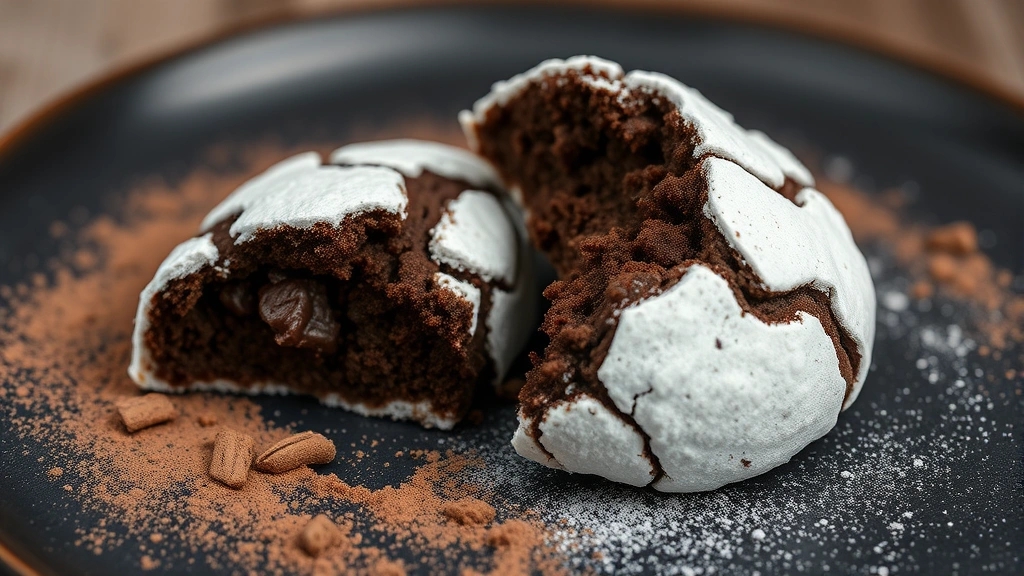
Bake at 325°F for 11-13 minutes. The cookies should look slightly underdone when you remove them from the oven—the tops will appear crackled and set, but the centers should feel soft when gently pressed. This is the critical moment: slightly underbaked cookies will have that perfect fudgy center.
Cool Properly (15 minutes)
Allow cookies to cool on the baking sheet for 5 minutes before transferring to a wire cooling rack. This brief resting period allows them to set without becoming too firm. Complete cooling takes approximately 10 additional minutes on the rack.
Understanding the Baking Science
The magic of chocolate crinkle cookies lies in several fascinating chemical and physical reactions happening simultaneously in your oven. Understanding these processes helps you troubleshoot and achieve perfect results consistently.
The Maillard Reaction and Caramelization
When the cookies bake, proteins and sugars react at high heat, creating hundreds of new flavor compounds through the Maillard reaction. This is why fresh-baked cookies taste so much more complex than the raw dough. The cocoa powder in the recipe contributes additional compounds that intensify during baking, developing deeper chocolate notes that weren’t present in the raw ingredients.
Starch Gelatinization
Flour contains starch granules that absorb moisture and swell during baking. This gelatinization process is what gives cookies their structure. In this recipe, the relatively high cocoa content and oil-based formula create a denser crumb than traditional butter cookies because oil doesn’t cream with sugar the same way butter does, resulting in less air incorporation and a fudgier final texture.
Protein Denaturation
Eggs contain proteins that unwind and bond with other proteins when heated, creating a network that traps moisture. This is why properly baked chocolate crinkle cookies have that characteristic fudgy texture—the egg proteins have set enough to hold everything together, but the cookies haven’t baked long enough for all the moisture to evaporate.
The Powdered Sugar Phenomenon
Powdered sugar (confectioners’ sugar) is granulated sugar ground into a fine powder with a small amount of cornstarch added. When these cold sugar crystals hit the hot cookie dough in the oven, they begin to dissolve and caramelize on the surface while the heat causes the dough underneath to expand. This creates those characteristic cracks as the expanding dough breaks through the sugar coating.
Why Temperature Matters
The 325°F baking temperature is lower than many recipes recommend for good reason. At this gentler temperature, the exterior sets and the sugar coating cracks while the interior remains underbaked enough to be fudgy. If you baked at 375°F, the cookies would spread too much and bake through completely, losing that signature texture. Oven thermometers are invaluable here—many home ovens run 25-50 degrees off from their setting, which can significantly impact results.
Delicious Variations to Try
Once you’ve mastered the classic chocolate crinkle cookie, numerous variations can keep your baking exciting. Understanding the base recipe allows you to experiment confidently.
Espresso-Enhanced Crinkles
Add 1 tablespoon of instant espresso powder to the dry ingredients. This intensifies the chocolate flavor dramatically without making the cookies taste like coffee. The espresso compounds amplify cocoa notes beautifully.
Mint Chocolate Crinkles
Add ½ teaspoon of peppermint extract to the wet mixture and reduce vanilla to ½ teaspoon. Alternatively, fold in ½ cup of finely chopped dark chocolate mint candies. This variation pairs beautifully with hot beverages and creates a refreshing flavor profile.
Salted Caramel Crinkles
After rolling dough balls in powdered sugar, gently press a caramel square into the center of each ball before baking. The caramel will melt into the cookie, creating a delightful surprise. Finish with a light sprinkle of fleur de sel on top after baking.
White Chocolate Crinkles
Reduce cocoa powder to ½ cup and add ¼ cup of white chocolate powder. Use 2 ounces white chocolate and 2 ounces milk chocolate instead of the semi-sweet and dark chocolate combination. Reduce powdered sugar coating to ¼ cup mixed with 2 tablespoons unsweetened cocoa powder for contrast.
Triple Chocolate Crinkles
Use 2 ounces each of semi-sweet, dark, and milk chocolate melted together. This creates a more complex chocolate flavor profile with subtle sweetness from the milk chocolate balanced against the darker varieties.
Storage and Make-Ahead Tips
Chocolate crinkle cookies maintain their quality remarkably well when stored properly, making them ideal for advance preparation.
Room Temperature Storage
Store completely cooled cookies in an airtight container at room temperature for up to 5 days. Place parchment paper between layers to prevent sticking. The cookies will soften slightly during storage as they absorb ambient moisture, which actually improves their fudgy texture.
Refrigerator Storage
For extended storage up to 2 weeks, keep cookies in an airtight container in the refrigerator. Cold storage actually enhances the chocolate flavor as the cocoa compounds become more pronounced at lower temperatures.
Freezer Storage
Freeze baked cookies in an airtight, freezer-safe container for up to 3 months. Thaw at room temperature for 30 minutes before serving. Alternatively, freeze the dough balls after rolling in powdered sugar. Bake frozen dough balls at 325°F for 13-15 minutes without thawing—they’ll bake beautifully from frozen.
Make-Ahead Strategy
Prepare the dough up to 24 hours in advance and refrigerate. Shape, coat, and freeze dough balls for up to 2 weeks. This approach allows you to bake fresh cookies whenever desired without advance preparation. It’s perfect for busy schedules or holiday entertaining.
For easy recipes for beginners, chocolate crinkle cookies represent an excellent starting point for understanding baking fundamentals. The recipe teaches crucial skills applicable to countless other desserts.
FAQ
Why aren’t my cookies cracking?
Insufficient powdered sugar coating or baking at too high a temperature prevents proper cracking. Ensure you coat each dough ball generously and thoroughly with powdered sugar. Verify your oven temperature with an oven thermometer. Additionally, if your dough wasn’t chilled adequately, the cookies may spread too quickly before the sugar coating can crack.
My cookies spread too much—what went wrong?
This typically results from inadequate chilling time, oven temperature that’s too high, or using melted chocolate that was too warm when added to the wet mixture. Always chill dough for at least 2 hours. Use an oven thermometer to verify 325°F. Allow melted chocolate to cool for 2 minutes before incorporating.
Can I use all dark chocolate instead of mixing semi-sweet and dark?
Yes, though the flavor will be more intense and less sweet. Using 8 ounces of dark chocolate creates a more sophisticated, less sweet cookie. Adjust to your preference, but avoid chocolate that’s 70% cacao or higher, as it can create a slightly bitter flavor in cookies.
How do I know when they’re perfectly baked?
The tops should look set and crackled, but when you gently press the center of a cookie, it should feel soft and yield slightly. The cookies will continue cooking from residual heat after removal from the oven. Underbaked is better than overbaked with this recipe.
Can I make these without oil?
Substituting butter for oil changes the texture significantly, creating a more cake-like rather than fudgy cookie. If you must use butter, use 6 ounces softened butter instead of ¾ cup oil, cream it with sugar before adding other ingredients, and expect a slightly different texture. The oil is essential for achieving that brownie-like consistency.
What if my oven runs hot or cold?
Use an oven thermometer to monitor actual temperature. If your oven runs hot, reduce the temperature by 25°F and bake for 13-15 minutes. If it runs cold, increase temperature by 25°F and monitor closely. Every oven is different, so adjusting based on your specific appliance ensures consistent results.
Why use both semi-sweet and dark chocolate?
This combination balances sweetness with chocolate intensity. Semi-sweet chocolate provides sweetness and approachable flavor, while dark chocolate adds complexity and depth. Using both creates a more sophisticated cookie than using either alone. Serious Eats offers excellent information on chocolate selection and pairing for baking applications.
Can these cookies be made vegan?
Replace eggs with a flax egg (1 tablespoon ground flaxseed mixed with 3 tablespoons water per egg). Ensure your chocolate and cocoa powder are certified vegan. The texture will be slightly different but still delicious.
How do I prevent the powdered sugar from disappearing?
The sugar naturally dissolves partially during baking—this is actually what creates the crinkles. However, if you prefer more visible powdered sugar coating, apply an extra light dusting immediately after removing cookies from the oven while they’re still warm.
For more grandma-approved recipes, chocolate crinkle cookies represent a timeless classic that generations have perfected. This baker-approved recipe draws on traditional techniques while incorporating modern baking science for reliable, impressive results.
Chocolate crinkle cookies deserve a permanent place in your baking rotation. They’re impressive enough for special occasions, simple enough for weeknight treats, and versatile enough to adapt to your preferences. The combination of fudgy interiors, crackled exteriors, and deep chocolate flavor creates a cookie that’s simultaneously humble and sophisticated. With this recipe and understanding of the techniques involved, you’ll produce professional-quality cookies that rival any bakery offering.
The beauty of mastering this recipe extends beyond the cookies themselves. Understanding how temperature, moisture, chocolate types, and coating techniques interact teaches you principles applicable to countless other baking projects. Whether you’re exploring King Arthur Baking Company’s resources for deeper technical knowledge or simply perfecting your personal baking skills, chocolate crinkle cookies provide an excellent foundation for building confidence and expertise in the kitchen.


