Tender Chuck Steak? Grandma’s Secret Recipe
Chuck steak has long been the underdog of beef cuts. Many home cooks shy away from it, intimidated by its reputation for toughness and the assumption that only expensive, tender cuts deserve a place on the dinner table. But here’s what my grandmother knew, and what she passed down through generations of our family: chuck steak, when prepared with intention and technique, transforms into something extraordinary. It becomes tender, flavorful, and absolutely worth your time and effort.
The secret isn’t magic—it’s knowledge. Chuck steak comes from the shoulder area of the cow, a hardworking muscle packed with connective tissue and fat marbling. This anatomy that seems like a curse is actually a gift. When treated properly through slow cooking, acid-based marinades, and mechanical tenderizing, chuck steak becomes more flavorful and interesting than many premium cuts. My grandmother understood this instinctively, and after years of perfecting her techniques, I’m thrilled to share her wisdom with you.
Whether you’re looking to prepare an easy dinner for beginners or want to master a classic technique that will impress your family, this guide will walk you through everything you need to know about preparing tender chuck steak the way my grandmother did.
Understanding Chuck Steak: The Basics
Before we dive into Grandma’s techniques, it’s important to understand what we’re working with. Chuck steak is a cut that comes from the shoulder section of the beef, typically 1 to 2 inches thick. It contains a good amount of fat and connective tissue (collagen), which is exactly what makes it perfect for slow cooking. When collagen breaks down during prolonged, moist heat cooking, it transforms into gelatin, which gives the meat an incredibly tender, almost silky texture.
The fat content in chuck steak is another advantage. Fat carries flavor and keeps the meat moist during cooking. Many home cooks make the mistake of trimming all the fat away, but my grandmother always left a thin layer of fat on the surface—this is crucial for both flavor and texture.
Chuck steak is also incredibly economical. It costs a fraction of premium cuts like ribeye or filet mignon, yet when prepared correctly, it rivals them in tenderness and surpasses them in flavor depth. This is why it was a staple in our family kitchen—not just because Grandma was frugal, but because she understood quality and value.
Grandma’s Secret Tenderizing Techniques
My grandmother employed three primary methods to tenderize chuck steak before cooking. Each method works on different principles, and using them in combination creates the most dramatic results.
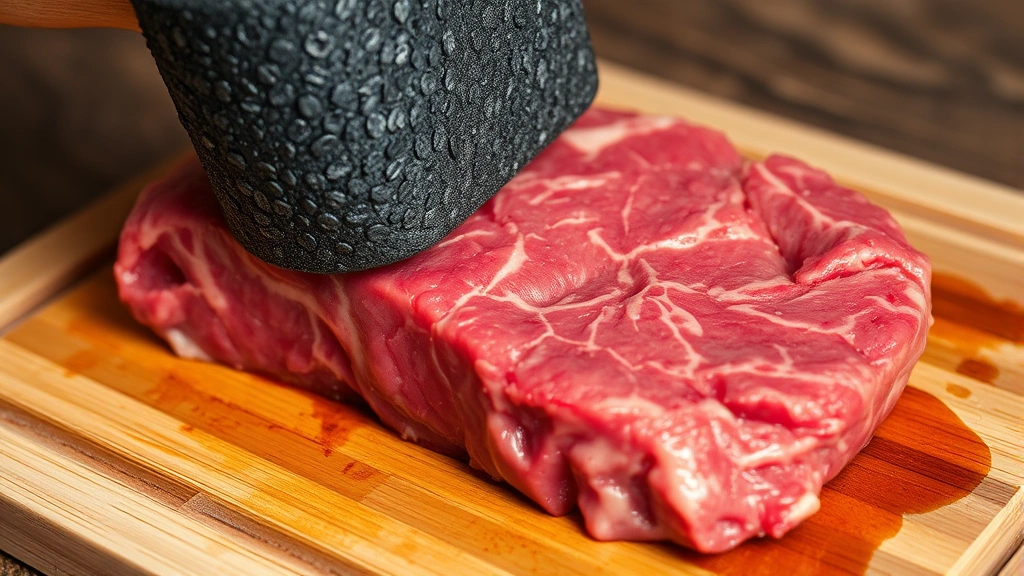
Method 1: Mechanical Tenderizing
The first technique involved a meat mallet—the kind with a flat side and a textured, dimpled side. Grandma would place the chuck steak on a cutting board and use the textured side of the mallet to pound the meat gently but firmly. This breaks down muscle fibers and helps the marinade penetrate deeper into the meat. The key is to use controlled, consistent pressure rather than aggressive pounding. Work in overlapping patterns across the entire surface of the steak, being careful not to completely pulverize the meat into submission.
Method 2: Enzymatic Tenderizing
Grandma kept fresh pineapple, papaya, and kiwi in her kitchen specifically for tenderizing meat. These fruits contain natural enzymes (bromelain in pineapple, papain in papaya, and actinidin in kiwi) that break down protein structures. She would blend a small portion of one of these fruits and add it to her marinade. The enzymes work by literally digesting the muscle proteins, making the meat incredibly tender. However, she was careful not to let the meat sit in enzymatic marinade for more than 4 hours, as the enzymes can eventually make the meat mushy if left too long.
Method 3: Acid-Based Tenderizing
This is perhaps the most accessible and reliable method. Acidic ingredients like vinegar, citrus juice, wine, and yogurt help break down collagen and denature proteins. Grandma combined acidic ingredients with her marinades to create a dual-action effect: the acid tenderizes while the oil and seasonings add flavor.
The Perfect Marinade Formula
After watching Grandma prepare chuck steak hundreds of times, I finally understood her marinade formula. It’s simple, but the ratios matter tremendously.
The Foundation:
- 1 part acid (vinegar, citrus, wine, or yogurt)
- 1 part oil (olive, vegetable, or sesame)
- 2-3 parts flavor components (soy sauce, Worcestershire sauce, herbs, garlic, onion)
This ratio ensures the meat tenderizes while remaining juicy and flavorful. Too much acid and the meat becomes mushy; too little and it remains tough. The oil helps distribute fat-soluble flavors and protects the meat from drying out.
Grandma’s Signature Marinade
Here’s her exact recipe that I’ve used for years:
- ¼ cup balsamic vinegar
- ¼ cup olive oil
- 3 tablespoons soy sauce
- 2 tablespoons Worcestershire sauce
- 6 cloves garlic, minced
- 2 tablespoons fresh rosemary, chopped
- 1 tablespoon fresh thyme, chopped
- 1 teaspoon black pepper
- 1 teaspoon salt
- ½ teaspoon red pepper flakes
Combine all ingredients in a bowl and whisk thoroughly. The beauty of this marinade is its versatility—you can substitute herbs based on what you have available, adjust the acid based on preference, and even add ginger or cumin for different flavor profiles.
Slow Cooking Methods That Work
Once the chuck steak is tenderized and marinated, the cooking method becomes critical. Grandma employed several different techniques depending on the occasion and available time.
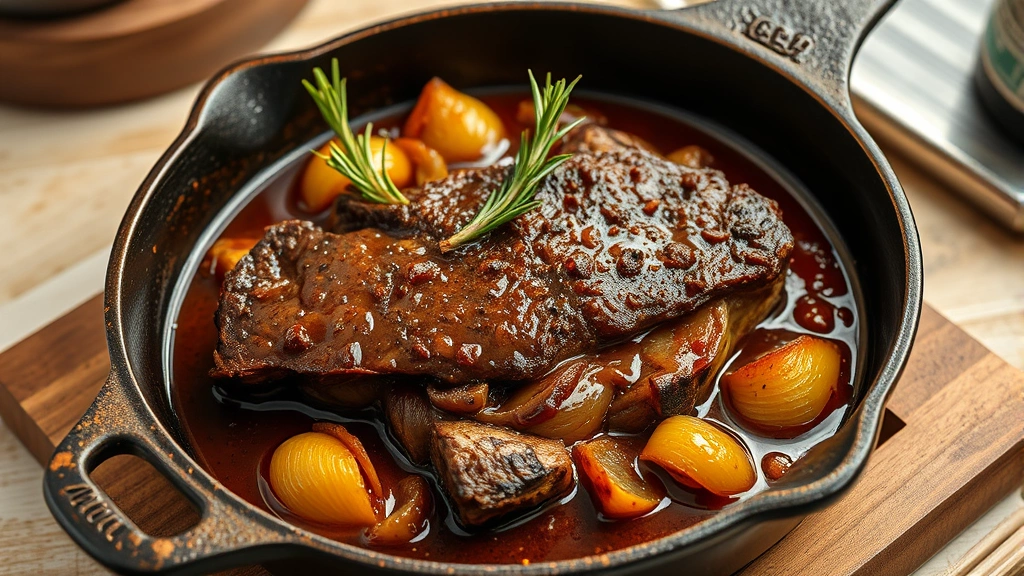
Braising in the Oven
This was Grandma’s favorite method. Braising involves searing the meat on high heat, then finishing it in a covered pot in the oven at low temperature with liquid. The combination of high initial heat and low, slow cooking creates a beautiful crust while the low heat allows the meat to become fork-tender. When using cast iron cookware, the heat distribution is particularly even, resulting in perfect browning and consistent cooking.
Slow Cooker Method
For days when Grandma was busy with other tasks, she used her slow cooker. She would place the marinated chuck steak in the slow cooker with additional broth or liquid, set it to low, and let it cook for 6-8 hours. While this method doesn’t create a crust, it produces incredibly tender meat and a flavorful cooking liquid that becomes the base for a delicious sauce.
Pressure Cooker Method
In recent years, I’ve adopted the pressure cooker method for when time is limited. The high pressure and steam break down collagen rapidly, achieving tenderness in 45 minutes what traditionally takes hours. Grandma was skeptical at first, but even she admitted the results were excellent.
Step-by-Step Recipe Instructions
Preparation (30 minutes active time):
- Remove the chuck steak from the refrigerator 30 minutes before cooking to bring it to room temperature. This ensures even cooking throughout.
- Pat the steak dry with paper towels—this helps with browning and prevents the meat from steaming.
- Using a meat mallet, gently pound the steak on both sides with the textured side, using firm but controlled pressure. Work in overlapping patterns across the entire surface.
- Place the tenderized steak in a large zip-top bag or shallow dish.
- Combine all marinade ingredients in a bowl and whisk thoroughly.
- Pour the marinade over the steak, ensuring it’s completely submerged. If using a bag, press out excess air before sealing.
- Refrigerate for at least 4 hours, or preferably overnight. This allows the tenderizing enzymes and acids to work their magic.
Cooking (Oven Braise Method – 2.5 hours total):
- Preheat your oven to 325°F.
- Remove the steak from the marinade, reserving the liquid. Pat the steak dry with paper towels.
- Heat 2 tablespoons of oil in a large cast iron skillet or Dutch oven over medium-high heat until it shimmers.
- Carefully place the steak in the hot oil and sear for 4-5 minutes per side until a deep brown crust forms. Don’t move the meat during searing—this is crucial for developing flavor.
- Remove the steak and set aside temporarily.
- Add 1 diced onion and 4 minced garlic cloves to the pan, sautéing for 2 minutes until fragrant.
- Pour in the reserved marinade plus 1 cup of beef broth, scraping up any browned bits from the bottom of the pan (this is called deglazing and adds incredible depth).
- Return the steak to the pan, nestling it into the liquid. The liquid should come about halfway up the sides of the meat.
- Cover the pan with a lid or foil and transfer to the preheated oven.
- Braise for 2-2.5 hours, or until the meat is fork-tender and easily shreds when pressed with a spoon.
- Remove from the oven and let rest for 10 minutes before serving.
Making the Sauce:
While the steak rests, you have the option to make a sauce from the braising liquid. Grandma always did this. Simply strain the liquid into a saucepan, removing any solids. For a thicker sauce, mix 2 tablespoons cornstarch with 3 tablespoons water and whisk it into the simmering liquid, stirring constantly until it reaches your desired consistency. Season with salt and pepper to taste.
Serving Suggestions and Pairings
The beauty of perfectly prepared chuck steak is its versatility. Here are Grandma’s favorite ways to serve it:
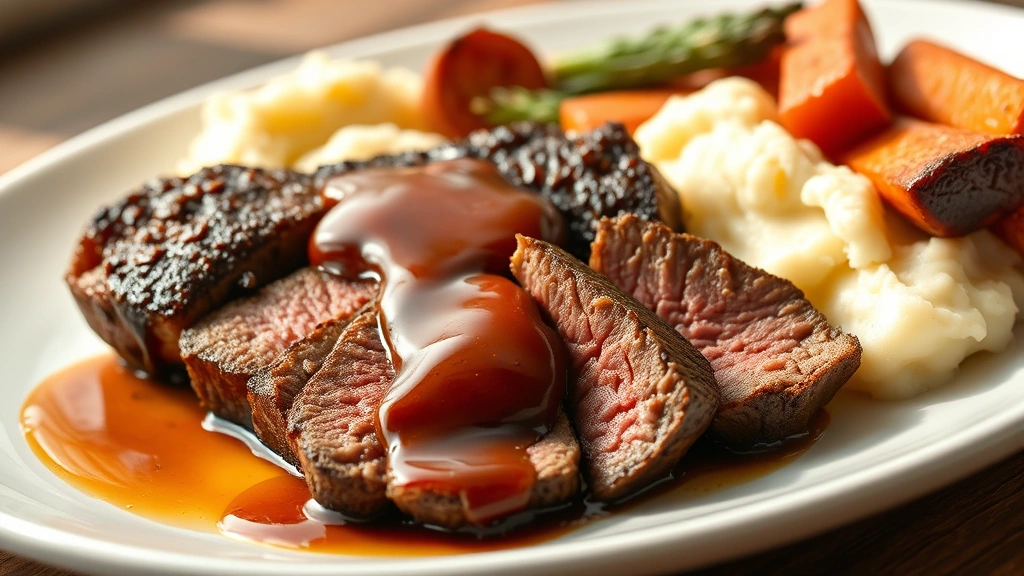
Classic Dinner Plate
Serve the sliced steak with the pan sauce spooned over top, alongside creamy mashed potatoes and roasted root vegetables. The tender meat and rich sauce create a deeply satisfying meal that feels special without requiring special ingredients.
Sandwich Style
Shred the leftover steak and use it for sandwiches. The meat becomes even more tender when shredded, and it pairs beautifully with crusty bread and a simple homemade salad dressing drizzled over top.
Stir-Fry and Asian Applications
Slice the cooked steak thinly and incorporate it into stir-fries with vegetables and rice. The tenderness of properly prepared chuck steak makes it ideal for this application.
Tacos and Mexican Fare
Shred the steak and use it as a filling for tacos, enchiladas, or quesadillas. The rich, beefy flavor complements Mexican spices beautifully.
Salad Topping
Slice the steak and serve it warm or at room temperature over a bed of greens for a protein-rich salad. This is particularly good when paired with acidic components like vinaigrette.
Storage and Leftovers
One of the advantages of preparing chuck steak is that it stores beautifully and often tastes even better the next day as flavors meld together.
Refrigerator Storage:
Store leftover cooked steak in an airtight container in the refrigerator for up to 4 days. Keep the meat in the braising liquid if possible—this prevents it from drying out. When reheating, warm gently in a low oven or on the stovetop with a splash of the braising liquid.
Freezer Storage:
Chuck steak freezes exceptionally well. Store cooked steak in the braising liquid in a freezer-safe container for up to 3 months. Thaw overnight in the refrigerator before reheating. Many people find that previously frozen and thawed chuck steak is even more tender, as the freezing process further breaks down muscle fibers.
Making Stock:
Don’t discard the braising liquid! Grandma always transformed it into stock. Simmer it with vegetable scraps, herbs, and additional broth to create a rich, flavorful base for soups and sauces. This is an excellent way to practice preparing healthy food recipes that maximize ingredient use.
Understanding proper storage also helps when planning easy dinner recipes throughout the week—prepare chuck steak on Sunday and use it multiple ways throughout the week.
FAQ
How long should I marinate chuck steak?
Minimum 4 hours, but overnight is ideal. The longer marinating time allows the tenderizing agents to work more effectively. Don’t exceed 24 hours with enzymatic marinades, as they can make the meat overly soft.
Can I use a different cut of meat with these techniques?
Absolutely. While these techniques are specifically designed for chuck steak, they work wonderfully on other tough cuts like brisket, round steak, or shoulder roast. Adjust cooking times based on thickness and size.
What if I don’t have a meat mallet?
You can use the bottom of a heavy skillet, a rolling pin, or even a heavy can. The goal is to apply consistent pressure to break down muscle fibers. Some people even use jaccard tenderizers (blade tools that pierce the meat repeatedly), though a mallet is most accessible.
Is the braising liquid safe to consume?
Yes, absolutely. The braising liquid contains all the flavorful compounds from the meat, marinade, and aromatics. It’s excellent for making sauces, gravies, and stocks. Store it according to the same guidelines as the cooked steak.
Can I cook chuck steak without marinating?
While possible, marinating is highly recommended. Without marinating, chuck steak will be less tender and less flavorful. Even a quick 2-hour marinade is better than none, though overnight is optimal.
Why does my chuck steak turn out tough despite following these steps?
The most common reasons are: insufficient marinating time, cooking at too high a temperature (slow, low heat is essential), or not cooking long enough. Ensure your oven temperature is accurate and give the meat adequate time to become tender—patience is key.
What’s the difference between chuck steak and chuck roast?
Chuck steak is cut into individual steaks from the chuck roast. Both come from the same area but are cut differently. Chuck steak is typically thinner and cooks faster, while chuck roast is a larger, thicker cut that’s ideal for pot roasts and stews.
Can I use these techniques for quick breakfast recipes?
While chuck steak isn’t typically a breakfast ingredient, the tenderizing principles apply to other proteins. You could prepare chuck steak the night before and use it in a hearty breakfast hash or grain bowl the next morning.


