Fluffy Cinnamon Rolls Without Yeast: A Game-Changing Recipe
Cinnamon rolls are the ultimate comfort food, but the traditional yeast-based versions require patience, planning, and a solid understanding of fermentation. What if you could skip all that and still achieve those pillowy, fluffy rolls that melt in your mouth? This no-yeast cinnamon roll recipe uses baking powder and baking soda to create an incredibly light crumb structure that rivals any traditional dough. The best part? You’ll have fresh, warm rolls ready in under an hour.
Whether you’re short on time, intimidated by yeast baking, or simply want a foolproof method, these yeast-free cinnamon rolls deliver every single time. The secret lies in understanding how chemical leaveners work and how to properly laminate your dough with cinnamon sugar filling. This approach produces tender, moist rolls with crispy edges and a soft interior—no overnight proofing required.
Why Skip the Yeast?
Yeast requires specific conditions to activate and create those signature air pockets through fermentation. Temperature control, bulk fermentation time, and proper shaping all demand precision. For many home bakers, this complexity leads to dense, underproofed rolls or over-fermented disasters. A no-yeast cinnamon roll recipe eliminates these variables entirely.
Chemical leaveners like baking powder and baking soda work instantly when combined with wet ingredients. Baking powder (which contains acid and base components) reacts immediately, while baking soda requires an acidic component like buttermilk or Greek yogurt to activate. This dual-leavening system creates a tender crumb with excellent rise. You’ll also notice that these rolls are slightly more cake-like than traditional versions—which many bakers actually prefer for their pillowy texture.
Time is another major advantage. Traditional cinnamon rolls require 2-4 hours of rising time. These no-yeast versions go from mixing bowl to oven in roughly 20 minutes of active work. They’re perfect for weekend brunches, unexpected guests, or when cinnamon roll cravings strike at midnight.
Essential Ingredients & Substitutions
For the Dough:
- 2 cups all-purpose flour (or 1 cup AP flour + 1 cup cake flour for extra tenderness)
- 3 tablespoons granulated sugar
- 1½ teaspoons baking powder
- ½ teaspoon baking soda
- ½ teaspoon salt
- 4 tablespoons cold butter, cubed
- ¾ cup buttermilk (or Greek yogurt thinned with milk)
- 1 large egg yolk
For the Cinnamon Sugar Filling:
- ¼ cup softened butter
- ½ cup packed brown sugar
- 2½ tablespoons ground cinnamon
- ¼ teaspoon fine sea salt
Ingredient Notes: Cold butter is crucial because it creates pockets of fat that produce flakiness and tenderness. Buttermilk’s acidity activates the baking soda while adding subtle tang. If you don’t have buttermilk, mix regular milk with lemon juice or white vinegar (1 tablespoon per cup) and let sit 5 minutes. Greek yogurt creates an even richer, more tender crumb. Use freshly ground cinnamon for maximum flavor—stale cinnamon loses its potency within 6 months.
For a dairy-free version, substitute cold coconut oil for butter and use unsweetened almond milk mixed with apple cider vinegar instead of buttermilk. The rolls will be slightly less tender but still delicious. Those avoiding eggs can omit the egg yolk, though it adds richness and helps with binding.
Step-by-Step Instructions
Step 1: Mix the Dry Ingredients
Whisk together flour, sugar, baking powder, baking soda, and salt in a large bowl. Make sure the baking soda and baking powder are evenly distributed—lumps will create uneven rise. Sift if you prefer, though whisking works fine.
Step 2: Cut in the Cold Butter
Add cold, cubed butter to the dry mixture. Using a pastry cutter, two knives, or your fingertips, work the butter into the flour until the mixture resembles coarse breadcrumbs. Some pea-sized butter pieces should remain visible—these create flakiness. Don’t overmix or the dough will be tough.
Step 3: Add Wet Ingredients
Create a well in the center of the dry mixture. Pour in buttermilk and egg yolk. Stir gently with a fork until just combined. The dough should be slightly shaggy and moist but not sticky. Overmixing develops gluten and creates tough rolls, so resist the urge to knead.
Step 4: Prepare Your Work Surface
Lightly flour a clean countertop or cutting board. Turn the dough out and gently bring it together with your hands (2-3 light folds). Don’t knead. The dough should be cohesive but still slightly rough-textured.
Step 5: Roll Out the Dough
Using a rolling pin, gently roll the dough into a 12×8 inch rectangle, roughly ¼-inch thick. If the dough springs back, let it rest 2 minutes and try again. Even thickness ensures even baking.
Step 6: Create the Filling
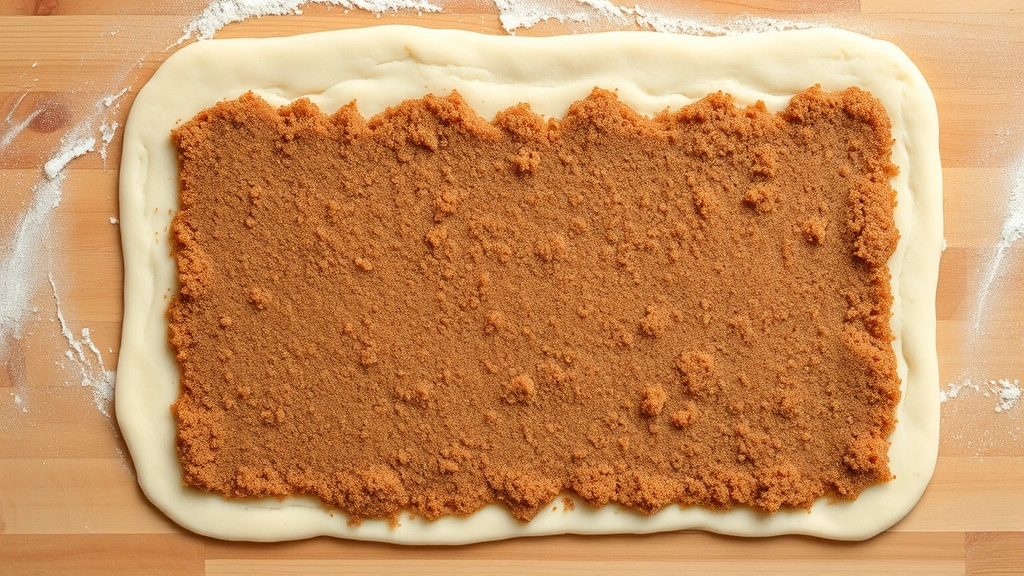
In a small bowl, mix softened butter, brown sugar, cinnamon, and salt until well combined. Spread this mixture evenly over the entire surface of the dough, leaving a ½-inch border on one long edge. This border prevents filling from squishing out during rolling.
Step 7: Roll and Cut
Starting from the long edge opposite the dry border, tightly roll the dough into a log. Use your fingers to seal the seam. Using a sharp knife or dental floss, cut the log into 8 equal pieces (for larger rolls) or 12 pieces (for smaller rolls). A serrated knife minimizes squishing. A helpful tip: use a piece of dental floss—slide it under the log, cross the ends over the top, and pull—this cuts cleanly without compressing the dough.
Step 8: Arrange and Bake
Place rolls cut-side up in a greased 9×13 inch baking pan, spacing them about 1 inch apart. They’ll expand slightly but won’t need additional rise time. Bake at 375°F for 18-22 minutes, until the tops are light golden brown and a toothpick inserted into the center comes out clean. Don’t overbake or they’ll dry out.
The Science Behind Fluffy Rolls
Understanding the chemistry helps you troubleshoot and modify this recipe confidently. Baking powder is a double-acting leavener—it releases carbon dioxide in two stages: first when it contacts liquid (room temperature), and again when heat reaches 160°F. This dual action creates initial lift and continued rise in the oven. Baking soda reacts only once, when it contacts acid, so it must be mixed with acidic ingredients like buttermilk.
The combination of both leaveners creates a more complex, finer crumb structure than using either alone. The acid-base reaction between baking soda and buttermilk creates immediate bubbles, while baking powder’s heat activation ensures continued rise throughout baking. This is why understanding leavening chemistry matters for consistent results.
Fat (butter) plays a crucial role in tenderness. When cold butter pieces are dispersed throughout the dough, they create small pockets. During baking, these melt and create steam, which contributes to a light crumb. Fat also coats flour particles, preventing excessive gluten development and keeping rolls tender rather than chewy.
The lamination process (layering dough with filling) also affects texture. As you roll the dough and create spirals of cinnamon sugar, you’re essentially creating a dough with multiple layers. During baking, steam escapes between these layers, creating separation and flakiness—similar to croissant lamination but simpler.
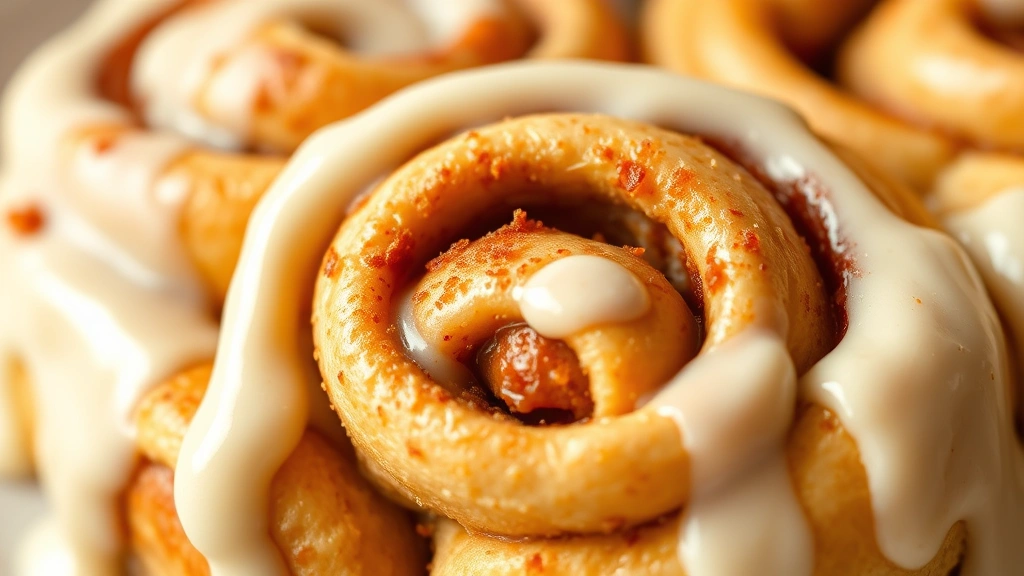
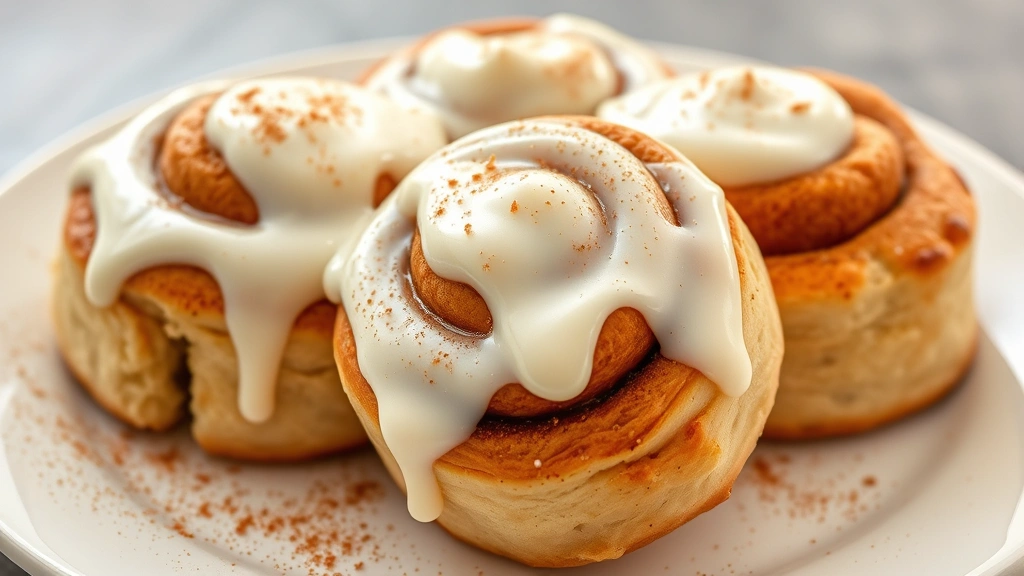
Cream Cheese Frosting & Toppings
The right frosting transforms good rolls into exceptional ones. Classic cream cheese frosting is the gold standard, but several variations work beautifully.
Traditional Cream Cheese Frosting:
- 4 oz cream cheese, softened
- 2 tablespoons butter, softened
- ½ cup powdered sugar
- ¼ teaspoon vanilla extract
- Pinch of salt
Beat cream cheese and butter until fluffy (2 minutes). Add powdered sugar gradually, beating until smooth. Add vanilla and salt. Spread over warm (not hot) rolls. The warmth helps it melt slightly into the crevices.
Lighter Options: For a tangier frosting, use Greek yogurt mixed with cream cheese (half and half). For less sweetness, whip heavy cream with a small amount of cream cheese and powdered sugar. For dairy-free, blend silken tofu with coconut cream, powdered sugar, and vanilla.
Beyond Frosting: Consider glazes instead—a simple mixture of powdered sugar, milk, and vanilla drizzles beautifully. Maple glaze (powdered sugar + maple syrup + butter) complements the cinnamon wonderfully. For a sophisticated touch, sprinkle fleur de sel over frosting to balance sweetness.
If you enjoy exploring different flavor profiles, consider pairing these rolls with peach salsa for brunch, or even incorporating spice-forward elements inspired by al pastor techniques into your filling for a savory-sweet variation.
Storage & Make-Ahead Guide
Room Temperature Storage: Unfrosted rolls keep in an airtight container for 2-3 days. Frosted rolls are best consumed within 1 day as the frosting can weep slightly. Reheat in a 300°F oven for 5-8 minutes to restore softness.
Refrigerator Storage: Wrap cooled rolls individually in plastic wrap and store in an airtight container for up to 5 days. The cool environment slows staling. Reheat gently before serving.
Freezer Storage: This is where no-yeast rolls shine. Freeze unfrosted rolls in a freezer-safe container for up to 3 months. Thaw at room temperature for 2 hours, then reheat at 325°F for 10-12 minutes. Alternatively, freeze frosted rolls for up to 2 months—thaw overnight in the refrigerator and serve cold or reheat gently. Some bakers prefer eating them cold straight from the freezer.
Make-Ahead Hack: Prepare rolls through step 8 (arrangement in the pan), cover tightly with plastic wrap, and refrigerate overnight. Bake directly from the refrigerator, adding 3-5 minutes to baking time. This works because the dough doesn’t require proofing—the leavening happens during baking.
FAQ
Can I use self-rising flour instead of all-purpose flour with baking powder and baking soda?
Self-rising flour already contains baking powder and salt, so you’d need to adjust. Use 2 cups self-rising flour, omit the baking powder and salt, but keep the baking soda (it’s needed to react with buttermilk’s acid). This works, though you lose some control over leavening power. Stick with all-purpose flour for best results.
Why are my rolls dense?
Overmixing is the primary culprit. Mixing the dough too much develops gluten, creating a tough crumb. Mix only until ingredients are combined. Secondary causes: using old baking powder/soda (they lose potency over time), or not enough buttermilk (dough too dry won’t rise properly). Ensure all leavening agents are fresh.
Can I make these rolls vegan?
Yes! Substitute cold coconut oil for butter, use unsweetened almond milk with apple cider vinegar instead of buttermilk, and omit the egg yolk. Use vegan butter for the filling and a vegan frosting (coconut cream-based or cashew-based). The texture will be slightly different but still tender and delicious.
What’s the difference between baking powder and baking soda in this recipe?
Baking soda (sodium bicarbonate) requires acid to activate—that’s the buttermilk. Baking powder is a mixture of baking soda, acid, and cornstarch; it activates both when wet and when heated. Using both creates more reliable rise and a finer crumb. You can’t substitute one for the other without adjusting acid content.
How do I prevent the cinnamon filling from sinking to the bottom?
Ensure your filling mixture is thick enough (not too much butter). If it’s runny, the filling will migrate during baking. Also, don’t roll too tightly—tight rolling can push filling out. A medium-firm roll works best. Finally, bake at the correct temperature; too-low heat allows filling to sink before the dough sets.
Can I double this recipe?
Absolutely. Double all ingredients and divide between two 9×13 pans. Baking time remains the same. You can also freeze one pan of unbaked rolls for later—just add 2-3 minutes to baking time when going from frozen.
Is there a way to make these rolls healthier?
Substitute half the all-purpose flour with whole wheat pastry flour (not regular whole wheat, which is too dense). Reduce brown sugar by 2 tablespoons and add 1 tablespoon honey or maple syrup to the filling. Use Greek yogurt instead of some buttermilk. These adjustments reduce sugar and add nutrition while maintaining texture. The rolls will be slightly less fluffy but still tender.
Why does the recipe call for an egg yolk instead of a whole egg?
The egg yolk adds richness and fat, which creates tenderness and moisture. The white would add protein and potentially toughness. If you use a whole egg instead, reduce other liquid by 1 tablespoon and add 1 tablespoon extra flour to compensate for the additional liquid.


