Crispy Coconut Cookies: Grandma’s Favorite Recipe
There’s something magical about biting into a warm, crispy coconut cookie fresh from the oven. These delightful treats have been passed down through generations, and for good reason. With their golden-brown edges, tender centers, and irresistible coconut flavor, homemade coconut cookies are a timeless favorite that brings back nostalgic memories of grandma’s kitchen. Whether you’re a seasoned baker or just starting your culinary journey, this classic recipe delivers consistent results every single time.
This comprehensive guide will walk you through every step of creating these beloved cookies from scratch. You’ll discover the secrets to achieving that perfect crispness on the edges while maintaining a slightly chewy interior, learn why certain ingredients matter more than others, and understand the baking science that transforms simple components into extraordinary treats. By the end, you’ll have the confidence and knowledge to make these cookies whenever the craving strikes.
Essential Ingredients for Perfect Coconut Cookies
The foundation of exceptional coconut cookies begins with understanding each ingredient’s role in the final product. Quality ingredients make an enormous difference in flavor and texture, so don’t skimp on the basics.
Butter serves as the primary fat and contributes to the crispy texture. Use unsalted butter at room temperature, which allows it to cream properly with sugar and incorporate air into the dough. Cold or melted butter won’t achieve the same light, fluffy results.
Granulated sugar provides sweetness and helps create the crispy exterior through caramelization during baking. When creamed with butter, sugar crystals create tiny air pockets that contribute to texture. Brown sugar can be substituted partially for added moisture and deeper flavor, though it will make cookies slightly softer.
Shredded coconut is the star ingredient. Use unsweetened, finely shredded coconut for the best results. Sweetened coconut can make cookies overly sweet and may brown too quickly. You’ll find quality coconut at specialty food stores or through King Arthur Baking Company, which offers premium baking ingredients.
Eggs bind ingredients together and add moisture. Use large eggs at room temperature. Vanilla extract enhances the coconut flavor without overpowering it. Pure vanilla extract delivers superior taste compared to imitation varieties.
All-purpose flour provides structure. Baking powder helps cookies rise slightly and creates a lighter crumb. Salt enhances all flavors and is absolutely essential, even though you won’t taste it distinctly.

Equipment You’ll Need
Having the right tools ensures consistent results and makes the baking process more enjoyable. You don’t need expensive equipment, but quality matters.
- Electric mixer (stand or hand mixer) for creaming butter and sugar
- Mixing bowls (at least two, preferably glass or stainless steel)
- Measuring cups and spoons for accuracy
- Baking sheets lined with parchment paper
- Cookie scoop for uniform sizing
- Wire cooling racks
- Oven thermometer to verify temperature accuracy
- Wooden spoon for hand mixing if preferred
An oven thermometer is particularly valuable since many home ovens run hot or cold. This single tool prevents common baking failures and ensures your cookies bake evenly.
Preparation Steps: Building Your Cookie Dough
Success begins before you preheat the oven. Proper preparation and ingredient handling are crucial for achieving that signature crispy texture.
Gather all ingredients and arrange them on your work surface. This practice, called mise en place, prevents forgotten ingredients and keeps you organized. Measure dry ingredients into a small bowl and whisk together to distribute the baking powder and salt evenly.
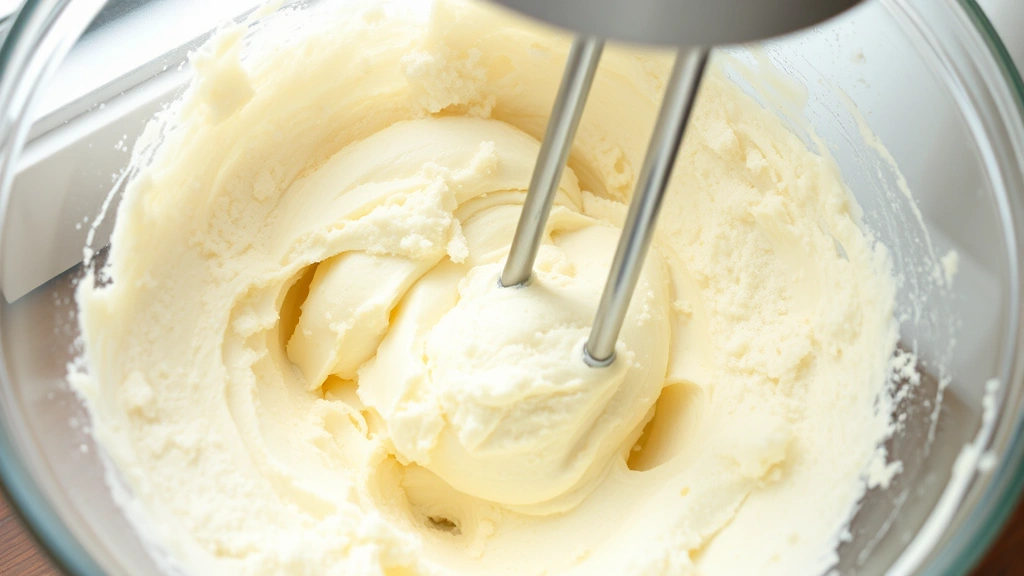
Bring butter to room temperature. This step cannot be overstated. Room-temperature butter creams properly with sugar, incorporating air that creates lift and texture. Cut butter into small cubes and let sit for 20-30 minutes. If you’re in a hurry, cut it into small pieces and it will soften faster. You should be able to easily press your finger into the butter.
Combine butter and sugar. Using an electric mixer on medium speed, beat butter and granulated sugar together for 3-5 minutes. The mixture should become pale, fluffy, and noticeably lighter in color. This creaming process is essential for cookie texture. Scrape down the bowl halfway through to ensure even mixing.
Add eggs one at a time. After creaming, add one egg and beat until fully incorporated before adding the second. Each egg should be completely combined before proceeding. This might take 1-2 minutes per egg. Add vanilla extract and beat for another 30 seconds.
Fold in dry ingredients. Reduce mixer speed to low and gradually add the flour mixture. Mix just until combined—overmixing develops gluten, which makes cookies tough rather than tender. The dough should come together without any visible dry flour streaks.
Gently fold in coconut. Using a spatula or wooden spoon, fold shredded coconut into the dough with as few strokes as possible. Folding rather than mixing prevents deflating the air you’ve incorporated. The dough should be evenly combined with coconut distributed throughout.
Chill the dough. Cover and refrigerate for at least 30 minutes, preferably 2 hours. Chilled dough spreads less during baking, resulting in thicker, crispier cookies. This step also develops flavor as ingredients meld together.
The Baking Process: Achieving Perfect Crispness
Baking is where science and art combine. Understanding oven temperature and timing creates the difference between mediocre and magnificent cookies.
Preheat your oven to 325°F for 15 minutes before baking. Use an oven thermometer to verify actual temperature. Many ovens fluctuate 25-50 degrees from the dial setting.
Line baking sheets with parchment paper. This prevents sticking and ensures even browning on the bottom. Avoid greasing sheets, as this can cause excessive spreading and browning.
Scoop dough consistently. Using a cookie scoop ensures uniform sizes, which means even baking. Scoop dough onto prepared baking sheets, spacing cookies about 2 inches apart. These cookies spread moderately during baking.
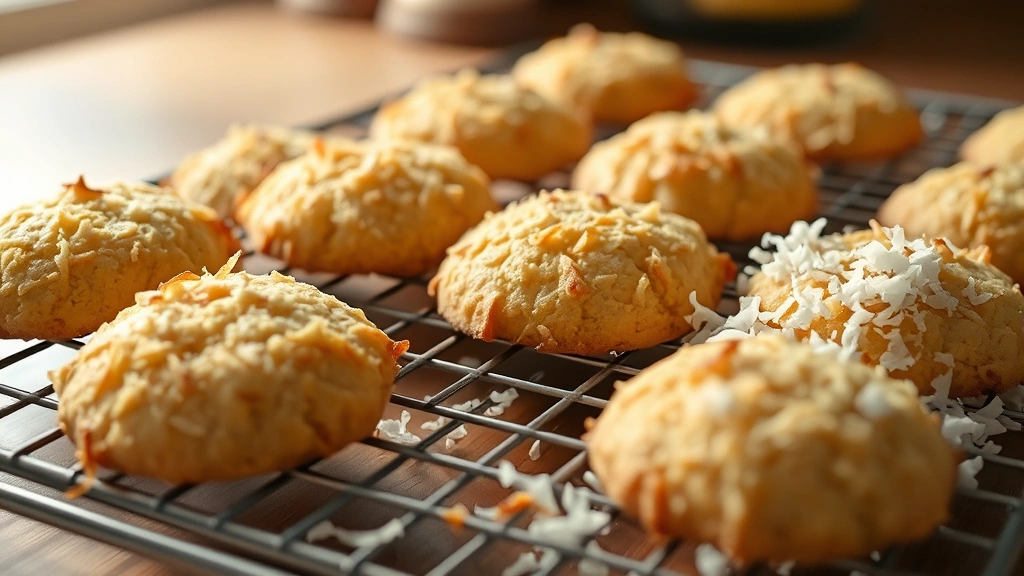
Bake for 12-15 minutes. Cookies should be golden brown around the edges with pale centers. The centers will look slightly underbaked—this is intentional. Residual heat continues cooking them after removal from the oven, and cookies firm up as they cool. Overbaking results in hard, dry cookies.
Rotate baking sheets halfway through. Most home ovens have hot spots. Rotating sheets at the 7-minute mark ensures even browning. If baking two sheets simultaneously, swap their positions.
The baking time varies slightly depending on oven characteristics and cookie size. Start checking at 12 minutes. Cookies are done when edges are light golden brown but centers still appear slightly soft.
Cooling and Storage: Preserving Crispness
How you cool and store cookies dramatically impacts their final texture and shelf life.
Cool on baking sheet for 5 minutes. Freshly baked cookies are extremely fragile. Leaving them on the hot baking sheet for a few minutes allows them to firm up enough to transfer without breaking. The residual heat also completes the baking process, creating that perfect crispy texture.
Transfer to cooling rack. Using a spatula, carefully transfer cookies to a wire cooling rack. The rack allows air to circulate underneath, preventing the bottom from becoming soggy. Cool completely, about 30 minutes, before storing.
Storage matters for maintaining crispness. Store cooled cookies in an airtight container with parchment paper between layers. Keep them in a cool, dry place away from humidity. Properly stored cookies remain crispy for up to one week. You can also freeze baked cookies for up to three months—thaw at room temperature before serving.
If cookies absorb moisture and become soft, briefly reheat them in a 300°F oven for 5 minutes to restore crispness.
Flavor Variations: Making Them Your Own
While the classic recipe is wonderful, creative variations keep these cookies exciting. The basic technique remains the same, with ingredient modifications creating new flavor profiles.
Toasted Coconut Cookies: Toast the shredded coconut in a 350°F oven for 8-10 minutes before adding to dough. Toasting deepens coconut flavor and adds complexity. Watch carefully as coconut browns quickly.
Chocolate Coconut Cookies: Fold 1 cup of mini chocolate chips into the dough along with coconut. The chocolate adds richness while coconut provides texture contrast. This variation pairs beautifully with creamy accompaniments if serving with dessert courses.
Lime Coconut Cookies: Add 2 tablespoons of fresh lime zest and 1 tablespoon of lime juice to the creamed butter mixture. The citrus brightness complements coconut beautifully, creating a tropical flavor profile perfect for warm weather.
Macadamia Coconut Cookies: Add 1 cup of chopped macadamia nuts to the dough. The buttery, slightly sweet nuts pair perfectly with coconut, creating a more luxurious treat reminiscent of Hawaiian flavors.
Almond Coconut Cookies: Replace half the coconut with finely shredded or ground almonds. Add ½ teaspoon of almond extract along with vanilla. This creates a more delicate, nuanced flavor.
Troubleshooting Guide: Common Issues and Solutions
Even experienced bakers encounter occasional challenges. Understanding what went wrong helps you succeed next time.
Cookies spread too much: This usually means the dough was too warm or the butter was too soft. Chill dough longer next time, and ensure butter is cool when creaming with sugar. Also verify your oven temperature with a thermometer.
Cookies are too dry: You likely overbaked them. Remove cookies when edges are golden but centers still look slightly soft. They continue cooking on the hot baking sheet. Slightly underbaked is better than overbaked.
Cookies aren’t crispy: Humidity is likely the culprit. Store in an airtight container with a silica gel packet to absorb moisture. You can also reheat briefly in a 300°F oven. The environment where you live affects results—cookies in humid climates need extra protection.
Cookies are too cake-like: You may have added too much flour or overmixed the dough. Measure flour by spooning into cups and leveling off, rather than scooping directly from the bag. Mix just until combined, not until the dough looks perfectly smooth.
Uneven browning: Your oven likely has hot spots. Always rotate baking sheets halfway through baking. Also verify oven temperature accuracy with a thermometer.
Cookies are too soft: Reduce baking time slightly, or lower oven temperature by 10°F and bake a bit longer. This creates more even baking and better texture development.
Frequently Asked Questions
Bakers often have similar questions about technique and customization. Here are answers to the most common inquiries.
Can I use sweetened coconut instead of unsweetened?
While possible, unsweetened coconut is strongly recommended. Sweetened coconut makes cookies overly sweet and browns more quickly, often burning before the cookies finish baking. If you only have sweetened coconut, reduce the granulated sugar by ¼ cup and watch baking time carefully.
How can I make these cookies vegan?
Replace butter with vegan butter (use a 1:1 ratio), and substitute eggs with flax eggs (1 tablespoon ground flaxseed plus 3 tablespoons water per egg, mixed and left to sit 5 minutes). The results are very similar, though texture may be slightly less crispy. Ensure your baking powder is aluminum-free.
Can I freeze cookie dough?
Absolutely! Scoop dough onto baking sheets, freeze until solid, then transfer frozen scoops to freezer bags for up to three months. Bake from frozen, adding 2-3 minutes to baking time. This is incredibly convenient for fresh-baked cookies whenever you want them.
Why is my kitchen smelling amazing but cookies still look pale?
Coconut has oils that release wonderful aroma before significant browning occurs. Don’t rely on smell alone—watch for golden edges and slightly soft centers. The cookies will crisp up as they cool.
Can I double this recipe?
Yes, doubling works well. However, if doubling, cream butter and sugar in two batches if your mixer is small, as overfilling reduces mixing efficiency. Otherwise, follow the same procedure and timing.
What makes these cookies different from store-bought versions?
Homemade cookies contain fresh, quality ingredients without preservatives or artificial flavors. You control sweetness levels and can customize flavors. The texture is superior because you bake to order rather than sitting in packaging. The satisfaction of homemade baking is incomparable.
How do I know when cookies are perfectly done?
Look for golden-brown edges with pale, soft-looking centers. Gently press the center with your finger—it should feel slightly soft but not raw. Cookies continue baking on the hot sheet, so slightly underbaked is preferable to overbaked.
Can I use coconut oil instead of butter?
This is not recommended. Coconut oil has different properties than butter and produces less crispy results. Butter contains water and milk solids that contribute to texture and flavor that coconut oil cannot replicate. Stick with butter for optimal results.
What’s the best way to ship these cookies?
Pack cooled cookies in layers separated by parchment paper in an airtight container. Fill any gaps with crumpled parchment to prevent movement. Ship in a well-padded box. These sturdy cookies travel better than delicate cookies, but proper packing is still essential.
Understanding the science and technique behind these beloved cookies empowers you to create bakery-quality treats at home. The combination of properly creamed butter and sugar, quality coconut, and precise baking creates cookies that taste like they came from grandma’s kitchen—because now they do. With this comprehensive guide, you have everything needed to master this classic recipe and create memories through baking.


