Cool Whip Desserts: Grandma’s Secret Picks for Timeless Treats
There’s something magical about Cool Whip desserts that transcends generations. My grandmother kept a container of this whipped topping in her freezer year-round, ready to transform simple ingredients into show-stopping desserts that made family gatherings unforgettable. Cool Whip isn’t just a convenient shortcut—it’s a culinary secret weapon that creates impossibly light textures, extends shelf life, and delivers consistent results every single time you bake.
Whether you’re preparing for a potluck, a holiday celebration, or simply craving something sweet on a Tuesday afternoon, Cool Whip desserts offer the perfect balance of simplicity and sophistication. These recipes have been perfected over decades, passed down through family recipe boxes and kitchen conversations. Let me share the treasured Cool Whip dessert recipes that my grandmother swore by, along with modern techniques to elevate them even further.
Why Cool Whip Remains a Kitchen Essential
Cool Whip has been a pantry staple since 1957, and for good reason. Unlike fresh whipped cream, which requires constant whisking and can separate if overworked, Cool Whip maintains its structure throughout the preparation and serving process. This stability makes it ideal for layered desserts that need to sit for hours or even days without weeping or deflating.
The science behind Cool Whip’s success lies in its emulsification. This product contains water, hydrogenated vegetable oil, corn syrup, and stabilizers that create a smooth, uniform texture. When you’re building a chocolate delight recipe, you need components that won’t collapse under the weight of other layers, and Cool Whip delivers precisely that reliability.
Beyond functionality, Cool Whip offers convenience without sacrificing quality. You can thaw it quickly, fold it into fillings, or dollop it directly onto desserts straight from the container. This accessibility democratizes dessert-making, allowing home cooks of all skill levels to create restaurant-quality treats. My grandmother understood this advantage, and she leveraged it to produce memorable desserts without spending hours in the kitchen.
For those interested in understanding the chemistry behind whipped toppings, ScienceDirect’s food science database offers detailed research on emulsification and stabilization techniques in culinary applications.
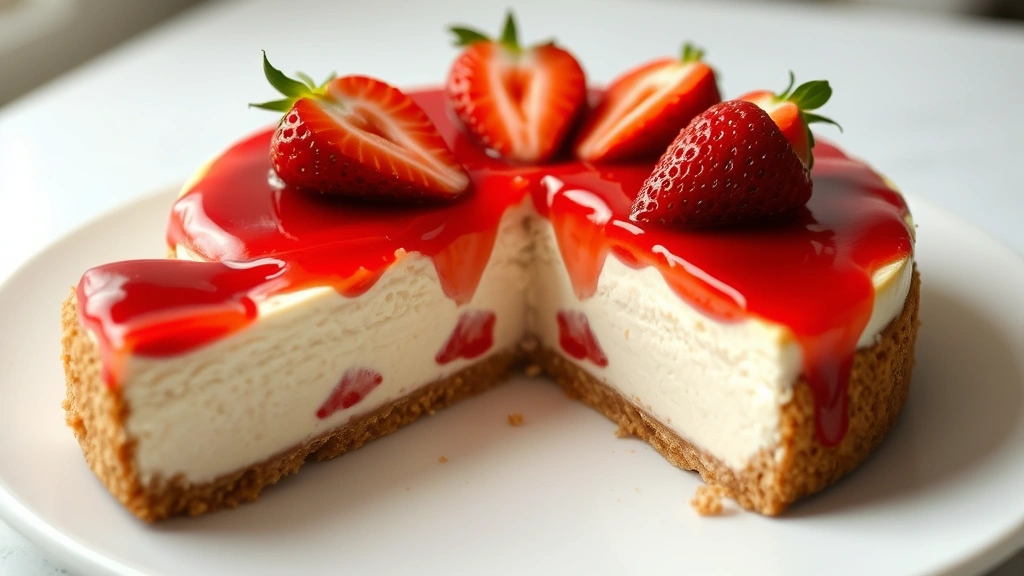
Classic No-Bake Cheesecake Delight
This is the dessert that launched my grandmother’s reputation as a dessert queen. The no-bake cheesecake requires no oven time, no water bath, and no stress. It’s pure indulgence wrapped in simplicity.
Ingredients:
- 2 cups graham cracker crumbs
- 6 tablespoons melted butter
- 3 tablespoons sugar
- 16 ounces cream cheese, softened
- 1 cup powdered sugar
- 2 teaspoons vanilla extract
- 8 ounces Cool Whip, thawed
- 1 cup fresh berries or fruit topping
Instructions:
- Combine graham cracker crumbs, melted butter, and 3 tablespoons sugar in a bowl. Press firmly into the bottom of a 9-inch springform pan.
- Beat softened cream cheese with powdered sugar and vanilla extract until completely smooth and creamy, about 2 minutes.
- Gently fold the thawed Cool Whip into the cream cheese mixture using a rubber spatula. Make broad, sweeping motions rather than vigorous stirring to maintain the airy texture.
- Spread the filling evenly over the crust, smoothing the top with the back of a spoon.
- Refrigerate for at least 4 hours, preferably overnight, until set.
- Top with fresh berries or your preferred fruit topping just before serving.
The key to this dessert’s success is the folding technique. When you incorporate Cool Whip into the cream cheese mixture, you’re creating tiny air pockets that give the cheesecake its signature light, mousse-like texture. Over-mixing deflates these pockets and results in a dense, heavy filling.
This cheesecake pairs beautifully with our cherry crisp recipe for a fruit-forward variation, or you can experiment with different toppings based on seasonal availability.
Strawberry Shortcake Perfection
Strawberry shortcake represents the pinnacle of summer desserts, and Cool Whip is absolutely essential for achieving the proper texture. While some bakers insist on homemade whipped cream, Cool Whip actually holds up better when layered between tender cake and juicy berries.
Components:
For the cake: Use a simple vanilla or wacky cake recipe baked in a round pan. Allow it to cool completely before slicing.
For the filling: Slice fresh strawberries and macerate them in 2 tablespoons of sugar for 30 minutes. This draws out their natural juices and intensifies their flavor.
For assembly: Place the cake layer on a serving plate. Spread a generous layer of thawed Cool Whip over the cake. Add a layer of strawberries with their juices. Repeat with another cake layer if desired. Top with more Cool Whip and a few perfect strawberry halves for garnish.
The beauty of this dessert lies in its flexibility. You can prepare individual shortcakes in glasses for an elegant presentation, or create one large cake to slice at the table. Cool Whip’s stability means the dessert won’t become soggy even if prepared a few hours in advance—a significant advantage over traditional whipped cream.
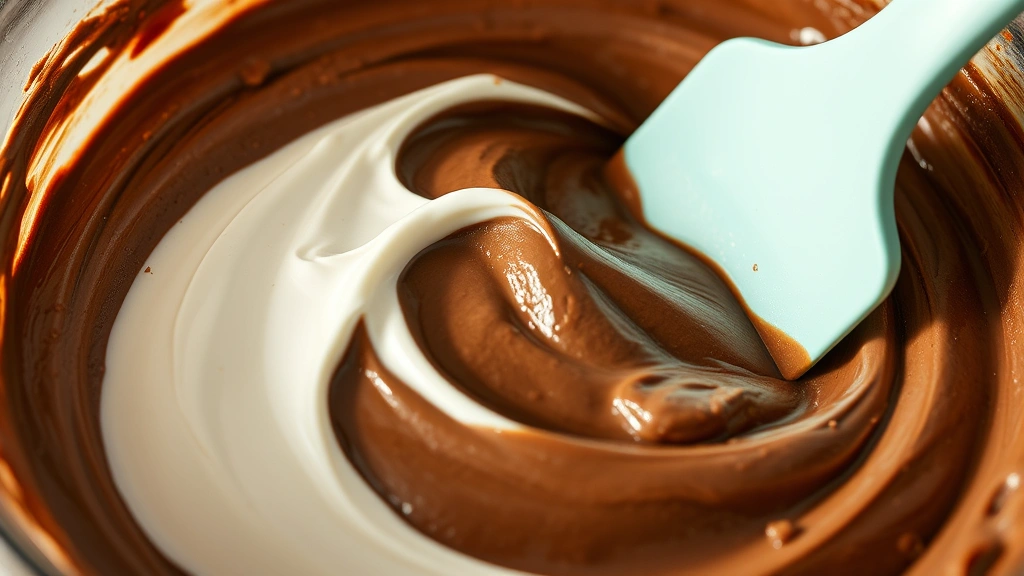
Chocolate Mousse Magic
Chocolate mousse sounds sophisticated and complicated, but Cool Whip transforms it into something achievable for any home cook. This dessert delivers professional results with minimal effort.
Ingredients:
- 6 ounces semi-sweet chocolate, chopped
- 3 tablespoons butter
- 3 tablespoons coffee or hot water
- 3 egg yolks (or 6 tablespoons pasteurized egg yolks for safety)
- 2 tablespoons sugar
- 1 teaspoon vanilla extract
- 12 ounces Cool Whip, thawed
- Cocoa powder for dusting
Method:
- Melt chocolate and butter together over a double boiler or in 30-second microwave intervals, stirring between each interval.
- Add coffee or hot water to the melted chocolate and stir until smooth.
- In a separate bowl, whisk egg yolks with sugar until pale and thick, approximately 2 minutes.
- Fold the chocolate mixture into the egg yolk mixture gently but thoroughly.
- Add vanilla extract and stir to combine.
- Allow the chocolate mixture to cool to room temperature, about 10 minutes.
- Fold the cooled chocolate mixture into the thawed Cool Whip in two additions, being careful not to overmix.
- Divide into serving glasses and refrigerate for at least 2 hours.
- Dust with cocoa powder just before serving.
For additional chocolate inspiration, explore our chocolate delight recipe, which uses similar principles but with different flavor dimensions.
The textural contrast in this mousse—silky chocolate against light, airy Cool Whip—creates an experience that feels indulgent while remaining surprisingly light. This is why my grandmother served it at her most important gatherings.
Layered Dessert Cups
These individual servings are perfect for meal prep and elegant enough for dinner parties. You can customize them based on what you have available.
Basic Layer Formula:
- Bottom layer: Crushed cookies or graham crackers mixed with melted butter
- Middle layer: Pudding, mousse, or curd
- Top layer: Cool Whip and fresh fruit or chocolate shavings
Build these cups in clear glasses so guests can see the beautiful layers. Some favorite combinations include:
Lemon Dream: Graham cracker base, lemon pudding middle, Cool Whip top with candied lemon peel
Cookies and Cream: Crushed Oreo cookies base, vanilla pudding middle, Cool Whip topped with cookie crumbles
Brownie Bliss: Fudgy brownie pieces base, chocolate pudding middle, Cool Whip with chocolate chips
These cups can be assembled up to 24 hours ahead, making them ideal for entertaining. The Cool Whip won’t deflate, and the layers meld slightly to create unified flavor profiles.
Peppermint Bark Dream
This holiday favorite combines chocolate, peppermint, and Cool Whip into an addictive treat that appears on dessert tables from November through December.
Ingredients:
- 12 ounces dark chocolate, chopped
- 8 ounces Cool Whip, thawed
- 2 tablespoons powdered sugar
- ½ teaspoon peppermint extract
- 6 ounces white chocolate, chopped
- ¾ cup crushed candy canes
Preparation:
- Melt dark chocolate and spread it evenly onto a parchment-lined baking sheet. Refrigerate until just set but still slightly tacky, about 10 minutes.
- Combine thawed Cool Whip with powdered sugar and peppermint extract.
- Spread the peppermint Cool Whip mixture over the dark chocolate layer.
- Melt white chocolate and drizzle it over the Cool Whip layer. Use a knife to create swirls.
- Immediately sprinkle crushed candy canes over the white chocolate.
- Refrigerate for at least 2 hours until completely firm.
- Break into irregular pieces and store in an airtight container.
The contrast between cold, creamy Cool Whip and snappy chocolate creates textural interest that keeps people reaching for more. This also makes an excellent gift when packaged in festive containers.

Banana Pudding Elegance
Banana pudding seems simple, but the secret to restaurant-quality results involves proper Cool Whip integration and timing.
Ingredients:
- One box vanilla wafers
- 6 ripe but firm bananas, sliced
- One 3.4-ounce box instant vanilla pudding mix
- 1½ cups cold milk
- 1 teaspoon vanilla extract
- 8 ounces Cool Whip, thawed
- 2 tablespoons powdered sugar
Assembly Process:
- Whisk pudding mix with cold milk and vanilla extract until thickened, about 2 minutes.
- Fold the thawed Cool Whip into the pudding mixture along with powdered sugar.
- In a 9×13-inch dish, create layers: vanilla wafers, banana slices, pudding mixture. Repeat layers, ending with pudding mixture.
- Top with additional crushed wafers if desired.
- Refrigerate for at least 4 hours before serving.
The timing of assembly matters here. If you use a marshmallow recipe to create a marshmallow topping, add it just before serving to prevent it from dissolving into the pudding.
My grandmother’s trick was to reserve some banana slices and arrange them on top of the pudding mixture just before serving, ensuring they stayed visually appealing rather than becoming mushy.
Storage and Make-Ahead Tips
Cool Whip desserts are exceptionally forgiving when it comes to advance preparation, but following these guidelines ensures optimal results:
Thawing Cool Whip: Always thaw it in the refrigerator, never at room temperature. This prevents separation and maintains the texture. A 12-ounce container requires 4-6 hours in the refrigerator.
Folding Technique: Use a rubber spatula and fold gently from the bottom of the bowl upward. This preserves air pockets and prevents deflation. Never use an electric mixer on thawed Cool Whip.
Make-Ahead Timeline: Most Cool Whip desserts can be prepared 24-48 hours in advance. No-bake cheesecakes actually improve after a day as flavors meld. Layered desserts in glasses hold beautifully for 24 hours. Mousse-based desserts are best within 12 hours.
Storage Containers: Keep desserts covered to prevent absorption of refrigerator odors. Plastic wrap works well, or use airtight containers if available.
Freezing Options: Many Cool Whip desserts freeze exceptionally well. Cheesecakes, mousse cups, and peppermint bark freeze for up to 3 months. Thaw overnight in the refrigerator before serving. Avoid freezing desserts with fresh fruit, as the fruit will become mushy upon thawing.
For detailed food safety information regarding storage temperatures and timelines, consult the FDA’s food safety guidelines.
Our thumbprint cookie recipe can be stored separately and crumbled over Cool Whip desserts just before serving for added texture and flavor.
Flavor Variations and Customizations
Once you master these foundational recipes, endless variations emerge. Consider these flavor combinations:
Coffee and Chocolate: Fold 2 tablespoons of instant coffee powder into Cool Whip before mixing with chocolate mousse for sophisticated depth.
Citrus Brightness: Add 1 tablespoon of lemon zest or lime zest to the Cool Whip for cheesecakes and mousse-based desserts.
Spiced Warmth: Incorporate ¼ teaspoon of cinnamon, nutmeg, or cardamom into the Cool Whip for fall-inspired desserts.
Liqueur Enhancement: Stir 1-2 tablespoons of liqueur (Grand Marnier, Kahlúa, Baileys) into thawed Cool Whip for adult desserts.
These variations maintain the structural integrity that makes Cool Whip so valuable while introducing sophisticated flavor dimensions.
For professional-level dessert techniques and flavor pairing strategies, The Culinary Institute of America offers extensive resources on advanced pastry techniques.
Why Grandma’s Secrets Still Matter
In an era of molecular gastronomy and avant-garde plating, there’s something wonderfully grounding about returning to the desserts that brought families together. My grandmother understood that the best desserts aren’t about impressing with complexity—they’re about creating moments of shared joy.
Cool Whip was her secret weapon because it allowed her to focus on what mattered: flavor, texture, and presentation. She could spend time on the details that made desserts memorable rather than wrestling with temperamental whipped cream or complicated techniques.
These recipes represent more than just instructions—they’re invitations to create your own family traditions. Whether you’re preparing these for a holiday gathering, a simple weeknight treat, or a special celebration, you’re participating in a culinary heritage that values accessibility, reliability, and genuine deliciousness.
Start with the classic pecan sandies recipe as a companion to these Cool Whip desserts, creating a complete dessert spread that honors traditional baking alongside no-bake innovations.
FAQ
Can I substitute Cool Whip with homemade whipped cream?
Yes, you can, but results may vary. Homemade whipped cream is less stable and may weep if prepared more than a few hours ahead. For layered desserts that sit for extended periods, Cool Whip performs better. If you prefer homemade, prepare it closer to serving time and add 1 tablespoon of cornstarch per cup of whipped cream for stability.
How do I prevent Cool Whip from deflating when folded into other ingredients?
Use a gentle folding motion with a rubber spatula rather than stirring or whisking. Fold in two additions rather than all at once. Ensure the Cool Whip is properly thawed but still cold. Avoid mixing with warm ingredients that will melt the topping.
Can I make these desserts dairy-free?
Yes, there are dairy-free Cool Whip alternatives available. Coconut whipped cream or aquafaba-based whipped toppings work in most recipes. Note that texture and stability may differ slightly. For cheesecake, use dairy-free cream cheese and adjust sweetness to taste.
How far in advance can I prepare Cool Whip desserts?
Most Cool Whip desserts can be prepared 24-48 hours ahead. No-bake cheesecakes improve after one day. Mousse-based desserts are best within 12 hours. Avoid preparing desserts with fresh fruit more than 12 hours ahead as fruit will release moisture and soften the texture.
What’s the difference between Cool Whip and whipped cream?
Cool Whip contains water, hydrogenated vegetable oil, corn syrup, and stabilizers, while whipped cream is simply cream and air. Cool Whip is more stable, lasts longer, and works better in layered desserts. Whipped cream has a richer flavor but requires careful handling and is best used immediately.
Can I freeze Cool Whip desserts?
Yes, most Cool Whip desserts freeze well for up to 3 months. Thaw overnight in the refrigerator before serving. Avoid freezing desserts containing fresh fruit, as fruit becomes mushy when thawed. Cheesecakes, mousse cups, and chocolate-based desserts freeze exceptionally well.
Is Cool Whip healthier than traditional whipped cream?
Cool Whip and whipped cream have different nutritional profiles. Cool Whip contains fewer calories per serving but includes hydrogenated oils and additives. Whipped cream is higher in calories but contains only natural ingredients. Choose based on your dietary preferences and cooking needs.


