Corn Ribs Recipe: Chef’s Secret Technique for Crispy, Flavorful Results
Corn ribs have become the ultimate vegetarian crowd-pleaser, transforming humble corn into a crispy, finger-licking sensation that rivals traditional meat ribs. This innovative cutting technique exposes more surface area, allowing seasonings and oils to create an irresistible golden crust while keeping the interior tender and juicy. Whether you’re planning a summer barbecue, hosting a dinner party, or simply craving a satisfying side dish, mastering the art of corn ribs will elevate your cooking game.
The beauty of this corn ribs recipe lies in its simplicity and versatility. Unlike complicated meat preparations, corn ribs require minimal ingredients and straightforward technique, yet deliver restaurant-quality results that impress every palate. From charred outdoor grilling to perfectly roasted oven preparations, we’ll explore the chef’s secrets that transform ordinary corn into an extraordinary dish.
Understanding the Corn Ribs Cutting Technique
The foundation of exceptional corn ribs begins with proper cutting technique. This method, popularized by innovative chefs exploring vegetable-forward cuisine, involves cutting corn cobs lengthwise into quarters or halves rather than the traditional cross-section kernels. This approach creates elongated “ribs” that resemble actual ribs in shape and presentation.
To execute this technique correctly, start with fresh corn ears that are firm and full of kernels. Place the corn upright on a cutting board and use a sharp chef’s knife to slice down along the cob, following the natural curves. Aim to cut through the kernels while leaving them attached to the woody core. Each ear typically yields four to six substantial ribs, depending on size and cutting precision.
The advantage of this cutting method extends beyond aesthetics. When you cut corn this way, you dramatically increase the surface area exposed to heat and seasonings. This expanded surface creates more opportunities for caramelization, which develops complex flavors and that coveted crispy exterior. The wooden cob acts as an insulating core, protecting the tender kernels while allowing them to cook gently from the inside out.
Professional chefs emphasize that the quality of your knife matters significantly. A dull blade will crush kernels and damage the cob structure, resulting in uneven cooking. Invest in a sharp 8-inch chef’s knife and maintain it regularly. Before cutting, pat corn dry with paper towels—this moisture removal is crucial for achieving better browning and texture.
Essential Ingredients and Seasonings
While corn ribs shine with minimal seasoning, understanding flavor fundamentals elevates your dish from good to unforgettable. The classic approach combines fat, heat, salt, and acid to create a balanced, memorable experience.
Base fat components: Olive oil serves as the primary vehicle for heat transfer and flavor delivery. Use extra virgin olive oil for finishing, and regular olive oil for cooking at higher temperatures. Melted butter adds richness and promotes browning through the Maillard reaction. Ghee offers a nutty flavor dimension that pairs beautifully with charred corn.
Essential seasonings: Kosher salt is non-negotiable—it amplifies sweetness while preventing bitterness. Fresh cracked black pepper provides warmth and complexity. Garlic powder, onion powder, and smoked paprika create savory depth. For heat, consider cayenne pepper or chili powder. Fresh herbs like cilantro, parsley, and chives add brightness when applied after cooking.
Advanced flavor builders: Nutritional yeast contributes umami and a subtle cheesy note. Cumin and coriander introduce earthy undertones. Lime zest and fresh lime juice brighten the overall profile. Tajín seasoning—a Mexican spice blend—has become wildly popular for corn preparations, offering chili, lime, and salt in perfect harmony.
The beauty of corn ribs is their compatibility with diverse flavor profiles. You might prepare them with Mexican-inspired seasonings one evening, then switch to Italian herb blends the next. This versatility makes them an excellent foundation for experimenting with global cuisines, much like how healthy chicken recipes adapt to various culinary traditions.
Step-by-Step Preparation Guide
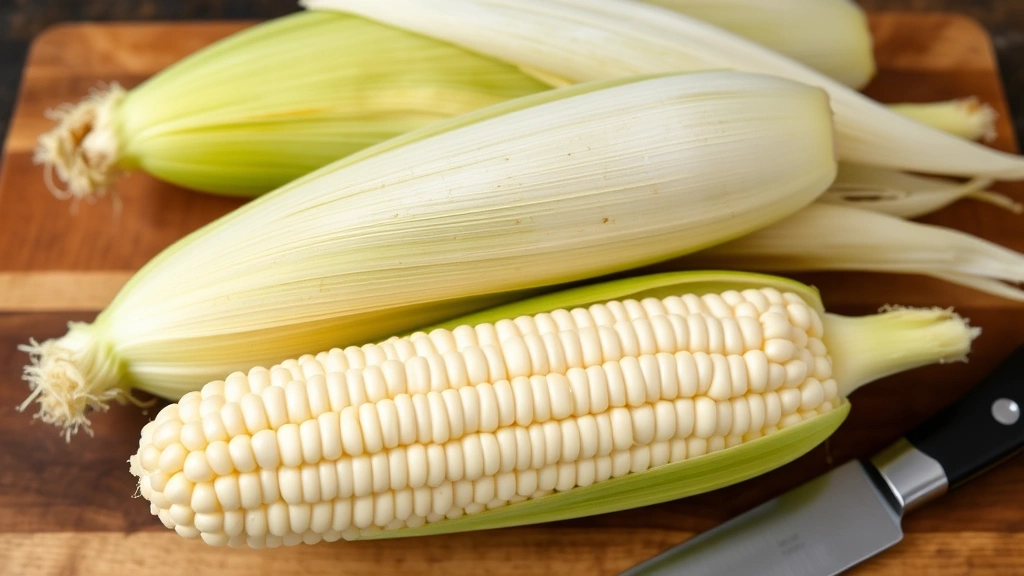
Step 1: Select and Store Corn Choose corn with tightly packed kernels, green husks, and slightly moist silk. Avoid ears with brown patches or wrinkled kernels. Use corn within two days of purchase for optimal sweetness and texture.
Step 2: Prepare Your Workspace Set up a clean cutting board, preferably wooden to prevent slipping. Gather a sharp knife, paper towels, and a large mixing bowl. Having everything organized ensures smooth execution.
Step 3: Remove Husks and Silk Peel back corn husks carefully and remove all silk strands. Rinse under cool water and pat completely dry with paper towels. Moisture inhibits browning and creates steam instead of the desired caramelization.
Step 4: Execute the Cut Stand corn upright on the cutting board. Using smooth, confident strokes, slice downward along the cob, rotating slightly between cuts. Aim for quarter-inch thickness in the kernels. You’ll create four to six rib-like pieces per ear.
Step 5: Prepare the Seasoning Mixture In a shallow bowl, combine olive oil, melted butter, minced garlic, salt, and pepper. This mixture becomes your flavor foundation. Whisk thoroughly to emulsify ingredients.
Step 6: Coat the Ribs Arrange corn ribs on a large platter or baking sheet. Using a pastry brush, generously coat all sides with the seasoning mixture. Ensure even distribution, paying special attention to the exposed cob and kernel faces.
Step 7: Apply Dry Seasonings Once oiled, sprinkle dry seasonings evenly across all ribs. Use your hands to gently press seasonings into the oil, ensuring they adhere properly. This prevents seasoning from falling off during cooking.
Grilling Method for Maximum Flavor
Grilling transforms corn ribs into something magical, creating smoky char that deepens flavor complexity. This method delivers the most authentic “rib” experience and is worth mastering.
Grill Preparation: Preheat your grill to medium-high heat (around 400°F). Clean grates thoroughly with a grill brush to prevent sticking. For gas grills, ensure all burners are functioning evenly. For charcoal grills, arrange coals to create two heat zones—direct and indirect.
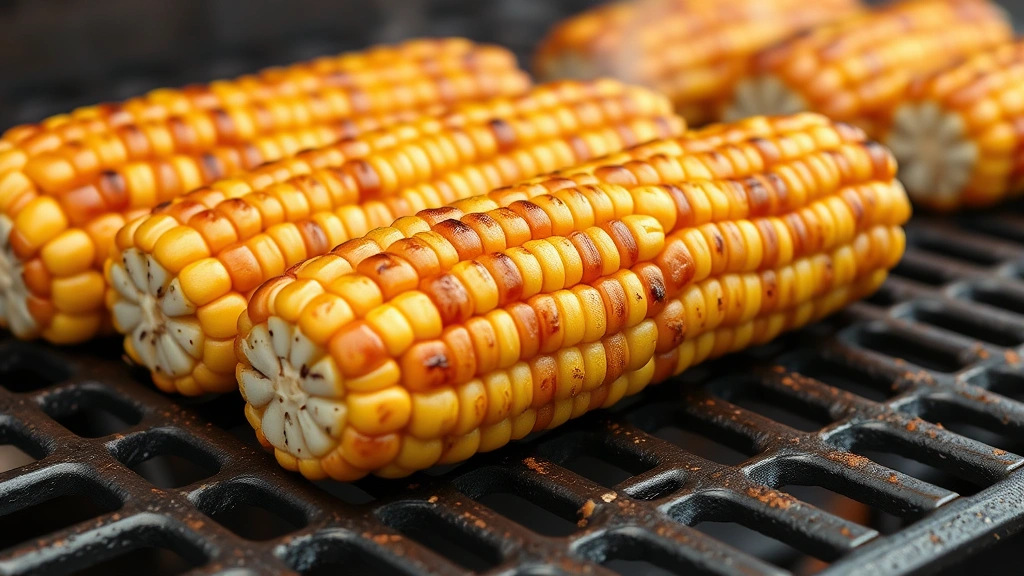
Direct Grilling Phase: Place seasoned corn ribs directly over heat, kernel-side down. This positioning allows kernels to char and develop caramelization. Grill for 4-5 minutes without moving—patience is crucial here. The kernels should develop golden-brown spots.
Rotation and Secondary Cooking: Flip ribs using tongs and grill the cob side for 3-4 minutes. This ensures even cooking and allows the woody cob to absorb smoky flavors. If using a charcoal grill, move ribs to the indirect zone to finish cooking without burning.
Finishing Technique: Check for doneness by piercing a kernel with a fork—it should be tender but not mushy. If kernels need more time, move to lower heat and continue cooking. Total grilling time typically ranges from 8-12 minutes, depending on corn size and grill temperature.
Final Enhancement: During the last minute of grilling, brush ribs with a second coat of herb butter or your chosen sauce. This creates a glossy finish and adds flavor complexity. Fresh herbs applied immediately after grilling stay vibrant and aromatic.
For those exploring complementary grilled dishes, consider pairing corn ribs alongside healthy chicken recipes for a complete grilled menu.
Oven Roasting Alternative
While grilling excels at creating char, oven roasting offers consistency and convenience, making it ideal for year-round preparation regardless of weather.
Oven Setup: Preheat your oven to 425°F. Line a large baking sheet with parchment paper or aluminum foil for easy cleanup. Position the rack in the upper-middle position—this proximity to heating elements promotes browning.
Arrangement and Spacing: Arrange prepared corn ribs in a single layer, kernel-side up. Space them about half an inch apart to allow hot air circulation. Crowding the pan creates steam rather than browning.
Roasting Timeline: Bake for 15-20 minutes, checking halfway through. The kernels should develop golden-brown edges while remaining tender inside. If browning unevenly, rotate the pan and continue cooking.
Broiler Finish: For enhanced browning, switch to the broiler setting for the final 2-3 minutes. Watch carefully to prevent burning. The intense direct heat creates char similar to grilling, though with less smoky depth.
Cooling and Serving: Remove from the oven and let rest for 2-3 minutes. This allows residual heat to finish cooking interior kernels while the exterior sets. Transfer to a serving platter immediately.
Sauce and Topping Ideas
While seasoned oil creates a delicious base, creative sauces and toppings transform corn ribs into signature dishes that reflect your culinary personality.
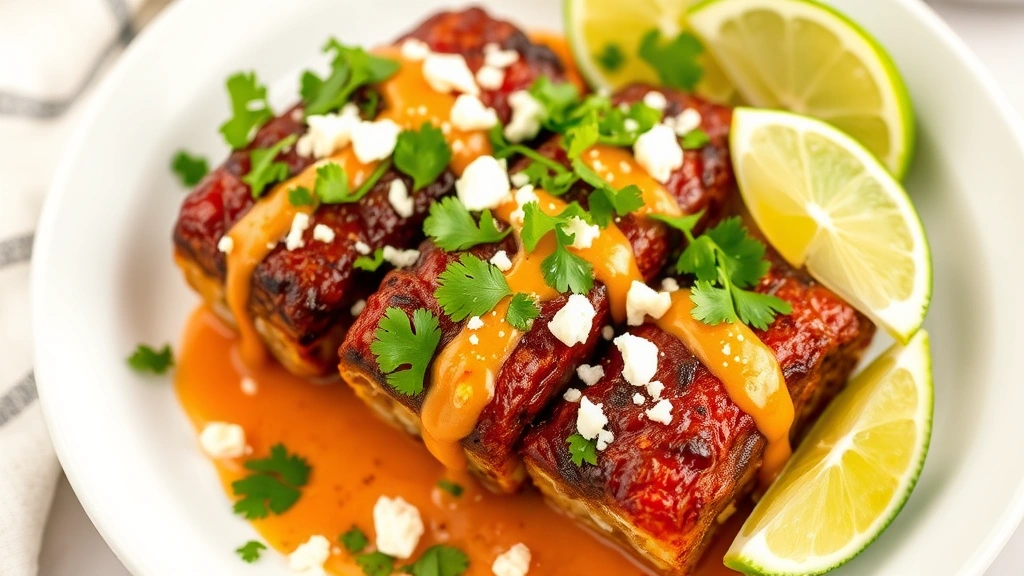
Chipotle Lime Crema: Blend Greek yogurt, chipotle peppers in adobo sauce, lime juice, and garlic to create a smoky, creamy sauce. Drizzle generously and finish with fresh cilantro and cotija cheese for Mexican-inspired elegance.
Garlic Herb Butter: Soften butter with minced garlic, fresh thyme, rosemary, and parsley. Spread this compound butter over hot corn ribs, allowing it to melt and coat every surface. Finish with fleur de sel for textural contrast.
Asian-Inspired Glaze: Combine soy sauce, mirin, sesame oil, and ginger to create an umami-rich glaze. Brush onto ribs during the final cooking minutes. Garnish with sesame seeds, sliced green onions, and a drizzle of sriracha.
Parmesan Truffle Finish: Toss hot corn ribs with truffle oil and freshly grated Parmigiano-Reggiano. Add black truffle shavings if budget allows. This elegant preparation elevates corn to fine dining status.
Smoky BBQ Coating: Create a sauce combining ketchup, apple cider vinegar, smoked paprika, and liquid smoke. Brush onto ribs and finish with crispy bacon bits and fresh thyme.
Spicy Honey Drizzle: Warm honey with hot sauce, melted butter, and cayenne pepper. Drizzle over finished ribs and sprinkle with crushed red pepper flakes. The sweet-spicy-savory balance creates addictive flavor.
Pro Tips from Professional Chefs
Moisture Management: Professional kitchens emphasize that corn moisture is the enemy of browning. Dry corn thoroughly before seasoning. Some chefs even allow cut corn to rest uncovered in the refrigerator for 30 minutes, allowing surface moisture to evaporate further.
Temperature Consistency: Maintain steady grill or oven temperature throughout cooking. Fluctuating heat creates uneven browning and inconsistent texture. Use an instant-read thermometer to verify grill temperature before beginning.
Oil Selection Strategy: According to culinary institutes like the Culinary Institute of America, using oils with higher smoke points prevents degradation at high temperatures. Avocado oil and refined coconut oil work beautifully for grilling applications.
Seasoning Timing: Apply salt immediately before cooking, not hours ahead. Early salting draws moisture to the surface, preventing browning. Conversely, add fresh herbs only after cooking—heat destroys their delicate aromatic compounds.
Grill Maintenance: Clean grates between batches prevents flavor transfer and sticking. Use a grill brush with brass bristles for cast iron grates. For stainless steel, use stainless steel brushes to prevent scratching.
Rest Period Importance: Allow cooked corn to rest for 3-5 minutes before serving. This residual cooking finishes the interior kernels while the exterior crust sets, creating optimal texture contrast.
Batch Cooking: If preparing large quantities, cook in batches rather than overcrowding. This maintains consistent temperature and ensures even browning across all pieces.
Serving Suggestions and Pairings
Corn ribs adapt beautifully to numerous dining contexts, from casual weeknight dinners to elaborate entertaining occasions.
Summer Barbecue Setting: Serve alongside grilled vegetables, fresh salads, and quality proteins. The charred sweetness of corn ribs complements smoky grilled meats perfectly. Set out multiple sauce options, allowing guests to customize their experience.
Vegetarian and Vegan Meals: Position corn ribs as the star protein alternative in plant-based menus. Pair with quinoa salads, roasted root vegetables, and legume-based sides. This creates satisfying, protein-rich plates that impress omnivores and herbivores alike. For additional plant-based inspiration, explore vegan dessert recipes for complete meal planning.
Taco and Bowl Foundations: Shred corn ribs off the cob and incorporate into Mexican-inspired bowls, tacos, and quesadillas. The charred kernels add textural interest and depth to grain bowls and Buddha bowls.
Appetizer Presentation: Serve corn ribs as handheld appetizers at parties and gatherings. The handle-like cob makes them naturally portable. Arrange on platters with various dipping sauces for interactive entertaining.
Salad Integration: Cool cooked corn ribs and cut kernels into salads featuring tomatoes, cucumbers, and fresh herbs. The charred flavor adds sophistication to simple vegetable combinations.
Cheese Course Companion: Serve warm corn ribs alongside soft cheeses, cured meats, and bread. The sweet-savory profile complements cheese boards beautifully.
Wine and Beverage Pairing: Light, crisp white wines like Sauvignon Blanc or Pinot Grigio complement corn ribs’ sweetness without overwhelming delicate flavors. For beer enthusiasts, pale ales and wheat beers provide excellent pairing options. Sparkling beverages cut through richness beautifully.
FAQ
Can I prepare corn ribs ahead of time?
Yes! Cut and season corn ribs up to 4 hours ahead, storing covered in the refrigerator. This advance preparation is convenient for entertaining. Cook just before serving for optimal texture and temperature.
What if my corn ribs are burning on the outside while staying raw inside?
This indicates excessive heat. Lower your grill or oven temperature by 25-50°F and extend cooking time. Alternatively, move ribs to indirect heat zones to finish cooking without additional browning.
Can frozen corn be used for this recipe?
Fresh corn produces superior results due to higher sugar content and better texture. Frozen corn loses structural integrity during freezing and thawing, making it unsuitable for the rib-cutting technique.
How do I store leftover corn ribs?
Store in an airtight container in the refrigerator for up to 3 days. Reheat gently in a 325°F oven for 8-10 minutes to restore crispness. Avoid microwaving, which creates soggy texture.
What causes corn ribs to be tough or chewy?
Overcooking is the primary culprit. Corn kernels become tough when exposed to excessive heat for extended periods. Monitor cooking closely and remove ribs when kernels are tender but still slightly yielding to pressure.
Are corn ribs suitable for dietary restrictions?
Absolutely! Corn ribs are naturally vegan, gluten-free, and vegetarian. They work beautifully in plant-based diets and accommodate various dietary needs. Simply ensure your seasonings and sauces align with specific restrictions.
Can I use canned corn for this preparation?
Canned corn loses structural integrity and cannot be cut into ribs. The kernels become soft and separated from the cob. Always use fresh corn for authentic corn ribs.
What’s the best way to remove corn from the cob after cooking?
Once cooled slightly, hold the cob vertically and use a sharp knife to cut downward, separating kernels. Alternatively, use a corn stripper tool designed specifically for this task.


