Crispy Duck Breast? Chef’s Proven Method
Achieving perfectly crispy duck breast with tender, juicy meat underneath is a culinary skill that separates home cooks from seasoned chefs. The secret lies not in complicated techniques or rare ingredients, but in understanding the science behind rendering fat and controlling heat. Duck breast has a thick layer of fat that, when properly managed, becomes gloriously golden and crackling while keeping the meat pink and succulent inside.
This proven method has been refined in professional kitchens worldwide and is now accessible to anyone willing to follow a few critical steps. Unlike chicken breast recipes that focus on moisture retention, duck breast cooking demands patience with the fat rendering process. The difference between rubbery, greasy duck and restaurant-quality results comes down to temperature control, timing, and one often-overlooked technique that transforms the entire dish.

Why Duck Breast Is Different from Poultry
Duck breast occupies a unique position in the culinary world. Unlike chicken or turkey, duck meat contains significantly more intramuscular fat and myoglobin, giving it a richer flavor profile and darker color similar to red meat. The fat layer on top—called the skin—can be up to half an inch thick, making proper rendering absolutely critical to the final dish.
The composition of duck fat differs fundamentally from chicken fat. Duck fat has a lower melting point and renders more readily when exposed to moderate heat, but it also requires precise temperature control to prevent the meat from overcooking before the skin achieves that desirable crispness. This is why generic poultry cooking methods fail spectacularly with duck breast. You cannot simply roast duck like you would shredded chicken recipes—the approach must be entirely different.
Professional chefs approach duck breast with respect for its fat content rather than fear of it. The fat is not an enemy; it’s the vehicle for flavor and texture. When rendered properly, duck fat creates a protective barrier that keeps the meat moist while the skin becomes crispy. Understanding this relationship is fundamental to mastering the technique.
Essential Equipment and Preparation
Before you begin cooking, gather these essential tools: a heavy-bottomed skillet (stainless steel or cast iron), a meat thermometer for precise doneness, a sharp knife for scoring, and paper towels for moisture management. The skillet is particularly important—it must be heavy enough to distribute heat evenly and conduct temperature accurately. Thin pans create hot spots that result in uneven rendering and burnt skin.
Preparation begins the night before if possible. Remove duck breast from refrigeration and place it on a plate uncovered in the coldest part of your fridge. This allows the skin to dry out gradually, a process that dramatically improves crisping. Dry skin renders fat more efficiently than moist skin, and this simple step makes an enormous difference in final results.
About 30 minutes before cooking, remove the duck breast from refrigeration and let it come to room temperature. This ensures even cooking throughout the meat. While the breast rests, prepare your workspace: have your thermometer ready, paper towels at hand, and any sauce components measured and organized. Professional kitchens call this mise en place, and it prevents scrambling when timing becomes critical.
The Fat-Rendering Technique
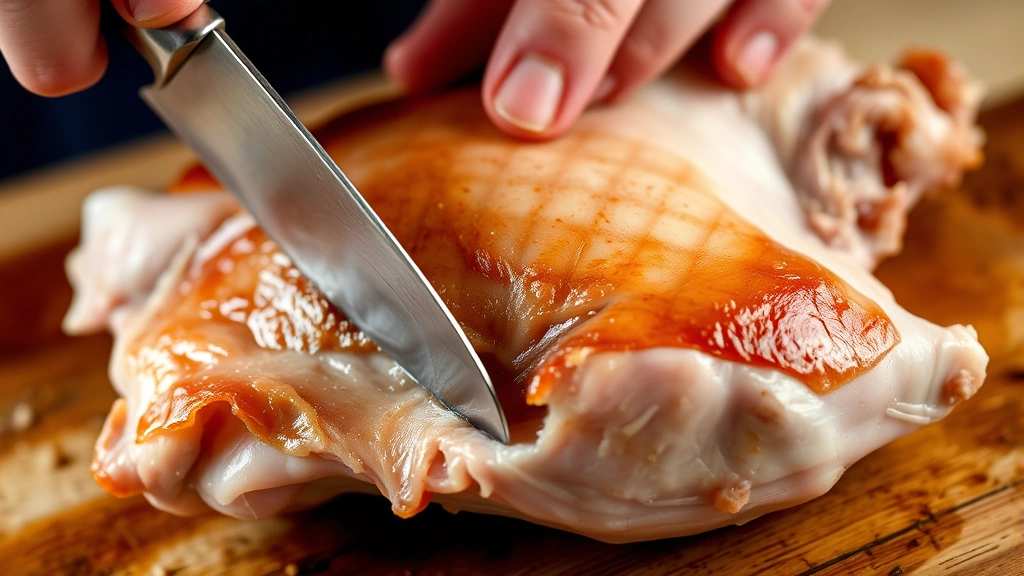
This is where the magic happens. Pat the duck breast completely dry with paper towels—moisture is the enemy of crispness. Using a sharp knife, score the skin in a crosshatch pattern, cutting only through the fat layer and not into the meat below. Space the cuts about a quarter-inch apart in both directions. These cuts create channels for fat to escape and increase surface area for crisping.
Place the duck breast skin-side down in a cold skillet. Yes, cold. This is counterintuitive but absolutely essential. The cold start allows fat to render gradually from a lower temperature, preventing the skin from burning before the fat fully liquefies. Turn the heat to medium (not high—this is crucial), and let the duck sit undisturbed for 8-12 minutes depending on breast size.
During this time, fat will accumulate in the pan. After about 5 minutes, you can begin tilting the pan and using a spoon to baste the skin with its own rendered fat. This accelerates the crisping process and ensures even browning. You’ll notice the skin gradually transforming from pale to golden to deep brown. The entire rendering process should take 12-15 minutes total, and the skin should look almost mahogany when properly rendered.
Pour off most of the rendered fat (save it—duck fat is liquid gold for cooking), leaving just enough to prevent sticking. This is also the moment to increase heat slightly if needed, but resist the urge to crank it up. Patience wins every time with duck.
Temperature Control Secrets
Professional chefs know that duck breast achieves optimal results at an internal temperature of 130-135°F for medium-rare. This temperature range keeps the meat tender and juicy while allowing the exterior to develop that essential crispness. Use an instant-read meat thermometer inserted horizontally into the thickest part of the breast, being careful not to touch bone if present.
The temperature climb accelerates quickly once you flip the breast to the meat side. After rendering the skin, flip the breast meat-side down into the remaining fat. Increase heat to medium-high and cook for 4-6 minutes, depending on thickness and desired doneness. Watch your thermometer carefully—duck meat continues cooking slightly after removal from heat due to carryover cooking.
Many home cooks make the mistake of cooking to 160°F or higher, which results in dry, tough meat. Duck is safe to consume at 160°F according to USDA guidelines, but professional chefs and food safety experts note that whole duck (where bacteria lives on the surface) is safe at lower temperatures when the exterior reaches proper heat. Since we’re cooking a breast with the skin on, the exterior protection is even greater. Target 130-135°F for restaurant-quality results.
Step-by-Step Cooking Method
Step 1: Preparation (Night Before) Remove duck breast from packaging and place on a plate uncovered in the coldest part of your refrigerator. This allows surface moisture to evaporate, which dramatically improves skin crisping.
Step 2: Room Temperature Rest (30 Minutes Before) Remove duck from refrigeration and let it sit at room temperature. Pat completely dry with paper towels. Score the skin in a crosshatch pattern with cuts spaced a quarter-inch apart, cutting only through fat and not into meat.
Step 3: Cold Start Rendering (12-15 Minutes) Place duck breast skin-side down in a cold, heavy-bottomed skillet. Turn heat to medium. Let sit undisturbed for 5 minutes, then begin basting skin with rendered fat using a spoon. Continue cooking until skin is deep golden-brown and most fat has rendered, approximately 12-15 minutes total. Pour off excess fat, reserving for other uses.
Step 4: Meat-Side Searing (4-6 Minutes) Flip duck breast meat-side down into remaining fat. Increase heat to medium-high and cook for 4-6 minutes until internal temperature reaches 130-135°F at the thickest point. Do not overcook.
Step 5: Rest (5-10 Minutes) Transfer duck breast to a warm plate and rest for 5-10 minutes. This allows juices to redistribute throughout the meat, ensuring maximum tenderness.
Resting and Slicing for Maximum Crispness
The resting period is not optional—it’s essential for several reasons. During cooking, muscle fibers contract and push moisture toward the center. Resting allows these fibers to relax and reabsorb moisture throughout the meat. Additionally, the exterior skin continues to firm up during rest, maintaining crispness even after slicing.
Tent the resting duck loosely with foil to keep it warm without trapping steam. The tent should not touch the skin, as condensation will soften the crispy exterior. Five to ten minutes is the ideal rest time; longer than this and the meat begins cooling too much.
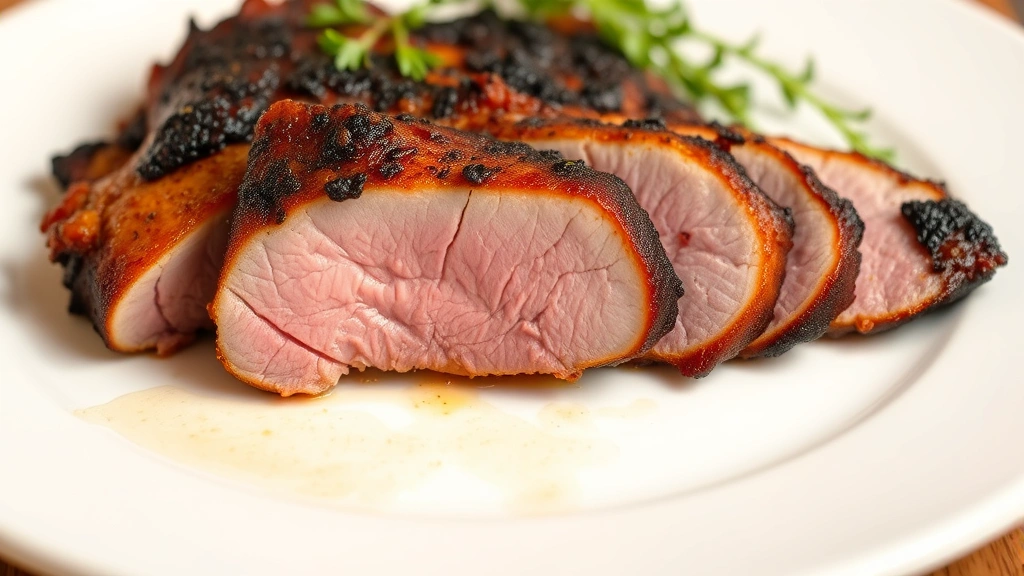
When ready to slice, use a sharp knife and cut against the grain at a slight angle. This technique shortens muscle fibers and makes each bite more tender. Slice to your desired thickness—about a quarter-inch is ideal for showcasing the contrast between crispy skin and tender meat. Arrange slices on a warm plate immediately to prevent heat loss.
The key to maintaining crispness after cooking is avoiding moisture. Never cover finished duck breast tightly, never let it sit in liquid, and never reheat by steaming. If you must reheat, use a dry oven method at low temperature.
Sauce Pairings and Serving Ideas
Duck breast’s rich flavor pairs beautifully with bright, acidic sauces that cut through the fat. Consider an orange sauce approach that complements poultry exceptionally well. The citrus acidity balances duck’s richness while the sauce adds visual appeal and moisture to the plate.
Cherry gastrique is a classic pairing—the sweet-tart flavor of cherries combined with a reduction of vinegar and sugar creates an elegant sauce that restaurants charge premium prices for. The process is simple: combine cherry preserves, red wine vinegar, and a touch of stock, reducing until glossy and coating the back of a spoon.
For Asian-inspired preparations, try a five-spice glaze or hoisin-based sauce. These approaches work particularly well when duck breast is served with steamed bok choy and jasmine rice. The combination echoes traditional Peking duck presentations while remaining accessible for home cooks.
You can also draw inspiration from chipotle honey chicken recipes and adapt them for duck—the smoky-sweet profile works beautifully with duck’s bold flavor. Serve sliced duck breast over a bed of mixed greens dressed with a light vinaigrette, topped with crispy skin pieces and your chosen sauce.
Simple accompaniments let the duck shine: creamed corn, roasted root vegetables, or a silky potato purée all complement the main protein without competing for attention. Avoid heavy cream-based sides that might overwhelm the palate.
Troubleshooting Common Issues
Skin Not Crispy Despite Proper Technique The most common cause is insufficient rendering time or starting with moist skin. Ensure your duck breast has been uncovered in the refrigerator overnight, and always pat dry before cooking. If skin remains soft after 15 minutes of rendering, your heat may be too low. Increase to medium-high for the final 2-3 minutes of skin cooking, watching carefully to prevent burning.
Meat Overcooked and Dry This indicates cooking past 135°F. Use an instant-read thermometer and remove from heat at 130°F. Remember that carryover cooking will raise the internal temperature by 3-5°F after removal from the pan. Alternatively, you may be using a thin-skinned breast that cooks faster than expected; reduce cooking time or use lower heat.
Uneven Browning or Burnt Spots Your skillet may have hot spots. Try rotating the duck breast 180 degrees halfway through the rendering process. Ensure your skillet is heavy-bottomed and preheated evenly. Also verify that your scoring cuts are consistent—deeper scores in some areas can cause uneven rendering.
Fat Splashing During Cooking This is normal but can be minimized by using a skillet with sides at least 2 inches tall and avoiding aggressive heat spikes. A splatter screen can help contain mess without trapping steam. Never cover the pan with a lid during rendering, as this creates steam that softens the skin.
Difficulty Finding Quality Duck Breast Check with specialty butchers, Asian markets, or online purveyors like D’Artagnan who specialize in game and poultry. Frozen duck breast works exceptionally well if thawed slowly in the refrigerator overnight. Avoid pre-packaged duck from conventional supermarkets when possible, as quality varies significantly.
FAQ
Can I cook duck breast without scoring the skin?
While technically possible, scoring dramatically improves results. The cuts allow fat to render more efficiently and create additional surface area for crisping. Unscored duck often results in areas of rubbery skin. If you prefer not to score, at least prick the skin all over with a fork.
What internal temperature is safe for duck breast?
The USDA recommends 160°F for all poultry, but professional chefs and food safety experts note that duck breast with skin on is safe at lower temperatures (130-135°F) because bacteria lives on the surface, which reaches proper temperatures. If you’re uncomfortable with this, cook to 140-145°F for a compromise between safety and tenderness.
Can I use duck breast in recipes like lettuce wraps?
Absolutely. Shredded crispy duck breast works wonderfully in lettuce wrap preparations. Cook using this method, then shred the meat and combine with sauce. The crispy skin pieces add excellent texture to the filling.
How do I store leftover duck breast?
Keep leftover duck in an airtight container in the refrigerator for up to three days. Reheat gently in a low oven (300°F) for 10-15 minutes to warm through without drying out. Do not use a microwave, which will toughen the meat and soften the skin.
Can I freeze duck breast?
Yes. Wrap tightly in plastic wrap and then foil, and freeze for up to three months. Thaw slowly in the refrigerator overnight before cooking. Frozen duck actually works beautifully for this method since the freezing process helps break down muscle fibers slightly, potentially improving texture.
What’s the difference between duck breast and chicken breast cooking?
Duck breast has significantly more fat and requires the cold-start rendering technique to properly crisp the skin. Chicken breast focuses on retaining moisture and cooking quickly, while duck emphasizes fat rendering and controlled heat. The cooking philosophies are fundamentally different.
Can I achieve crispy skin in the oven instead of stovetop?
You can combine methods: render on the stovetop for 10 minutes, then transfer skin-side up to a 400°F oven for 6-8 minutes to finish cooking the meat while the skin crisps further. This hybrid approach works well for larger breasts or when cooking multiple breasts simultaneously.


