
Ginger Cookies Recipe: Grandma’s Secret Method
There’s something magical about biting into a warm ginger cookie fresh from the oven—that perfect balance of spicy warmth, buttery softness, and subtle sweetness that takes you straight back to childhood. My grandmother’s ginger cookies recipe has been passed down through three generations, and today I’m sharing her carefully guarded secrets that make these cookies absolutely irresistible. These aren’t your typical thin, crispy gingersnaps; they’re chewy on the inside with delightfully crinkled edges, infused with layers of ginger flavor that dance on your palate.
What makes my grandmother’s method different from standard ginger cookie recipes is her understanding of how spices work together and her technique for developing deep, complex flavors. She taught me that ginger cookies are more than just a simple dessert—they’re a celebration of warming spices and baking chemistry. This comprehensive guide will walk you through every step, explaining the reasoning behind each ingredient and technique so you can master this timeless recipe and create cookies that rival any bakery.
Essential Ingredients for Authentic Ginger Cookies
The foundation of exceptional ginger cookies starts with understanding your ingredients. My grandmother always said that quality ingredients are non-negotiable, and after decades of baking, I completely agree. Let me break down each component and explain why it matters.
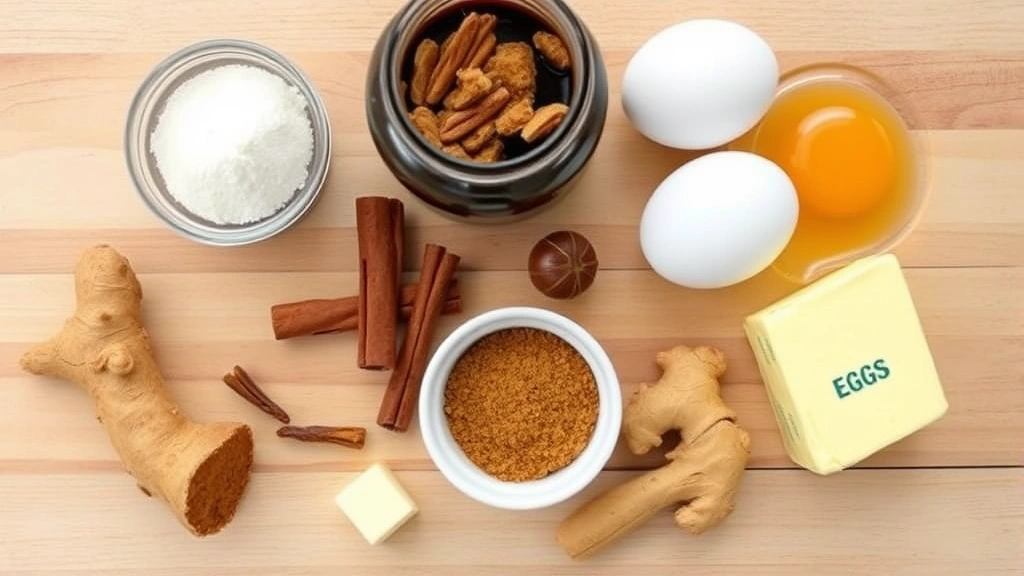
The Dry Ingredients: You’ll need two and one-quarter cups of all-purpose flour, which provides the structure. For the leavening agents, use one teaspoon of baking soda and one-half teaspoon of baking powder. The baking soda reacts with the molasses to create lift, while the baking powder provides additional rise. Together, they create that tender, slightly chewy texture we’re after.
The spice blend is where magic happens. You need two tablespoons of ground ginger (this is crucial—don’t skimp), one and one-half teaspoons of ground cinnamon, one-half teaspoon of ground cloves, one-quarter teaspoon of ground nutmeg, and one-eighth teaspoon of black pepper. Yes, black pepper! This secret ingredient adds depth and a subtle kick that most people can’t identify but absolutely love. The combination creates a sophisticated spice profile that’s warm without being overwhelming.
The Wet Ingredients: Unsalted butter (one cup, softened to room temperature) is essential because it allows you to cream properly without salt interference. One cup of granulated sugar and three-quarters cup of packed brown sugar create the right sweetness and texture. Brown sugar adds moisture and a subtle molasses note. Most importantly, you need three-quarters cup of unsulfured molasses—not blackstrap, as it’s too intense. Molasses provides moisture, color, and that distinctive ginger cookie flavor. One large egg binds everything together and adds richness.
Finally, one-half teaspoon of sea salt brings all flavors into focus. Serious Eats has excellent resources on how salt enhances baking chemistry, which is worth exploring if you want to understand flavor development deeper.

Preparation and Spice Selection
Before you begin mixing, proper preparation sets you up for success. My grandmother taught me that mise en place—having everything measured and ready—prevents mistakes and ensures consistent results.
Spice Selection and Freshness: This cannot be overstated: use fresh spices. Ground spices lose potency after six months, so check your containers. If your ground ginger smells faint or stale, it’s time to replace it. Whole spices last longer, so consider buying whole cloves and nutmeg, then grinding them yourself with a spice grinder. The flavor difference is remarkable. For ginger, fresh ground is superior, but quality ground ginger works beautifully if that’s what you have.
Before adding spices to your flour mixture, I recommend toasting them gently in a dry skillet over low heat for about one minute. This awakens the essential oils and deepens their flavor. You’ll notice the aroma becomes more vibrant and complex. This step is grandmother’s secret that elevates these cookies from good to extraordinary.
Measuring Accurately: Use a kitchen scale if possible, as it’s more accurate than volume measurements. If measuring by cups, spoon flour into measuring cups and level with a knife—don’t scoop directly from the bag, as this compacts the flour. For brown sugar, pack it firmly into the measuring cup.
Ensure your butter is genuinely softened to room temperature. It should yield slightly to pressure but still hold its shape. Cold butter won’t cream properly, and overly soft or melted butter changes the texture. Leave it on the counter for about thirty minutes before starting.
The Secret Mixing Method
This is where grandmother’s technique truly shines. Most bakers rush through mixing, but she understood that proper creaming develops structure and texture.
Creaming the Butter and Sugar: Place softened butter in a large mixing bowl. Using an electric mixer on medium speed, beat for about one minute until it’s pale and fluffy. This creaming process incorporates air, which helps the cookies rise and creates a lighter crumb. Gradually add granulated sugar, then brown sugar, beating for three to four minutes total. The mixture should look pale, fluffy, and almost whipped. This takes longer than most recipes suggest, but it’s essential.
Adding the Molasses and Egg: Add molasses slowly while mixing on low speed. Molasses is thick, so add it in three additions, mixing after each addition until fully incorporated. The mixture will look separated and broken—this is normal. Add the egg and beat on low speed for about one minute until the mixture comes back together. It should look smooth and well-combined, though slightly lighter than before.
Combining Dry Ingredients: In a separate bowl, whisk together flour, baking soda, baking powder, salt, and your toasted spices. Whisking ensures even distribution, which is crucial for consistent flavor in every cookie. Create a well in the center of the wet ingredients and add the dry mixture in two additions, stirring on low speed just until combined. Do not overmix at this stage—overmixing develops gluten, which makes cookies tough. The dough should come together but still look slightly shaggy.
Cover the bowl with plastic wrap and refrigerate for at least two hours, preferably overnight. This resting period allows flour to fully hydrate, spices to meld with the dough, and flavors to develop. Cold dough also spreads less during baking, creating thicker, chewier cookies. This patience is grandmother’s most important secret.
Baking Techniques and Temperature Control
Proper baking technique determines whether your cookies are perfect or disappointing. Preheat your oven to 350°F (175°C) and position racks in the upper and lower thirds. Line baking sheets with parchment paper—this prevents sticking and ensures even browning.
Shaping the Cookies: Remove dough from the refrigerator and let it sit at room temperature for five minutes to soften slightly. Using a one-and-one-half inch cookie scoop or tablespoon, portion dough onto prepared baking sheets, spacing them about two inches apart. These cookies spread moderately, so proper spacing prevents merging.
Here’s grandmother’s finishing touch: prepare a small bowl with one-quarter cup of granulated sugar. Lightly wet your fingertips, dip them in sugar, and gently press the top of each dough ball, creating a slight depression. This sugar coating adds texture and visual appeal while encouraging slight cracking during baking, which is characteristic of authentic ginger cookies.
Baking Process: Bake for ten to twelve minutes. The cookies should look set around the edges but still slightly soft in the center—this is key to achieving the chewy texture. They’ll continue cooking on the hot baking sheet after removal from the oven. If you bake until they look completely done, they’ll overbake and become hard. The centers should jiggle very slightly when you gently shake the baking sheet.
Rotate the baking sheets halfway through baking for even browning. If using two sheets simultaneously, swap their positions to ensure both bake at the same rate. Remove from the oven and let cookies rest on the baking sheet for three minutes before transferring to a wire cooling rack. This resting period allows them to set without becoming brittle.
For chocolate variations, consider making chocolate truffles as a complementary dessert that showcases similar baking principles.
Storage and Shelf Life
Proper storage keeps your ginger cookies fresh and delicious. Once completely cooled, store them in an airtight container at room temperature. Place parchment paper between layers to prevent sticking. These cookies maintain their texture for up to one week, though they’re best consumed within three to four days.
If you prefer softer cookies, add a slice of bread or half an apple to the container. The moisture from these items transfers to the cookies, keeping them chewy. Replace the bread or apple every two days. For crispier cookies, store them in a container with a paper towel, which absorbs excess moisture.
These cookies freeze beautifully for up to three months. Freeze them in a single layer on a baking sheet, then transfer to freezer bags. You can also freeze the dough for up to two months. Scoop dough onto a baking sheet, freeze solid, then transfer to freezer bags. Bake frozen dough directly from the freezer, adding one to two minutes to the baking time.
Delicious Variations and Flavor Combinations
Crystallized Ginger Addition: For extra ginger intensity, chop one-half cup of crystallized ginger into small pieces and fold into the dough before refrigerating. This adds chewy pockets of concentrated ginger flavor and a sophisticated texture.
White Chocolate Ginger Cookies: Fold one cup of white chocolate chips into the prepared dough. White chocolate complements ginger beautifully, adding sweetness and richness without competing with spice flavors.
Spiced Ginger Cookies with Cardamom: Add one-half teaspoon of ground cardamom to your spice blend. Cardamom is a sophisticated spice that adds floral notes and complexity, elevating these cookies for special occasions.
Ginger Cookies with Lemon Zest: Add two teaspoons of fresh lemon zest to the wet ingredients. The brightness of lemon contrasts beautifully with warm ginger spices, creating a more refreshing cookie.
For other flavor-forward recipes, explore how similar baking principles apply to pepper jelly, which also balances heat with sweetness in interesting ways.
Double Ginger Intensity: Use one tablespoon of minced fresh ginger in addition to ground ginger. Fresh ginger adds brightness and a slightly spicy bite that complements the warm earthiness of ground ginger beautifully.
Espresso Ginger Cookies: Add one tablespoon of instant espresso powder to the dry ingredients. Coffee enhances chocolate and spice flavors, creating a more complex, sophisticated cookie perfect for after-dinner service.
FAQ
Why are my ginger cookies spreading too much?
Excessive spreading typically means your dough was too warm or your oven temperature was too low. Ensure dough is properly chilled before baking, and verify your oven temperature with an oven thermometer. Additionally, check that your baking soda and baking powder haven’t expired, as old leavening agents don’t provide sufficient lift.
Can I use blackstrap molasses instead of unsulfured molasses?
Blackstrap molasses is much more intense and bitter. While you can substitute it, reduce the amount to one-half cup and increase brown sugar to one cup to balance the flavor. The cookies will taste different, though still delicious—more robust and less subtle.
What’s the difference between these cookies and gingersnaps?
Gingersnaps are thin, crispy cookies with a snappy texture. Grandmother’s ginger cookies are thicker and chewy with a crinkled top. The difference comes from baking time and dough thickness. These cookies are underbaked slightly to maintain chewiness, while gingersnaps bake until completely crispy.
How can I make these cookies dairy-free?
Substitute butter with an equal amount of dairy-free butter alternative. Ensure it’s a 1:1 baking substitute, not a spread. The egg can be replaced with a flax egg (one tablespoon ground flaxseed mixed with three tablespoons water, let sit five minutes). The results are slightly different in texture but still delicious.
Can I double this recipe?
Yes, doubling works well. Use a stand mixer for easier mixing of larger quantities. The baking time remains the same, though you may need to bake in multiple batches. Ensure your oven maintains consistent temperature when baking multiple sheets simultaneously.
Why is resting the dough overnight important?
Resting allows flour to fully hydrate, which improves texture and structure. It also allows spices to fully integrate with the dough, deepening flavor. The cold dough spreads less during baking, creating thicker, chewier cookies. This patience truly makes a difference in the final product.
What if I don’t have molasses?
Molasses is difficult to substitute directly because it provides moisture, flavor, and color. You could try dark honey or a combination of honey and brown sugar, but the flavor and texture will differ noticeably. Molasses is inexpensive and shelf-stable, so it’s worth purchasing for authentic results.
How do I know when cookies are perfectly done?
Perfectly baked ginger cookies should look set around the edges but still slightly soft in the center. When you gently shake the baking sheet, the centers should jiggle very slightly. They’ll continue cooking on the hot sheet after removal from the oven. Err on the side of underbaking slightly—you can always bake a bit longer next time if needed.
Understanding proper baking principles, like those explored in King Arthur Baking Company’s resources, helps you troubleshoot and improve your baking consistently. These ginger cookies represent the culmination of baking knowledge passed down through generations, and mastering them opens doors to understanding countless other baked goods.


