Baking gluten-free bread at home doesn’t have to be intimidating or complicated. With the right recipe, techniques, and understanding of how gluten-free flours behave, you can create a delicious loaf that rivals anything from a bakery. This proven recipe comes from years of testing and refinement, incorporating insights from professional bakers who’ve mastered the art of gluten-free baking. Whether you’re newly diagnosed with celiac disease, managing gluten sensitivity, or simply exploring dietary options, this guide will walk you through every step to achieve bakery-quality results in your own kitchen.
The key to successful gluten-free bread lies in understanding that you’re not just replacing wheat flour with a gluten-free alternative—you’re creating an entirely different structure. Without gluten’s elasticity and strength, gluten-free doughs require different hydration levels, binding agents, and handling techniques. This recipe uses a carefully balanced blend of flours that mimics traditional bread’s texture while providing superior taste and structure. You’ll discover that homemade gluten-free bread can be moister, more flavorful, and significantly more satisfying than most commercial options.
Why Gluten-Free Bread Matters
Creating homemade bread that’s gluten-free addresses a growing dietary need affecting millions worldwide. Beyond health considerations, many home bakers discover that making gluten-free bread from scratch offers superior quality compared to store-bought alternatives. Commercial gluten-free breads often rely heavily on preservatives, gums, and fillers to achieve acceptable texture—ingredients that home bakers can eliminate entirely.
Gluten-free baking also opens creative possibilities. Without the constraints of traditional gluten development, you can experiment with whole grains, seeds, and alternative flours that would be impossible in conventional bread baking. The moisture content in gluten-free dough actually allows for more flavorful additions and extended shelf life when properly stored. Understanding this foundational difference transforms your approach from “replacing” gluten to “reimagining” bread entirely.
Understanding Your Ingredients
This recipe’s success depends on using quality ingredients in precise proportions. Let’s break down each component and understand its role:
- Brown Rice Flour (1 cup): The foundation of this blend, providing mild flavor and neutral taste. Brown rice flour contains the bran, offering more nutrition than white rice flour while contributing subtle earthiness.
- Tapioca Starch (¾ cup): Creates lightness and elasticity, mimicking some of gluten’s structural properties. Tapioca starch gelatinizes during baking, helping trap moisture and create a tender crumb.
- Sorghum Flour (½ cup): Adds nutritional depth and subtle sweetness. This ancient grain flour provides fiber and minerals while contributing to a more complex flavor profile.
- Xanthan Gum (1½ teaspoons): Acts as the binder that gluten would normally provide. This natural thickener creates elasticity and helps the dough hold together. Omit if your flour blend already contains xanthan gum.
- Warm Water (1¼ cups): Gluten-free doughs require more hydration than traditional bread. The extra moisture compensates for the lack of gluten’s water-binding capacity.
- Active Dry Yeast (2¼ teaspoons): One standard packet. Ensure your yeast is fresh by checking the expiration date—expired yeast won’t provide adequate rise.
- Honey (2 tablespoons): Feeds the yeast and adds subtle sweetness. Honey also contributes to browning and moisture retention.
- Sea Salt (1½ teaspoons): Enhances flavor and controls fermentation rate. Sea salt contains trace minerals that improve overall bread quality.
- Olive Oil (2 tablespoons): Enriches the dough, improving texture and moisture. Oil also extends shelf life by slowing staling.
When sourcing these ingredients, consider purchasing from specialty baking suppliers or King Arthur Baking Company, known for exceptional gluten-free flour blends and baking education. Their testing standards ensure consistency across batches.
Step-by-Step Instructions
Preparation Phase (5 minutes)
Begin by gathering all ingredients and equipment. This recipe requires a stand mixer with a dough hook attachment, as hand-mixing gluten-free dough is extremely difficult. Preheat your oven to 375°F (190°C) and prepare a loaf pan by lining it with parchment paper, allowing paper to extend above the edges for easy removal.
Measure your dry ingredients into a small bowl: brown rice flour, tapioca starch, sorghum flour, xanthan gum, and salt. Whisk these together thoroughly, breaking up any clumps in the xanthan gum. This ensures even distribution of the binder throughout your dough.
Activation Phase (10 minutes)
Pour warm water (110°F/43°C is ideal) into your stand mixer bowl. Sprinkle yeast over the water and add honey. Let this sit for 5 minutes until foamy—this confirms your yeast is alive and active. If no foam appears, your yeast is dead and you’ll need to start over with fresh yeast.
Once foamy, add olive oil to the yeast mixture and stir gently. Add your whisked dry ingredients to the wet mixture, stirring with a wooden spoon until roughly combined. This prevents flour from flying everywhere when you attach the mixer.
Mixing Phase (8-10 minutes)
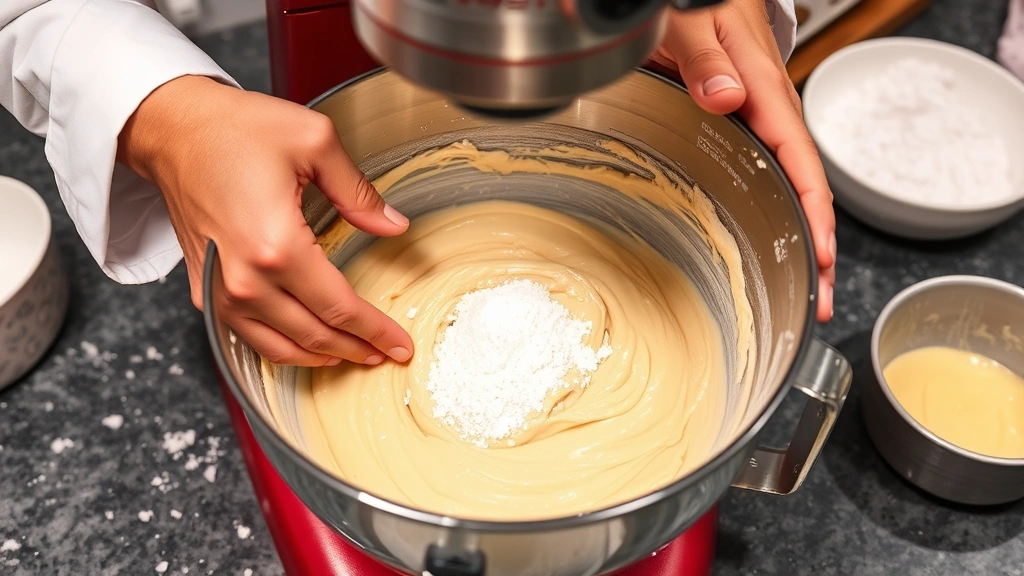
Attach the dough hook to your stand mixer and mix on medium-low speed for 8-10 minutes. Gluten-free dough won’t form a ball like traditional dough—instead, it will resemble thick cake batter with a slight sheen. The mixture should pull away from the bowl’s sides slightly while remaining soft and sticky.
Stop the mixer halfway through and scrape down the bowl with a spatula, ensuring no dry flour remains at the bottom. The dough should look smooth and cohesive when finished mixing, with no visible lumps of flour.
First Rise Phase (60-90 minutes)
Transfer your dough to the prepared loaf pan, smoothing the top with a wet spatula. The dough will be quite wet—this is correct. Cover the pan with a damp kitchen towel or plastic wrap, creating a warm environment for rising.
Place the covered pan in a warm location (around 75°F/24°C) for 60-90 minutes until the dough rises about one inch above the pan’s rim. Unlike traditional bread, gluten-free dough won’t double in volume—look for a modest, steady rise instead. If your kitchen is cold, place the pan in an unheated oven with the light on, creating an ideal rising environment.
Baking Phase (40-45 minutes)
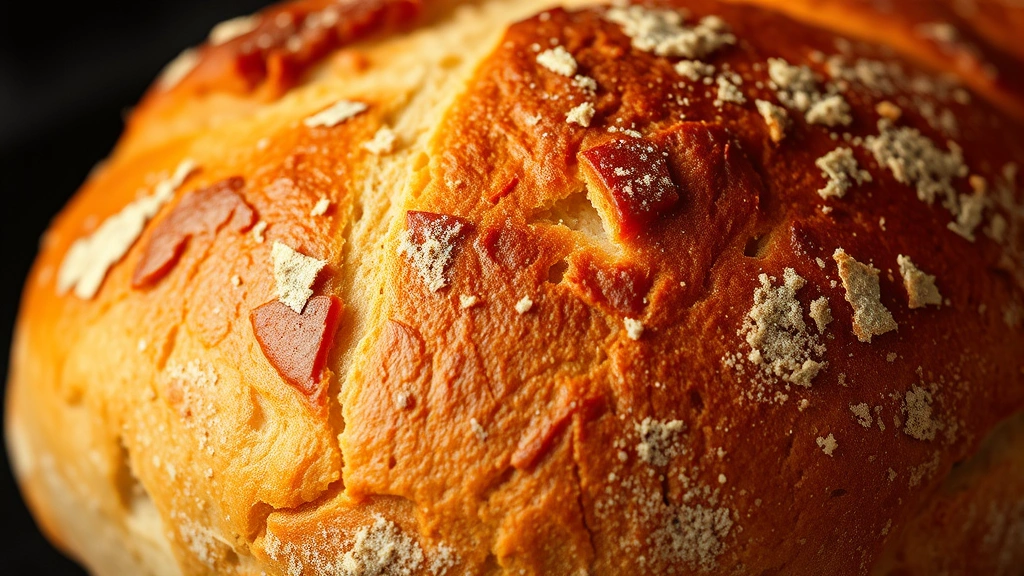
Remove the damp towel and place the pan directly into your preheated 375°F (190°C) oven. Bake for 40-45 minutes until the top is golden brown and a thermometer inserted into the center reads 205-210°F (96-99°C). The internal temperature is crucial—it indicates complete starch gelatinization and proper moisture evaporation.
If the top browns too quickly, tent it loosely with aluminum foil for the final 15 minutes of baking. Every oven varies, so watch your loaf carefully during the last 10 minutes.
Cooling Phase (Critical!)
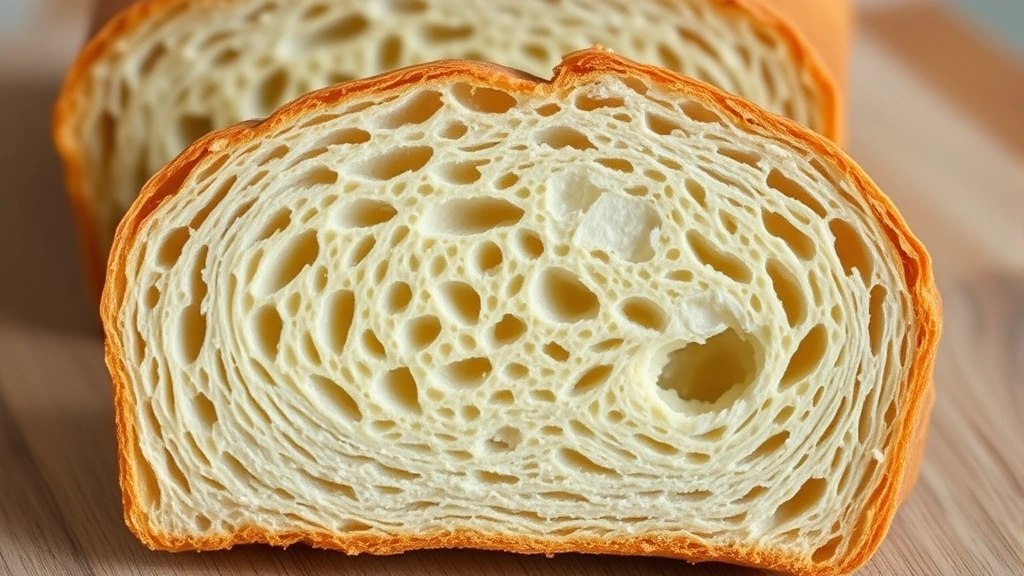
Remove the bread from the oven and let it cool in the pan for 15 minutes. This allows the crumb structure to set properly. Turn the loaf out onto a wire rack and cool completely—at least 2-3 hours—before slicing. Cutting warm gluten-free bread results in a gummy texture; the cooling period is essential for proper texture development.
Professional Baking Tips
Understanding these professional techniques separates successful gluten-free baking from disappointing attempts:
- Water Temperature Matters: Yeast activation depends on precise water temperature. Too cold (below 105°F), and yeast won’t activate. Too hot (above 115°F), and you’ll kill the yeast. Use an instant-read thermometer for accuracy.
- Don’t Skip the Cooling Period: This is where many home bakers fail. Gluten-free bread’s crumb structure continues setting as it cools. Slicing too early traps steam, creating a gummy interior.
- Invest in a Good Scale: Gluten-free baking demands precision. Volume measurements (cups) vary significantly based on how you scoop flour. A digital scale ensures consistency across batches. Weigh flour at 125 grams per cup for accuracy.
- Use Quality Xanthan Gum: This ingredient is non-negotiable. Cheap xanthan gum can create unpleasant flavors or inconsistent results. Brands like Bob’s Red Mill are reliable choices.
- Room Temperature Control: Gluten-free doughs are temperature-sensitive. A kitchen at 70°F versus 78°F will dramatically affect rising time. Warmer environments accelerate fermentation; cooler ones slow it down.
- Don’t Overwork the Dough: Unlike traditional bread, which benefits from extensive kneading, gluten-free dough becomes overworked quickly. Mix just until combined and smooth—over-mixing creates dense bread.
When combined with techniques from cooking fundamentals, these baking principles become intuitive and repeatable.
Troubleshooting Common Issues
Dense, Heavy Crumb: Usually caused by inadequate rising time, expired yeast, or overmixing. Ensure your yeast is fresh and give the dough sufficient time to rise in a warm environment. If using a stand mixer, reduce mixing time by 1-2 minutes.
Gummy Interior: This indicates insufficient cooling time or underbaking. Always cool completely before slicing, and verify internal temperature reaches 205°F before removing from the oven. If gumminess persists, your flour blend may contain too much moisture—try reducing water by 2 tablespoons in your next batch.
Dry, Crumbly Texture: Opposite of gumminess, dryness suggests overbaking or insufficient water. Reduce baking time by 5 minutes and increase water by 2 tablespoons next time. Also ensure your loaf pan size matches the recipe—a larger pan spreads dough too thin, causing excessive drying.
Flat Loaf with No Rise: Dead yeast is the primary culprit. Test yeast activity before mixing by checking for foam after 5 minutes in warm water. Also verify your rising location is warm enough—75°F minimum is ideal.
Sunken Top: Indicates overproofing (too much rising). Reduce first rise time by 15-20 minutes. The dough should rise about one inch above the pan rim, not significantly more.
Uneven Crumb Structure: Large holes surrounded by dense areas suggest uneven mixing or temperature fluctuations during rising. Mix thoroughly until completely smooth, and maintain consistent temperature throughout the rising period.
Storage and Shelf Life
Properly stored gluten-free bread lasts longer than you might expect, thanks to its higher moisture content:
- Room Temperature (2-3 days): Store in an airtight container or wrapped tightly in plastic wrap. Keep away from direct sunlight and heat sources. Gluten-free bread stales more slowly than wheat bread due to added fats and moisture.
- Refrigerator (5-7 days): Cool storage extends shelf life significantly. Place cooled bread in an airtight container or sealed plastic bag. The cool temperature slows mold growth and staling.
- Freezer (3 months): Slice the completely cooled loaf, wrap slices individually in plastic wrap, then place in a freezer bag. This allows you to thaw individual slices as needed. Toast frozen slices directly in a toaster for best results.
Never refrigerate warm bread—condensation will create a soggy texture. Always cool completely first.
Creative Variations
Once you’ve mastered the basic recipe, experiment with these delicious additions:
- Seeded Bread: Add ½ cup mixed seeds (flax, sunflower, pumpkin) to the dry ingredients. Seeds add nutrition, texture, and visual appeal.
- Herb and Olive Bread: Fold in 2 tablespoons fresh rosemary, 1 tablespoon dried oregano, and ¼ cup sliced olives during the final minute of mixing. Perfect for pairing with homemade pasta sauce.
- Whole Grain Version: Replace ¼ cup brown rice flour with millet flour or amaranth flour for increased nutrition and complex flavor.
- Sweet Bread: Increase honey to 4 tablespoons and add 1 teaspoon vanilla extract. This creates a slightly sweet bread perfect for breakfast.
- Sourdough-Style: Use a gluten-free sourdough starter instead of commercial yeast. This requires extended fermentation (12-24 hours) but develops complex, tangy flavors.
When exploring variations, adjust only one or two ingredients at a time. This helps you understand how each addition affects the final product.
FAQ
Can I use a different flour blend?
Yes, but results may vary. Pre-made gluten-free flour blends from brands like King Arthur or Bob’s Red Mill work well—simply substitute equal amounts. However, avoid all-purpose wheat flour blends, which contain gluten. If creating your own blend, maintain similar ratios: approximately 50% starch, 40% grain flour, and 10% specialty flour.
What if I don’t have xanthan gum?
Xanthan gum is essential for this recipe’s success and shouldn’t be omitted. However, if unavailable, psyllium husk powder (use 2 tablespoons) or ground flaxseed mixed with water (3 tablespoons ground flax mixed with 9 tablespoons water, let sit 15 minutes) can substitute. Results won’t be identical, but acceptable.
Can I make this bread without a stand mixer?
It’s challenging but possible. Mix dry ingredients thoroughly, then combine with wet ingredients using a sturdy wooden spoon or hand mixer. Mix for 12-15 minutes until smooth and glossy. The dough’s sticky nature makes hand-mixing exhausting, so a mixer is strongly recommended.
Why is my bread so expensive compared to wheat bread?
Gluten-free flours cost significantly more than wheat flour due to specialized processing and smaller market demand. However, homemade gluten-free bread still costs less than quality bakery options and contains no preservatives.
Can I add commercial yeast nutrients?
Yes. Adding ½ teaspoon diastatic malt powder or ¼ teaspoon instant potato flakes provides additional nutrients for yeast, potentially improving rise. These are optional but helpful in cooler kitchens.
How do I know if my loaf is fully baked?
Three indicators confirm doneness: golden-brown top color, hollow sound when tapping the bottom, and internal temperature of 205-210°F. Use all three checks to ensure complete baking.
Is this recipe suitable for sourdough conversion?
Absolutely. Replace commercial yeast with ½ cup active gluten-free sourdough starter and reduce water to 1 cup. Extend first rise to 12-18 hours at room temperature. The extended fermentation develops superior flavor and digestibility.
Can I make rolls instead of a loaf?
Yes. Divide dough into 12 portions and place in a muffin tin. Reduce rising time to 45-60 minutes and baking time to 20-25 minutes. Rolls are perfect for easy dinner recipes.
What’s the difference between this recipe and commercial mixes?
Homemade recipes offer complete control over ingredients, eliminating preservatives, gums, and additives common in commercial products. You’ll also achieve superior flavor through proper fermentation and fresh ingredients.


