Hard Candy Made Easy? Grandma’s Secret Recipe
Making hard candy at home sounds intimidating, but it’s one of those kitchen secrets that becomes second nature once you understand the fundamentals. My grandmother kept a worn notebook filled with candy recipes, and her hard candy formula has been passed down through three generations. The magic isn’t in exotic ingredients or complicated techniques—it’s in understanding temperature control and a few simple principles that transform sugar syrup into glossy, jewel-like candies.
Whether you’re looking to create old-fashioned lemon drops, cinnamon discs, or fruity sour candies, this grandmother’s hard candy recipe delivers consistent results every single time. The process takes about an hour from start to finish, and you’ll need just a handful of ingredients you probably already have in your kitchen. Let me walk you through exactly how to make professional-quality hard candies that rival anything you’d buy at a candy shop.
Essential Ingredients for Hard Candy Success
Grandmother’s secret formula relies on just four basic ingredients, though you might add a few optional components depending on your flavor goals. Here’s what you need:
- Granulated sugar (2 cups) – The foundation of every hard candy. Use pure white granulated sugar for the clearest results.
- Light corn syrup (¾ cup) – This prevents crystallization and keeps your candy smooth and glossy. Don’t skip this ingredient.
- Water (¾ cup) – Combines with sugar and corn syrup to create the base syrup.
- Butter (2 tablespoons) – Adds richness and helps prevent sticking during the final stages.
- Flavoring extracts or oils (½ to 1 teaspoon) – Choose high-quality flavorings like peppermint, lemon, cherry, or cinnamon oil.
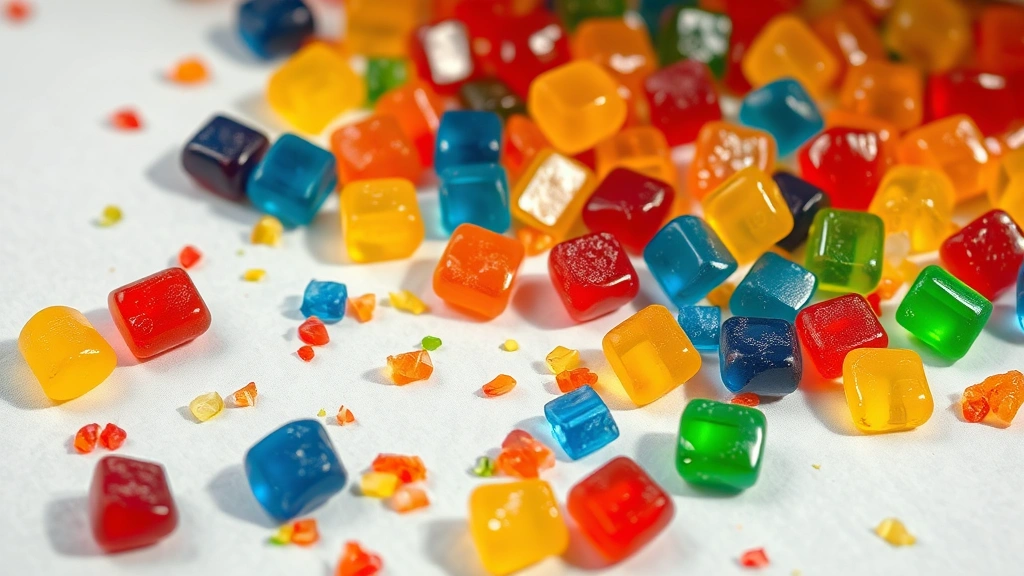
- Food coloring (optional, 2-3 drops) – Creates beautiful, vibrant candies that look as good as they taste.
- Powdered sugar (for dusting, optional) – Adds a traditional finish to sour candies or fruit drops.
The beauty of this grandmother’s hard candy recipe is its flexibility. Once you master the base technique, you can experiment with different flavor combinations. Consider pairing your candy-making with complementary kitchen projects—if you enjoy precise measurements and timing, you’ll appreciate how similar it is to making white sauce recipe techniques where temperature and timing matter tremendously.
Quality matters significantly when choosing your ingredients. Use pure vanilla extract rather than imitation, and invest in candy-specific flavoring oils from reputable suppliers. These concentrated oils deliver better flavor and won’t water down your mixture like liquid extracts sometimes do.
Equipment You’ll Actually Need
You don’t need fancy candy-making equipment to create professional hard candies. Here’s what grandmother kept in her kitchen:
- Candy thermometer – This is non-negotiable. A reliable thermometer ensures you hit the exact temperature needed for hard candy (300-310°F). Digital thermometers work well, but traditional mercury-style thermometers are also reliable.
- Heavy-bottomed saucepan (2-3 quart capacity) – Prevents burning and distributes heat evenly. Stainless steel or copper bottoms work best.
- Wooden spoon or silicone spatula – Wooden spoons don’t conduct heat as readily as metal utensils, protecting your hands.
- Parchment paper – Line your work surface to prevent sticking and make cleanup easier.
- Candy molds or silicone molds – Optional but helpful for creating uniform shapes. You can also pour onto parchment and break into pieces.
- Lollipop sticks (optional) – For creating lollipops instead of hard candies.
- Scissors or candy cutter – For cutting cooled candy into bite-sized pieces.
Gather all your equipment before you begin. Candy-making happens quickly once your syrup reaches temperature, and you won’t have time to hunt for supplies mid-process.
Step-by-Step Hard Candy Instructions
Follow these detailed steps to create grandmother’s famous hard candies. The process is straightforward when you pay attention to temperature and timing:
- Combine dry ingredients. Pour 2 cups granulated sugar, ¾ cup light corn syrup, and ¾ cup water into your heavy-bottomed saucepan. Stir over medium heat until the sugar completely dissolves. This should take about 3-4 minutes. You shouldn’t see any sugar crystals in the mixture.
- Stop stirring. Once the mixture reaches a gentle boil, stop stirring completely. Stirring at this point can cause crystallization, which ruins the smooth texture of your candy. Just let it bubble gently.
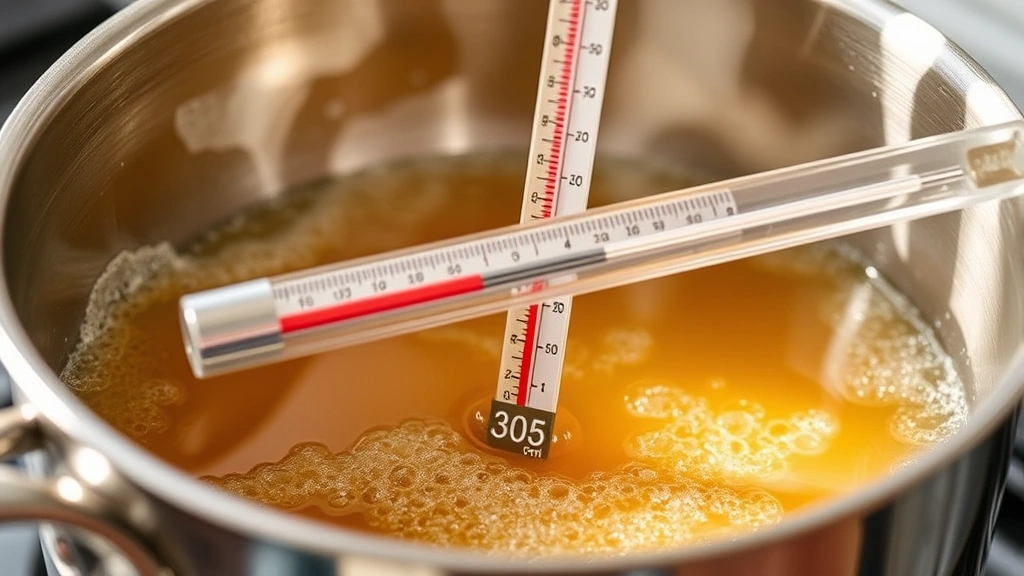
- Monitor temperature carefully. Insert your candy thermometer into the mixture, making sure it doesn’t touch the bottom of the pan. Watch as the temperature gradually rises. This step requires patience—don’t rush by increasing heat.
- Reach the hard-crack stage. Continue cooking until your thermometer reads 300-310°F. This is the “hard-crack” stage where candy becomes brittle and cracks easily. At 300°F, you’ll have slightly softer candy; at 310°F, it becomes very hard and snappy.
- Add butter and flavorings. Remove the pan from heat. Working quickly, add 2 tablespoons butter and stir gently until melted. Add ½ to 1 teaspoon of your chosen flavoring oil and 2-3 drops of food coloring if desired. Stir just until combined—don’t over-mix, as this creates air bubbles.
- Pour immediately. Carefully pour the hot mixture onto parchment paper in a thin, even layer. Work quickly but carefully, as the mixture cools rapidly. If you’re using molds, pour into them immediately.
- Cool completely. Allow the candy to cool at room temperature for at least 2 hours. Don’t refrigerate—this can cause condensation and sticky candy. Patience here pays off.
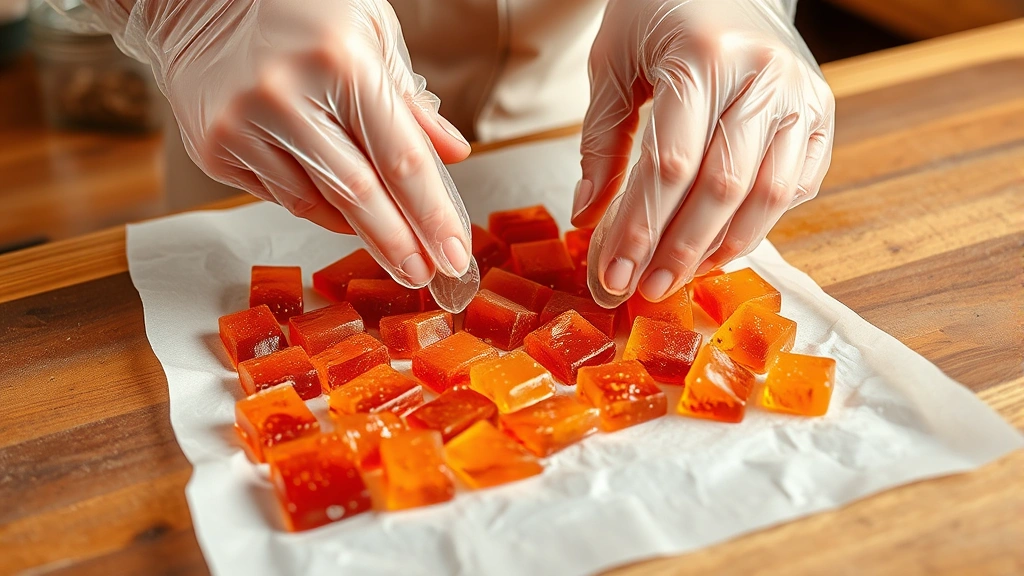
- Break into pieces. Once completely hardened, break the candy sheet into bite-sized pieces using your hands or a candy cutter. Wear food-safe gloves if the candy is sharp.
- Optional coating. Toss finished candies in powdered sugar for a sour candy effect, or dust with a little cornstarch to prevent sticking.
This process becomes intuitive after your first batch. Many candy makers find the ritual meditative—watching the temperature rise, adding the final flourishes, and witnessing the transformation from liquid to solid candy is genuinely magical.
Temperature Control: The Secret Weapon
Temperature control is absolutely the most critical factor in making successful hard candy. Understanding what happens at different temperature stages separates mediocre candy from grandmother’s perfect batches.
The candy thermometer reading determines your candy’s final texture. At 270°F, you create soft taffy. At 290°F, you’re in the firm-ball stage. But hard candy requires reaching 300-310°F, the hard-crack stage. This specific temperature range is where sugar molecules arrange themselves into the brittle, snappy texture that defines true hard candy.
Why is this so important? Sugar syrup undergoes physical transformation at precise temperatures. Below 300°F, the candy remains somewhat chewy and sticky. Above 310°F, you risk caramelization, which darkens the candy and creates burnt flavors. The narrow window between 300-310°F is perfection—grandmother always aimed for 305°F for the ideal balance.
Invest in a quality thermometer. Cheap thermometers often read inaccurately, throwing off your entire batch. Position the thermometer bulb in the center of the syrup, not touching the pan’s sides or bottom. If you’re making multiple batches, test your thermometer’s accuracy using boiling water (should read 212°F at sea level).
Environmental factors matter too. High humidity affects candy-making. On extremely humid days, grandmother would cook her syrup to 310°F instead of 305°F to account for atmospheric moisture. Conversely, at high altitudes where water boils at lower temperatures, adjust your target temperature down by about 1°F per 500 feet of elevation.
Flavoring and Coloring Your Candies
This is where you customize grandmother’s basic recipe into something uniquely yours. The flavoring and coloring stage happens right at the end, after you remove the pan from heat.
Choosing Your Flavorings
Grandmother kept a collection of flavoring oils rather than extracts. Oils are more concentrated and won’t dilute your candy mixture. Popular options include:
- Peppermint oil for classic mint drops
- Lemon oil for bright, citrusy candies
- Cinnamon oil for spiced varieties
- Cherry or raspberry oil for fruity options
- Wintergreen oil for that distinctive throat-cooling sensation
- Anise oil for licorice-flavored candies
Use between ½ and 1 teaspoon of flavoring oil per batch. Start with ½ teaspoon—you can always add more, but you can’t remove excess flavoring. Some oils, like peppermint and wintergreen, are potent and need less than milder flavors like cherry.
Adding Color Effectively
Food coloring adds visual appeal without affecting taste. Use gel or liquid food coloring rather than powder, which doesn’t dissolve well in hot syrup. Add just 2-3 drops for vibrant color. Remember that colors intensify slightly as the candy cools, so err on the side of lighter color.
For multi-colored candies, divide your batch before adding color. Make one portion red, another yellow, and a third orange by mixing colors. This technique creates beautiful variety from a single cooking session.
Sour Coating Options
If you enjoy sour candies, grandmother had several tricks. After breaking the cooled candy into pieces, toss them in a mixture of powdered sugar and citric acid (use a 3:1 ratio of sugar to citric acid). The citric acid provides that pucker-worthy sour kick. You can find citric acid at health food stores or online.
Storage and Shelf Life Tips
Properly stored hard candy lasts remarkably long. Grandmother’s candies would sit in her pantry for months without deteriorating, though they never lasted that long because everyone kept eating them.
Storage Containers
Store finished candies in airtight containers. Glass jars with tight-fitting lids work perfectly. Layer the candy with parchment paper between layers to prevent sticking. Avoid plastic containers initially, as the oils in some flavorings can affect plastic over time.
Environmental Factors
Keep hard candy away from moisture and humidity. A cool, dry pantry is ideal—not the refrigerator. Humidity causes candies to become sticky and lose their snap. If you live in a humid climate, add a small packet of food-grade silica gel to your storage container to absorb excess moisture.
Shelf Life
Hard candy typically lasts 2-3 weeks at room temperature in dry conditions, though it often keeps longer. The sugar content acts as a natural preservative. If stored properly in an airtight container away from humidity, hard candy can last several months. Check occasionally for stickiness or crystallization.
If your candies develop a sticky surface or white crystallization, they’ve absorbed moisture from the air. This doesn’t make them unsafe to eat, but they’ve lost their ideal texture. Prevent this by ensuring your storage container is completely airtight.
Troubleshooting Common Hard Candy Problems
Even experienced candy makers encounter occasional issues. Here’s how grandmother solved common problems:
Candy is too sticky or won’t harden
You didn’t reach the proper temperature. Hard candy requires 300-310°F. If your candy stayed soft and chewy, your thermometer might be inaccurate or you removed it from heat too early. Check your thermometer’s accuracy in boiling water, and next time, cook to exactly 305°F.
Candy is too hard and tastes burnt
You overcooked it. Temperatures above 310°F cause caramelization, creating that burnt flavor and extremely brittle texture. Lower your target temperature to 305°F on the next batch. Also, ensure your heat isn’t too high—medium heat is sufficient.
White crystals form on the candy surface
This is sugar crystallization, usually caused by stirring after the mixture boils or by ambient humidity. Ensure you stop stirring once the mixture reaches a boil. Store finished candy in airtight containers away from humidity. This doesn’t affect taste, just appearance.
Candy is grainy or sandy-textured
Sugar crystallization occurred during cooking. This happens when you stir after boiling or when sugar crystals form on the pan’s sides. Use a pastry brush dipped in water to brush down the sides of the pan before cooking to prevent crystal formation. Never stir once boiling begins.
Flavor seems weak or disappeared
You used liquid extract instead of flavoring oil, or you didn’t add enough. Liquid extracts can evaporate in the high heat. Always use concentrated flavoring oils. For the next batch, increase your flavoring oil to ¾ or 1 teaspoon.
Candy sticks to teeth excessively
This indicates insufficient cooking. You need to reach the hard-crack stage (300-310°F) for candy that snaps cleanly rather than sticking. Undercooked candy stays softer and more adhesive. Use your thermometer to verify exact temperature.
If you’re interested in other precision-based cooking techniques, you might enjoy exploring how homemade pasta sauce requires similar attention to ingredient ratios and timing. The fundamental principles of quality cooking apply across many culinary areas.
FAQ
Can I make hard candy without a candy thermometer?
Not reliably. A candy thermometer is essential for hitting the exact temperature required for proper hard candy texture. Without it, you’re guessing, and guessing usually results in candy that’s either too soft or burnt. Thermometers are inexpensive—invest in a good one.
What’s the difference between hard candy and lollipops?
The base recipe is identical. The difference is presentation. Hard candy is broken into irregular pieces after cooling, while lollipops are poured into molds or onto sticks during the cooling process. You can use grandmother’s recipe for either by simply changing how you pour and cool the mixture.
Can I use honey instead of corn syrup?
Not as a direct substitute. Corn syrup prevents crystallization in ways honey doesn’t. You could use a mixture of corn syrup and honey, but pure honey won’t give you the same smooth, glossy results. Stick with corn syrup for grandmother’s recipe.
How do I make sour hard candies?
The base recipe remains unchanged. After breaking cooled candy into pieces, toss them in a mixture of powdered sugar and citric acid (3 parts sugar to 1 part citric acid). The citric acid provides the sour flavor. You can also add citric acid directly to the syrup before cooking—use ¼ teaspoon per batch.
Can I scale this recipe up for larger batches?
Yes, you can double or triple the recipe. However, larger batches require more careful temperature monitoring and may cook slightly longer. Use a larger saucepan and ensure your thermometer can accurately read the center of a larger volume of syrup. Work in smaller batches if you’re new to candy making.
What should I do if my candy mixture seizes or crystallizes during cooking?
If crystallization happens, immediately remove the pan from heat. You can try adding a tablespoon of water and heating gently to dissolve the crystals, but often the batch is lost. Prevention is key—don’t stir after boiling, and use corn syrup as specified in the recipe.
Can I make hard candy with artificial sweeteners?
Not with this method. Artificial sweeteners don’t reach the same temperature stages as sugar and won’t crystallize properly. They’re also often heat-sensitive. Grandmother’s recipe requires real sugar for the chemical reactions that create hard candy’s texture.
How can I prevent my candy from sticking to the container?
Layer finished candy with parchment paper between pieces, and store in airtight glass containers rather than plastic. If sticking occurs, separate pieces gently with your hands or a non-stick spatula. Dusting with cornstarch or powdered sugar also helps prevent adhesion.
What’s the best way to gift homemade hard candy?
Package finished candy in cellophane bags tied with ribbon, or layer it in decorative jars. Include a note about storage (airtight, cool, dry place). Hard candy makes excellent gifts because it lasts longer than many homemade treats. Your friends and family will appreciate the personal touch.
Can I add nuts or other mix-ins to hard candy?
Not successfully with this method. Nuts and other mix-ins don’t tolerate the extreme temperatures required for hard candy. They’ll burn or become unpleasantly hard. Keep grandmother’s recipe pure, or create layered candies by pouring a thin base layer, adding mix-ins, then pouring another layer on top.


