
Easy Onigiri Recipe: Tried and True Method!
Onigiri, the beloved Japanese rice ball, represents the perfect intersection of simplicity and satisfaction. These handheld treasures have been nourishing people across Japan for centuries, and now they’ve captured hearts worldwide. Whether you’re packing lunch for work, preparing a quick snack, or introducing your family to Japanese cuisine, mastering the easy onigiri recipe is an essential kitchen skill that takes mere minutes to learn.
What makes onigiri so special isn’t just their delicious taste—it’s the versatility, portability, and genuine comfort they bring to any meal. You can fill them with anything from traditional umeboshi (pickled plums) to modern ingredients like spicy tuna or crispy bacon. The beauty of this onigiri recipe lies in its adaptability to your pantry and preferences, making it one of the most accessible healthy food recipes you can master.
Essential Ingredients for Perfect Onigiri
The foundation of any great onigiri starts with quality short-grain white rice, specifically Japanese rice varieties like Koshihikari or Calrose. These rices have the perfect starch content that allows them to stick together beautifully while remaining tender. You’ll need approximately 2 cups of cooked rice to make 6-8 onigiri, depending on size preference.
Beyond rice, you’ll want to gather sea salt, which serves dual purposes: seasoning the rice and preventing your hands from sticking during shaping. Unlike table salt, sea salt has larger crystals that distribute more evenly and provide better flavor. For filling options, consider keeping foods rich in antioxidants on hand, such as pickled vegetables or umeboshi.
The rice itself should be freshly cooked and still warm when you begin shaping—this is crucial for achieving that perfect texture and ensuring all your fillings adhere properly. If your rice has cooled completely, you can gently reheat it by sprinkling a little water and microwaving for 30-60 seconds. The moisture content matters significantly; rice that’s too dry won’t hold together, while rice that’s too wet will feel mushy and difficult to shape.

Equipment You’ll Need
One of the greatest advantages of making onigiri is that you need minimal equipment. At its most basic, you only need your hands and a small bowl of water. However, having the right tools makes the process faster and more enjoyable.
A dedicated onigiri mold (available online or at Asian markets) is optional but tremendously helpful, especially when learning. These plastic molds come in various shapes—triangles, balls, and cute character designs—and take the guesswork out of uniform sizing. If you don’t have a mold, no problem; your hands work perfectly fine.
Keep a small bowl of water mixed with a pinch of salt nearby for dipping your fingers. This prevents the warm rice from sticking to your hands and makes the shaping process much more pleasant. A nori punch or scissors helps if you want to add decorative nori bands, though this step is entirely optional. For quick breakfast recipes, you might appreciate having a small cutting board for preparing fillings.
Step-by-Step Instructions
Prepare Your Workspace: Begin by arranging everything within arm’s reach. Have your warm rice in a bowl, filling ingredients prepped and portioned into small amounts (usually about 1 tablespoon per onigiri), and your salt water ready. This preparation prevents fumbling and keeps your process smooth.
Start with Rice: Wet your hand in the salt water and grab approximately 1/3 cup of warm rice. Gently squeeze it to remove excess moisture, but don’t compress it too firmly—onigiri should be tender inside, not dense. The rice should hold together but remain light and fluffy.
Create the Pocket: Using your thumb and index finger, create a small indent in the center of the rice ball. This is where your filling will nest. Make the pocket deep enough to hold your chosen filling without it poking through the bottom, but not so deep that you puncture the rice.
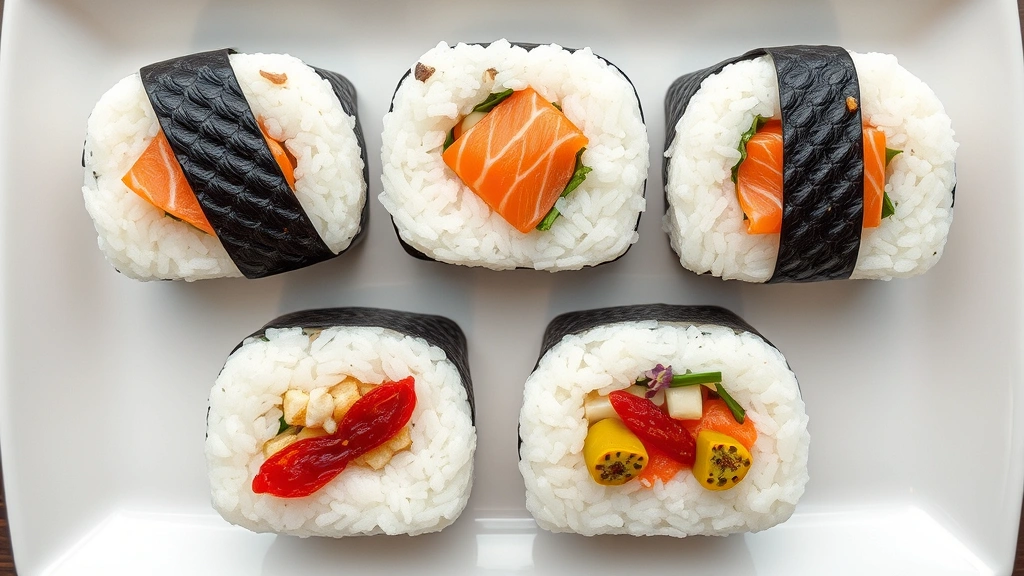
Add Your Filling: Place your selected filling into the pocket. Whether it’s a single umeboshi, a spoonful of seasoned tuna, or grilled salmon, ensure it sits securely within the rice. This step determines the flavor experience of each bite.
Seal and Shape: Gently pull the rice around the filling, ensuring it’s completely enclosed. If you’re using a mold, place the rice in the mold, add filling to the center, add more rice on top, and press down. If shaping by hand, continue molding into your desired shape—triangles are traditional, but balls work equally well. The finished onigiri should feel firm enough to hold together but not rock-hard.
Optional Nori Wrapping: Once shaped, you can wrap a thin strip of nori around the bottom third of the onigiri. This serves both functional and aesthetic purposes: it provides a grip for eating and adds visual appeal. Many people prefer to add nori just before eating to maintain crispness.
Filling Ideas and Variations
The true magic of onigiri lies in its incredible flexibility. Traditional fillings include umeboshi (pickled plum), which provides a tart, salty contrast to the mild rice. Salted salmon, either fresh or grilled, is another classic choice that adds richness and omega-3 fatty acids to your meal.
Modern adaptations have expanded the possibilities considerably. Spicy tuna mixed with mayo creates a fusion-style filling that appeals to contemporary palates. Grilled chicken with teriyaki sauce, seasoned ground beef, or even vegetarian options like roasted mushrooms work beautifully.
For those exploring organic vs non-organic food choices, consider organic pickled vegetables, locally-sourced fish, or sustainably-raised poultry for your fillings. Kimchi for a Korean twist, seasoned edamame for vegetarians, or even a soft-boiled quail egg create exciting variations.
Don’t overlook simple options: a small piece of cheese, a dab of miso paste, or even just a sprinkle of furikake (seasoning mixture) transforms plain rice into something special. The key is using quality ingredients in appropriate portions—remember, a little filling goes a long way in a compact rice ball.
Storage and Make-Ahead Tips
Onigiri are ideal for meal prep and make-ahead cooking. When properly stored, they keep well for 24 hours at room temperature or up to 3 days in the refrigerator. This makes them perfect for food waste reduction tips and batch cooking strategies.
For room temperature storage (ideal for lunchboxes), wrap each onigiri individually in plastic wrap or place them in an airtight container. They actually taste best at room temperature, as the rice maintains its ideal texture and the flavors meld beautifully. If you’re packing them for lunch, they’ll be perfect by midday without requiring refrigeration.
For refrigerator storage, place onigiri in airtight containers with parchment paper between layers. Before eating cold onigiri, consider microwaving them for 20-30 seconds to restore the rice to its optimal texture. Freezing is also possible: freeze onigiri on a baking sheet, then transfer to freezer bags. They’ll keep for up to 2 months and can be reheated directly from frozen by microwaving for 1-2 minutes.
A crucial tip: add nori wrapping just before eating rather than immediately after shaping. Nori becomes soggy quickly when exposed to the moisture from warm rice, so this timing preserves that satisfying crunch. This technique also allows you to prepare rice balls days in advance and customize them fresh when ready to eat.
Troubleshooting Common Issues
Rice Won’t Hold Together: Your rice is likely too dry. Add a splash of water to your cooked rice, stir gently, and let it sit for a few minutes. Alternatively, ensure you’re using short-grain rice with adequate starch content. The starch is what creates the binding power.
Hands Sticking Constantly: Dip your hands more frequently in the salt water. If the water becomes too warm and diluted, refresh it. Some cooks prefer slightly cooler water for this reason. You can also try wearing food-safe plastic gloves if hand-shaping feels too messy.
Filling Leaking Out: Your pocket isn’t deep or secure enough. Practice creating a deeper indent with your thumb and ensure the rice completely surrounds the filling before final shaping. Fillings should be fully enclosed, not touching the exterior surface.
Onigiri Too Dense: You’re pressing too hard during shaping. Onigiri should be gently molded, not compressed. Think of it as cradling the rice rather than squeezing it. Light hand pressure creates the ideal texture.
Rice Tastes Bland: Season your rice directly before shaping by sprinkling a bit of salt, mixing gently, and sometimes adding a splash of rice vinegar. Some cooks prefer seasoning the rice, while others rely solely on salty fillings and nori. Experiment to find your preference.
Understanding proper Japanese rice cooking techniques from culinary experts will elevate your foundation. Many issues stem from rice quality or preparation rather than shaping technique.
FAQ
Can I use regular white rice instead of Japanese rice?
While regular long-grain rice works in a pinch, it won’t hold together as well. Japanese short-grain rice contains more amylose starch, which creates the binding properties essential for onigiri. If you must substitute, consider risotto rice (Arborio) as a closer alternative, though it’s not ideal.
How much filling should I use per onigiri?
Approximately 1 tablespoon of filling is standard. Too much filling makes the rice ball difficult to shape and prone to leaking, while too little leaves you with mostly rice. One filling piece (like a single umeboshi) is also perfectly acceptable.
Is nori necessary for onigiri?
No, nori is entirely optional. Many onigiri are served without it. Nori primarily serves as a grip for eating and adds visual appeal. It’s purely a personal preference and can be added or omitted based on your taste and what you have available.
Can I make onigiri ahead of time?
Absolutely! Onigiri are perfect for meal prep. Make them up to 24 hours in advance and store at room temperature in airtight containers. They’re actually more convenient as make-ahead food than many other meal prep options because they taste great at room temperature.
What’s the best way to reheat cold onigiri?
Microwave for 20-30 seconds if you prefer them warm. You can also wrap them in damp paper towels and microwave, which adds moisture back to the rice. Some people enjoy them straight from the fridge without reheating—it’s entirely a matter of preference.
Can I make onigiri with brown rice?
Yes, though brown rice requires different treatment. Brown rice is less sticky than white rice, so you may need to add a bit of water or cooking liquid after cooking to improve its binding properties. Many people add a small portion of white rice to brown rice to achieve better texture for onigiri.
Where can I learn more about Japanese rice preparation?
Resources like Just One Cookbook offer detailed Japanese cooking techniques, while The Spruce Eats provides comprehensive guides to Asian cooking methods. For scientific understanding of rice starch and cooking, Serious Eats offers in-depth culinary science explanations.


