Ultimate Oven Brisket: Grandma’s Secret Recipe for Tender, Flavorful Perfection
There’s something magical about a slow-cooked oven brisket that fills your home with an aroma that memories are made of. My grandmother guarded her brisket recipe like a precious heirloom, and for good reason—this isn’t just meat and seasonings thrown into a pan. It’s a carefully orchestrated dance of low heat, time, and technique that transforms a tough cut of beef into something so tender it practically melts on your tongue. After years of watching her work her magic in the kitchen, I’ve finally cracked the code to recreating that legendary dish, and I’m thrilled to share every secret with you.
Unlike quick-cooking methods or outdoor barbecuing, oven brisket offers consistency and control that few other cooking methods can match. You don’t need fancy equipment or years of culinary training—just patience, quality ingredients, and the willingness to follow a proven process. This recipe has been tested countless times and refined through family dinners, holiday gatherings, and countless satisfied taste-buds. Whether you’re preparing for a special occasion or simply want to impress your family with restaurant-quality meat at home, this guide will walk you through every step with the precision and care grandma always demonstrated.
What Makes Oven Brisket Special
Oven brisket cooking represents one of the most reliable methods for achieving consistently tender, juicy results. The controlled environment of your oven ensures even heat distribution, eliminating hot spots that can cause uneven cooking. Unlike stovetop methods where you’re battling temperature fluctuations, the oven maintains steady, predictable conditions for hours on end.
The magic happens through a process called collagen conversion. Brisket contains significant amounts of collagen—the tough connective tissue that makes it initially chewy and unpleasant. When exposed to low, steady heat for extended periods (typically 4-6 hours), this collagen slowly transforms into gelatin, which dissolves into the meat and creates that luxurious, tender texture everyone craves. This isn’t something that happens quickly; it requires patience and proper temperature management.
Grandma always emphasized that low and slow is the only way to go. She’d often say that rushing the process is like trying to rush love—it simply won’t work. High heat might cook the meat faster, but it will also drive out moisture and create a tough, stringy texture that’s disappointing. The oven method respects the meat’s structure and allows flavors to develop gradually and deeply.
Choosing and Preparing Your Brisket
The foundation of any great brisket dish is selecting the right cut of meat. Brisket comes from the lower chest area of the cow and is typically sold as either a flat cut or a point cut. The flat is leaner and slices more neatly, while the point has more marbling and fat, which contributes to flavor and tenderness. For this recipe, I recommend using the entire packer brisket if your oven can accommodate it, or choose a flat if space is limited.
When shopping, look for meat that has good marbling—those white streaks of fat running through the muscle. This fat is essential for flavor and moisture. A quality brisket should feel firm to the touch and have a deep red color. Avoid anything that looks pale or has been sitting in the case for too long. Many butchers will trim the fat cap to about a quarter-inch thickness, which is perfect for this recipe.
Before cooking, remove your brisket from the refrigerator at least 30 minutes before placing it in the oven. This allows the meat to come closer to room temperature, ensuring more even cooking throughout. Pat the surface completely dry with paper towels—moisture on the surface prevents proper browning and the development of that flavorful crust. If you’re concerned about food safety, check out best healthy food recipes for additional food handling guidelines.
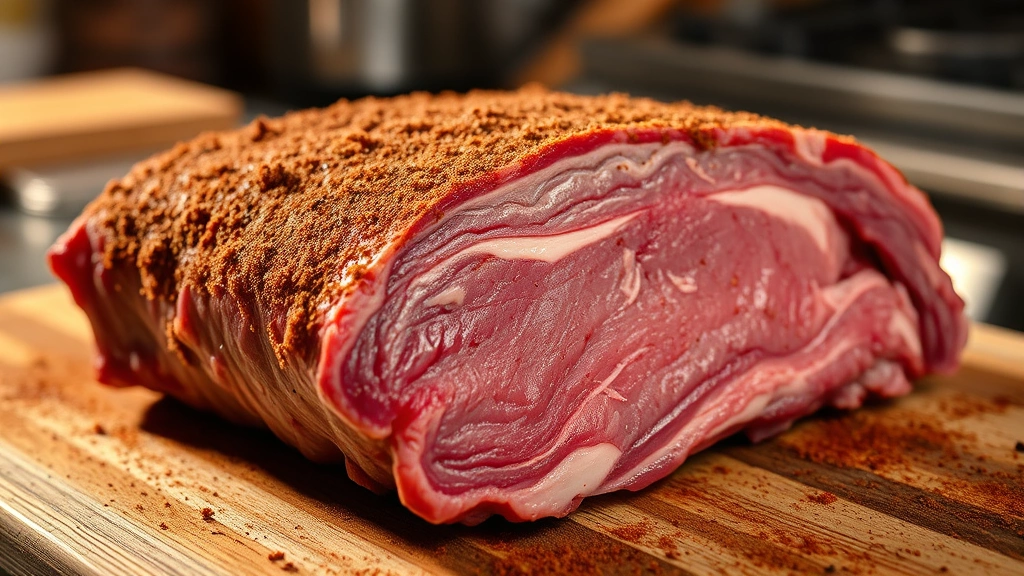
The Secret Dry Rub Blend
Grandma’s secret wasn’t really a secret at all—it was simply the perfect balance of seasonings that complement beef without overpowering it. The dry rub serves multiple purposes: it creates a flavorful crust during searing, it seasons the meat throughout, and it contributes to the development of what’s called the bark—that delicious, caramelized exterior.
The Dry Rub Ingredients:
- 3 tablespoons brown sugar (adds sweetness and helps with browning)
- 2 tablespoons kosher salt (enhances flavor and helps retain moisture)
- 1 tablespoon black pepper (freshly ground for maximum impact)
- 1 tablespoon garlic powder (not garlic salt)
- 1 tablespoon onion powder (adds depth without moisture)
- 2 teaspoons paprika (adds color and mild sweetness)
- 1 teaspoon cayenne pepper (optional, for subtle heat)
- 1 teaspoon dry mustard (enhances beef flavor)
- 1 teaspoon thyme (adds earthiness)
Mix all these ingredients in a small bowl and set aside. The beauty of this blend is that it works with the natural flavors of beef rather than trying to mask or overwhelm them. The brown sugar is particularly important—it caramelizes during the searing process and creates a wonderful crust. Don’t skip this ingredient thinking white sugar will work just as well; brown sugar has molasses content that adds complexity.
Apply the rub generously to all surfaces of the brisket, paying special attention to the sides and ends. Use your hands to press it into the meat, ensuring even coverage. Some of the rub will fall off during cooking, but what remains will contribute significantly to the final flavor profile.
Step-by-Step Cooking Instructions
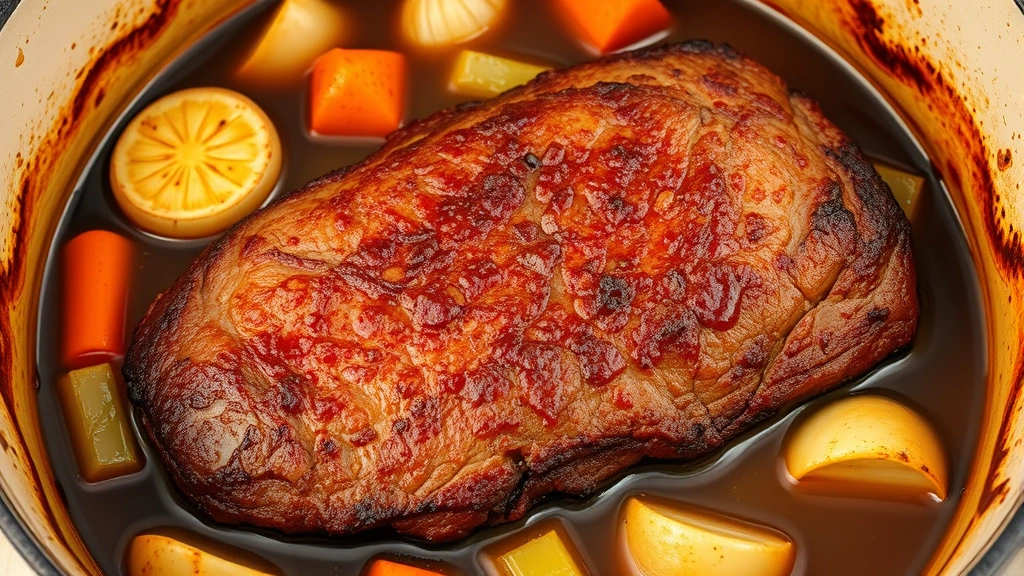
Ingredients for the Braising Liquid:
- 2 cups beef broth (homemade is ideal, but quality store-bought works)
- 1 cup red wine (optional, but adds depth)
- 1 large onion, quartered
- 4 carrots, cut into 2-inch pieces
- 4 celery stalks, cut into 2-inch pieces
- 6 garlic cloves, crushed
- 3 bay leaves
- 2 teaspoons Worcestershire sauce
- 1 teaspoon balsamic vinegar
The Cooking Process:
- Preheat your oven to 325°F. This temperature is crucial—it’s low enough to allow gradual cooking but high enough to develop flavors effectively. Allow the oven at least 15 minutes to reach temperature.
- Heat a large Dutch oven or heavy roasting pan over medium-high heat on your stovetop. Add 2 tablespoons of neutral oil (vegetable or canola work well). Once the oil shimmers, carefully place the seasoned brisket fat-side down in the pan.
- Sear the brisket for 4-5 minutes without moving it. You want to develop a dark brown crust on the bottom. This step is non-negotiable—the Maillard reaction that occurs during searing creates complex flavors that can’t be replicated any other way.
- Flip the brisket and sear the other side for another 4-5 minutes. The fat cap should also get a brief sear (about 2 minutes), standing the meat up on its edge.
- Remove the brisket to a plate and set aside. Don’t wash the pan—those browned bits are liquid gold for flavor.
- Add the vegetables (onion, carrots, celery, and garlic) to the same pan and sauté for 3-4 minutes, stirring occasionally. These vegetables will soften and their flavors will infuse into the braising liquid.
- Pour in the beef broth and red wine, scraping the bottom of the pan with a wooden spoon to release all those caramelized bits. Add the bay leaves, Worcestershire sauce, and balsamic vinegar.
- Return the brisket to the pan, fat-side up. The liquid should come about halfway up the sides of the meat. If it doesn’t, add more broth.
- Cover the pan tightly with foil or a lid and transfer to your preheated oven.
For more ideas on braising and slow-cooking techniques, explore healthy crockpot recipes for additional slow-cooking inspiration that applies similar principles.
Once in the oven, resist the urge to check on the brisket frequently. Every time you open the oven door, heat escapes and the cooking time extends. Set a timer and trust the process. This is exactly what grandma taught me—patience is the secret ingredient that most home cooks lack.
Temperature Monitoring and Timing
The cooking time for brisket isn’t exact because variables like the meat’s thickness, your oven’s accuracy, and the starting temperature all play roles. However, as a general rule, expect 45 minutes to 1 hour of cooking time per pound at 325°F.
The true indicator of doneness is tenderness, not time. After about 3 hours, carefully remove the foil and insert a meat thermometer into the thickest part of the meat, avoiding any large pockets of fat. You’re looking for an internal temperature of 190-203°F. At this temperature, the collagen has sufficiently converted to gelatin, and the meat will be tender enough to shred with minimal pressure.
Some people prefer to flip the brisket halfway through cooking, while others leave it undisturbed. Grandma always flipped hers at the 2-hour mark, reasoning that even heat exposure on both sides promoted uniform cooking. If you choose to flip, do so gently and carefully to avoid tearing the meat.
As the brisket cooks, the braising liquid will reduce and concentrate. This is exactly what you want—it creates a rich, flavorful sauce for serving. If at any point the liquid level drops below one-quarter up the side of the meat, add more broth to prevent the bottom from scorching.
You can use a reliable meat thermometer from a trusted culinary equipment source to ensure accuracy in temperature readings, which is crucial for consistent results.
Resting and Slicing Techniques
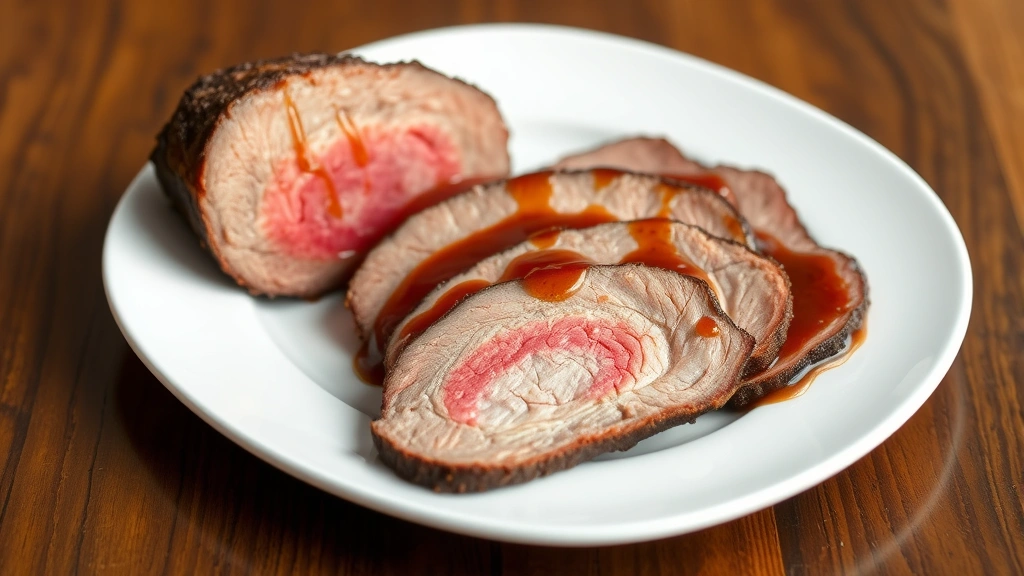
Once your brisket reaches the target temperature, remove it from the oven and carefully transfer it to a cutting board. This is where most home cooks make a critical mistake—they immediately start slicing. Resist this impulse with every fiber of your being.
Let the brisket rest for at least 15-20 minutes, loosely tented with foil. During this resting period, the muscle fibers relax and the juices redistribute throughout the meat. If you cut immediately, all those precious juices run out onto the board instead of staying in the meat. The result is a drier, less satisfying bite. Grandma would say the brisket is still cooking during this rest, and she was absolutely right from a food science perspective.
While the brisket rests, strain the braising liquid into a saucepan, pressing the vegetables to extract their flavors, then discard the solids. Skim off excess fat from the surface if desired, though much of that fat contributes to the sauce’s richness and mouthfeel. Simmer the sauce over medium heat for 5-10 minutes to concentrate flavors further.
For slicing, use a sharp carving knife and cut against the grain. The grain runs along the length of the brisket, so you want to cut perpendicular to these muscle fibers. Cutting against the grain shortens these fibers, making each bite more tender. Slice to your preferred thickness—about a quarter-inch is ideal for most applications.
If you’re concerned about the nutritional aspects of beef consumption, foods rich in antioxidants can complement your meal beautifully and provide nutritional balance.
Serving Suggestions and Pairings
Grandma always served her brisket with simple, classic sides that let the meat shine. Creamed horseradish was her signature accompaniment—the sharp, pungent flavor cuts through the richness of the beef beautifully. She’d also prepare mashed potatoes with plenty of butter and a simple green salad with vinaigrette.
The braising liquid, now reduced to a rich sauce, should be served alongside the sliced brisket. Guests can drizzle it over their portions to taste. Some prefer it generously applied, while others prefer just a light coating.
Classic Side Dishes:
- Creamed horseradish or prepared horseradish
- Mashed potatoes with butter and fresh herbs
- Roasted root vegetables (carrots, parsnips, beets)
- Simple green salad with vinaigrette
- Crusty bread for soaking up sauce
- Pickled vegetables for contrast
Wine Pairing Suggestions:
If you used red wine in your braising liquid, continue with the same varietal for serving. A full-bodied Cabernet Sauvignon, Malbec, or Bordeaux blend complements brisket beautifully. The tannins in these wines cut through the fat and enhance the beef’s flavors. For white wine drinkers, a full-bodied Chardonnay or even an aged white Burgundy can work well.
Leftover brisket is a gift that keeps giving. Slice it thin and use it for sandwiches the next day. The meat actually improves after sitting overnight as flavors continue to meld. Reheat gently in the oven with some of the braising liquid to restore moisture. You can also shred the meat and use it in tacos, grain bowls, or hash.
For more inspiration on serving occasions and meal planning, check out Serious Eats’ comprehensive guide to beef cooking techniques, which offers additional perspectives on meat preparation and serving.
The beauty of mastering best healthy food recipes like this brisket is that you’re building kitchen skills that extend far beyond a single dish. Understanding how heat, time, and technique work together creates confidence in the kitchen that translates to all your cooking endeavors.
FAQ
How far in advance can I prepare brisket?
You can apply the dry rub up to 24 hours in advance. Store the rubbed brisket uncovered in the refrigerator—this allows the surface to dry out slightly, which improves browning. Remove it from the refrigerator 30 minutes before cooking to bring it closer to room temperature.
Can I cook brisket at a higher temperature to save time?
While you technically can, it’s not recommended. Higher temperatures will toughen the meat before the collagen has time to convert to gelatin. 325°F is the sweet spot that balances cooking time with meat quality. Patience truly is a virtue when cooking brisket.
What if my brisket is still tough after cooking?
This usually indicates it hasn’t reached a high enough internal temperature. Continue cooking and check temperature every 30 minutes until it reaches 190-203°F. Some briskets, particularly very large ones, may take longer than expected.
Can I use a slow cooker instead of an oven?
Absolutely. Use the low setting and cook for 8-10 hours. You’ll miss out on the initial searing step, so sear the brisket in a skillet first, then transfer to the slow cooker. This method works wonderfully and produces equally tender results. For slow cooker inspiration, explore healthy crockpot recipes for additional guidance.
How do I store leftover brisket?
Store cooled brisket in an airtight container with some of the braising liquid for up to 4 days in the refrigerator. You can also freeze it for up to 3 months. Thaw in the refrigerator overnight before reheating gently in a 300°F oven with additional broth to restore moisture.
What’s the difference between brisket flat and brisket point?
The flat is leaner and slices more neatly, making it ideal for presentation. The point has more marbling and fat, which makes it more forgiving and flavorful. For a first attempt, the flat is often recommended, but once you’ve mastered the technique, experimenting with the point is worthwhile.
Can I make this recipe without red wine?
Yes. Simply use additional beef broth to replace the wine. The wine adds depth and slight acidity, but a quality brisket will still be delicious without it. You might add an extra teaspoon of balsamic vinegar to compensate for the acidity the wine would have provided.
Grandma’s ultimate oven brisket recipe represents more than just a dish—it’s a connection to tradition, a demonstration of patience, and a celebration of simple ingredients prepared with care. Every time you follow this recipe, you’re not just cooking meat; you’re honoring generations of home cooks who understood that the best meals come from technique, respect for ingredients, and time. The next time someone asks for your secret, you can smile knowingly and share this guide, passing along the wisdom that transforms an ordinary cut of beef into something truly extraordinary. For more culinary insights and professional cooking techniques from established culinary sources, continue expanding your kitchen knowledge and confidence.


