Prickly Pear Jam? Grandma’s Secret Recipe
There’s something magical about discovering a recipe that’s been passed down through generations, especially when it involves an ingredient as unique and vibrant as the prickly pear. My grandmother’s prickly pear jam recipe has been a family treasure for decades, and today I’m thrilled to share it with you. This gorgeous, jewel-toned jam captures the sweet-tart essence of this desert cactus fruit in a way that transforms ordinary toast into something truly extraordinary.
The prickly pear, also known as Opuntia, is a remarkable fruit with a mild, slightly sweet flavor reminiscent of watermelon and strawberry. When transformed into jam, it becomes a sophisticated spread that pairs beautifully with morning pastries, swirled into healthy dessert recipes, or even drizzled over savory dishes. What makes my grandmother’s version special isn’t just the fruit itself—it’s the carefully guarded combination of spices and techniques that bring out the fruit’s natural complexity.
Whether you’re a seasoned jam maker or picking up a wooden spoon for the first time, this recipe is approachable yet impressive. The magic lies in understanding the fruit’s unique properties and respecting traditional methods that have stood the test of time.
Understanding Prickly Pears
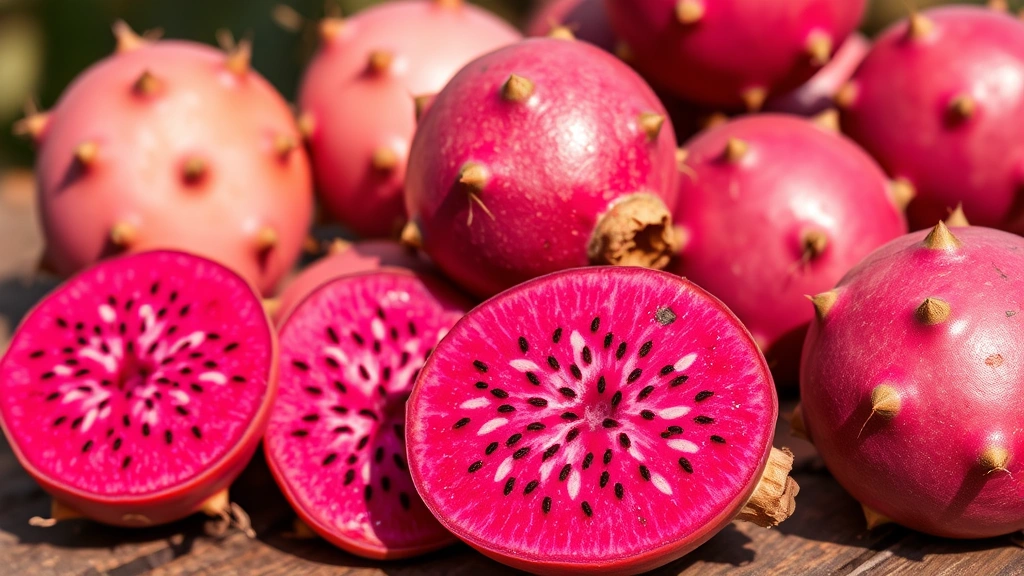
Before diving into the recipe, let’s talk about what makes prickly pears so special. These fruits grow on the Opuntia cactus and are native to Mexico, though they’re now cultivated throughout the Mediterranean, Middle East, and North Africa. The fruit itself is egg-shaped with a thick, bumpy skin that ranges from yellow-green to deep red depending on the variety and ripeness.
What my grandmother always emphasized is that the color of the prickly pear indicates its flavor profile. Lighter varieties tend to be more delicate and floral, while the deeper red and purple varieties pack more intense, berry-like sweetness. This is crucial information for jam making because you want fruit that’s flavorful enough to shine through the cooking process.
Nutritionally, prickly pears are remarkable. They’re packed with vitamin C, fiber, and antioxidants, making them one of nature’s most healing fruits. If you’re interested in the broader health implications, our guide on foods rich in antioxidants provides excellent context for why these fruits deserve a place in your kitchen.
Selecting and Preparing Your Fruit
The foundation of exceptional jam is exceptional fruit. My grandmother taught me to visit farmers’ markets in late summer or early fall when prickly pears are at their peak. Look for fruits that yield slightly to gentle pressure—not soft, but not rock-hard either. The skin should be unblemished, and the fruit should feel heavy for its size, indicating good juice content.
Here’s where most people go wrong: handling the fruit. Prickly pears have tiny, hair-like spines called glochids that are nearly invisible but incredibly irritating. Never, and I mean never, handle them with bare hands. My grandmother’s trick was to use heavy kitchen gloves or, better yet, hold each fruit with a kitchen towel while cutting.
Preparation steps:
- Wearing gloves, rinse each prickly pear under cool running water
- Cut off both the top and bottom ends with a sharp knife
- Make a shallow lengthwise cut through the skin, being careful not to cut into the flesh
- Peel away the thick skin—it should come away easily from ripe fruit
- Chop the peeled fruit into chunks and remove any remaining seeds if desired
- Press the fruit through a fine-mesh sieve to extract juice and separate seeds
This last step is critical. My grandmother would say that the juice is where the jam magic happens. You’ll want approximately 4 cups of prickly pear juice for this recipe, which typically requires 8-10 medium fruits depending on variety and juiciness.
The Secret Ingredients
Now we arrive at what makes my grandmother’s recipe truly special. While most prickly pear jams rely solely on fruit and sugar, her version incorporates three secret elements that elevate it from good to unforgettable.
Ingredient breakdown for one batch:
- 4 cups fresh prickly pear juice
- 3 cups granulated sugar
- ¼ teaspoon ground cardamom
- ⅛ teaspoon ground clove
- 1 tablespoon fresh lemon juice
- 1 vanilla bean, split and scraped (or ½ teaspoon pure vanilla extract)
- Pinch of sea salt
The cardamom and clove aren’t randomly chosen—they’re spices that have been paired with fruit preserves across Middle Eastern and Mediterranean cuisines for centuries. According to The Culinary School at Bubble, these warm spices enhance fruit’s natural sweetness while adding complexity that prevents the jam from tasting one-dimensional.
The vanilla bean is equally important. Rather than using extract alone, my grandmother insisted on using fresh vanilla beans whenever possible. The tiny black seeds distribute throughout the jam, creating visual interest and a subtle floral note that complements the prickly pear’s delicate flavor.
The lemon juice serves a dual purpose: it brightens the flavor and increases the natural pectin in your jam, helping it set properly without relying on commercial pectin. This is why my grandmother never needed added gelling agents—she understood the science of fruit chemistry instinctively.
Step-by-Step Jam Making
Jam making is equal parts art and science. My grandmother approached it with reverence, and I encourage you to do the same. Set aside at least two hours for this process, and don’t rush it.
Step One: Combine Your Base
Pour your 4 cups of prickly pear juice into a large, heavy-bottomed stainless steel pot. Add the sugar gradually while stirring constantly. This slow addition prevents crystallization and ensures even distribution. Once combined, add the lemon juice, cardamom, clove, and sea salt. Stir until the sugar is completely dissolved—this should take about 5-7 minutes over medium heat.
Step Two: Prepare Your Aromatics
Split your vanilla bean lengthwise and use the back of a knife to scrape out the tiny black seeds. Add both the pod and seeds to your mixture. This step can’t be rushed—the vanilla needs time to infuse its flavor into the juice. Stir occasionally for the next 10 minutes before increasing heat.
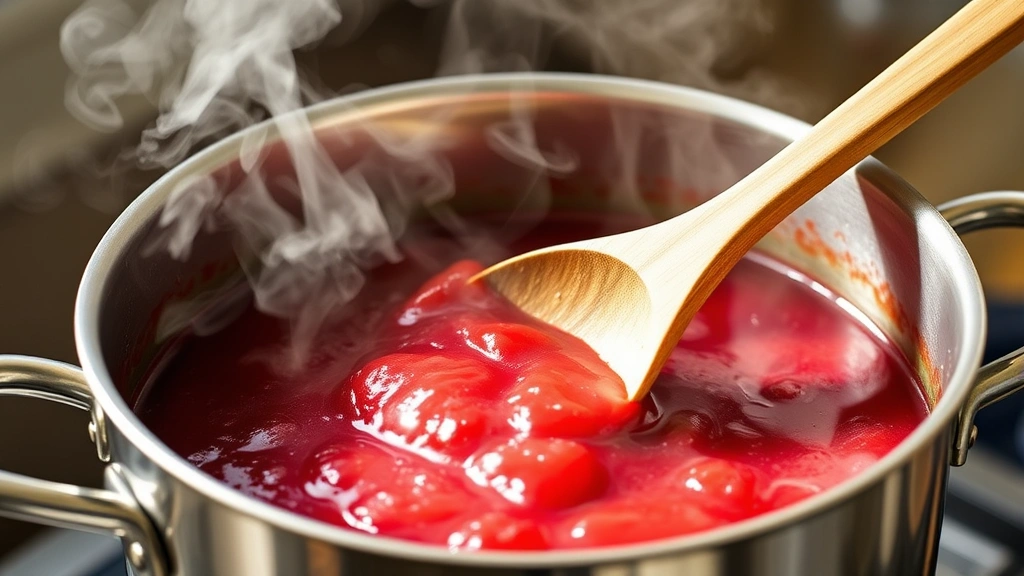
Step Three: Achieve a Rolling Boil
Increase heat to medium-high and bring your mixture to a rolling boil. This is when the mixture boils so vigorously that it continues boiling even while stirring. Once you reach this point, reduce heat to medium-low and maintain the boil. My grandmother would say to “keep it singing but not screaming.”
During this boiling phase, a foam will rise to the surface. Use a clean spoon to skim this off periodically. This isn’t waste—it’s impurities and excess proteins that, if left in, can make your jam cloudy.
Step Four: Monitor Temperature and Consistency
The transformation from juice to jam happens gradually. My grandmother never used a timer; instead, she watched the mixture carefully, observing how it moved on the spoon. After about 30-40 minutes of boiling, the mixture will noticeably thicken. The color will deepen from pale pink to a gorgeous ruby or deep magenta, depending on your prickly pear variety.
Stir frequently during the last 15-20 minutes of cooking. This prevents sticking on the bottom and ensures even heat distribution. The mixture should reduce by approximately half its original volume—this concentration is what transforms juice into jam.
Step Five: Remove the Vanilla Pod
Once your jam reaches the proper consistency (we’ll test for this in the next section), remove the vanilla pod. It will have given all its flavor to the mixture, and removing it prevents any bitterness from prolonged cooking.
Testing for Perfect Set
This is where many jam makers stumble. Knowing exactly when your jam has reached perfect set is crucial for texture and spreadability. My grandmother taught me three foolproof methods.
The Spoon Test (Most Reliable)
Dip a clean spoon into the boiling jam and hold it horizontally. Let the jam cool for 2-3 seconds on the spoon. If it wrinkles slightly when you push it with your finger, it’s ready. If it’s still liquid, continue cooking for another 2-3 minutes and test again. This is the method my grandmother swore by because it accounts for your specific stove and pot.
The Plate Test (Visual Confirmation)
Place a small white plate in the freezer before you start cooking. When you think your jam is done, drop a small spoonful onto the cold plate. Wait 30 seconds, then push it with your finger. It should wrinkle and not run back into the space you created. If it does run, keep cooking.
The Temperature Test (Scientific Approach)
Use a candy or jam thermometer to measure the temperature. Jam is ready when it reaches 220°F (104°C). However, this method is less reliable at high altitudes, so my grandmother preferred the spoon test for her mountain kitchen.
It’s better to slightly undercook your jam than overcook it. Underdone jam can always be recooked with a bit of lemon juice, but overcooked jam becomes rubbery and loses its delicate flavor. Trust your instincts and remember that jam continues to set slightly as it cools.
Sterilizing and Storing
My grandmother’s greatest lesson about jam preservation wasn’t about the jam itself—it was about the vessel holding it. Sterilization is non-negotiable if you want your jam to keep safely for months.
Sterilizing Jars:
- Wash jars, lids, and bands in hot, soapy water
- Place clean jars in a large pot of boiling water for 10 minutes
- Remove with a jar lifter and place upside-down on a clean kitchen towel
- Keep jars hot until you’re ready to fill them
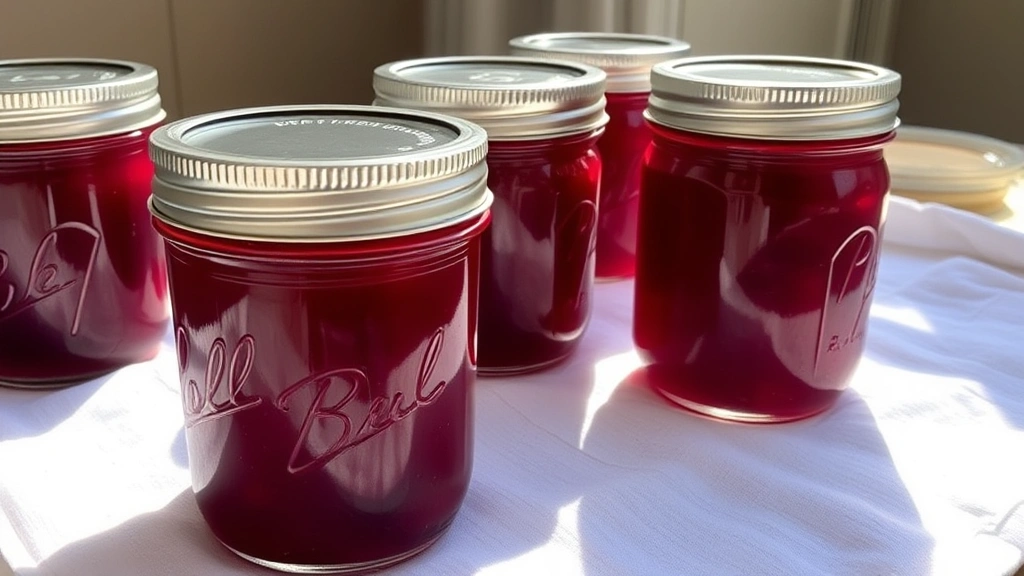
Filling and Sealing:
Working quickly while your jam is still hot, use a funnel and ladle to fill jars, leaving ¼ inch of headspace. Wipe the rims clean with a damp cloth—any jam residue prevents proper sealing. Place hot lids on jars and screw bands on until fingertip-tight (not fully tight).
Processing for Shelf Stability:
Place filled jars in a large pot of boiling water, ensuring they’re covered by at least 1 inch of water. Boil for 10 minutes (adjust for altitude if necessary). Remove jars and let cool on a kitchen towel. You’ll hear a satisfying “pop” as each jar seals—this is the sound of preservation.
Properly sealed jam keeps in a cool, dark pantry for up to two years, though my grandmother would say it rarely lasts that long. Once opened, refrigerate and use within three weeks. This is when you’ll truly appreciate the flavor—spread on warm toast, swirled into healthy dessert recipes, or paired with sharp cheese on a charcuterie board.
For more sophisticated applications, consider how this jam complements savory dishes. It pairs beautifully with duck, pork, and game meats. Some cooks even use it to glaze roasted vegetables or incorporate it into salad dressings for a touch of exotic sweetness.
FAQ
Can I make prickly pear jam without fresh fruit?
While fresh fruit is ideal, you can use frozen prickly pear juice or concentrate in a pinch. Thaw frozen juice completely before using, and reduce the sugar slightly if using concentrate, as it’s already reduced. However, my grandmother always insisted that fresh fruit produces superior flavor and color.
What if my jam doesn’t set properly?
If your finished jam is too runny, you can reboil it. Add 1 tablespoon of lemon juice per cup of jam, return to a boil, and cook until it reaches proper consistency again. Alternatively, mix in a small amount of powdered pectin dissolved in water according to package directions, though my grandmother preferred the traditional method.
Can I reduce the sugar content?
Sugar serves as both sweetener and preservative in jam. While you can reduce it by 10-15%, going lower risks improper setting and shorter shelf life. If you prefer less sweet jam, my grandmother suggested using a natural sweetener like honey for part of the sugar, though this requires careful testing.
Where can I find prickly pears year-round?
Fresh prickly pears are seasonal (late summer through fall), but many specialty markets, Mexican grocers, and farmers’ markets carry them during season. You can also find frozen prickly pear juice online or in specialty sections of well-stocked supermarkets. Some sources like Serious Eats maintain guides for sourcing specialty ingredients.
Is prickly pear jam suitable for people with dietary restrictions?
This recipe is naturally vegan, gluten-free, and nut-free. For low-sugar versions, consult resources on sugar-free jam making from trusted culinary sources. Those with cactus allergies should avoid this recipe entirely.
Can I use this jam in cooking and baking?
Absolutely! This jam works beautifully in baked goods, as a filling for pastries, or as a glaze. It’s particularly stunning swirled into yogurt or used in healthy dessert recipes. Some adventurous cooks even incorporate it into cocktails or use it to top savory dishes like roasted veggies.
How do I know if my jam has gone bad?
Signs of spoilage include mold on the surface, off-putting odors, or fermentation bubbles. If the seal has been compromised, discard the jam. Properly sealed jam stored in cool, dark conditions won’t spoil, but once opened, use within three weeks and store in the refrigerator.
My grandmother’s prickly pear jam recipe represents more than just a preserve—it’s a connection to tradition, a celebration of unique ingredients, and proof that the most special recipes often come from those we love. As you make this jam, take time to appreciate each step, trust the process, and remember that the best recipes are those made with intention and care. Your kitchen will fill with the most beautiful aroma, and your family will taste the love in every spoonful. For additional inspiration on transforming simple ingredients into extraordinary dishes, explore our collection of jam and preserve techniques and culinary guidance.


