How to Make Crunchwrap Supreme: The Ultimate Taco Bell Copycat Recipe
If you’ve ever bitten into a Taco Bell Crunchwrap Supreme, you know exactly why this menu item has devoted fans. The combination of seasoned beef, melted nacho cheese, crispy tortilla layers, and fresh toppings all wrapped in a grilled flour tortilla creates an irresistible handheld meal. The best part? You can recreate this iconic fast-food favorite right in your own kitchen with simple ingredients and straightforward techniques.
Making a crunchwrap supreme recipe at home gives you complete control over ingredient quality and portion sizes. You’ll discover that homemade versions often taste even better than the original, with fresher lettuce, perfectly seasoned meat, and that signature satisfying crunch that makes this sandwich so craveable. Whether you’re looking for a quick weeknight dinner or an impressive meal to share, this copycat recipe delivers restaurant-quality results in under 30 minutes.

Essential Ingredients You’ll Need
The beauty of making crunchwrap supreme at home is that most ingredients are pantry staples or easy grocery store finds. Understanding each component’s role helps you appreciate why this sandwich works so well structurally and flavor-wise.
For the protein base, you’ll need one pound of ground beef. Choose 80/20 ground beef for the best balance of flavor and texture. The fat content ensures juicy, flavorful meat that won’t dry out during cooking. You’ll also need taco seasoning—either store-bought or homemade with chili powder, cumin, paprika, garlic powder, and onion powder.
The cheese component is non-negotiable. You’ll need one cup of nacho cheese sauce, which you can make from scratch using butter, flour, cheddar cheese, and milk, or use jarred nacho cheese for convenience. Some cooks prefer American cheese slices for their melting properties—feel free to experiment.
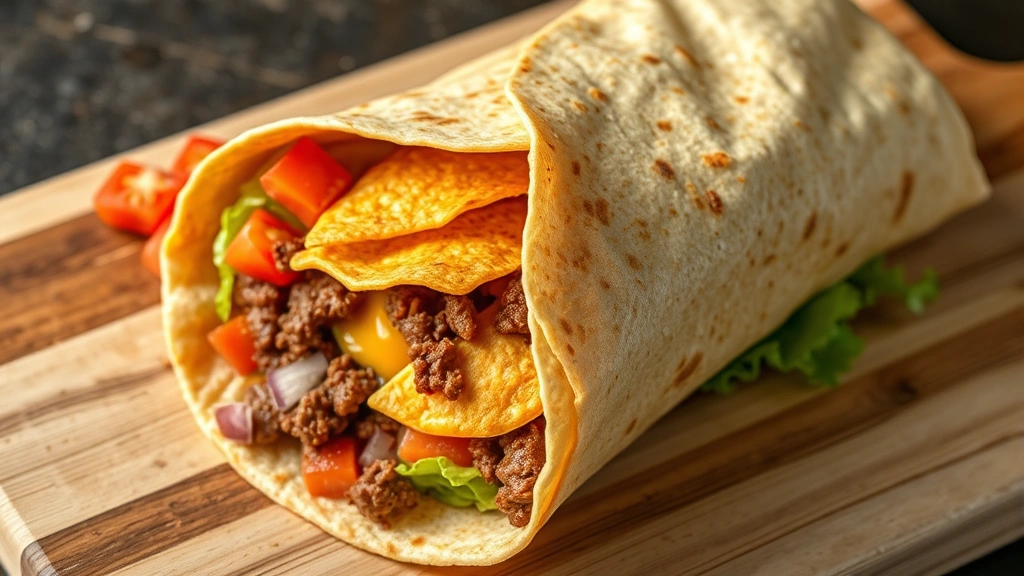
For the structural layers, gather four large flour tortillas, one package of tostada shells or fried tortilla chips (the crispy element that gives this sandwich its name), one cup of sour cream, and one cup of shredded lettuce. Fresh iceberg lettuce works perfectly and provides that essential crunch.
Additional toppings and condiments include one medium tomato (diced), one-half cup diced red onion, and salt and pepper to taste. Some recipes include jalapeños for heat, but they’re optional based on preference.
Preparation Steps Before Assembly
Proper preparation ensures smooth assembly and prevents any last-minute scrambling. Start by cooking the ground beef in a large skillet over medium-high heat. Break the meat into small pieces as it cooks, stirring frequently for about 5-7 minutes until completely browned. Drain excess fat using a colander, then return the meat to the skillet.
Add your taco seasoning along with one-quarter cup water and one tablespoon of tomato paste. Simmer for 3-4 minutes, allowing the flavors to meld and the sauce to thicken slightly. The meat should be well-coated and flavorful. Taste and adjust seasonings as needed.
While the meat cooks, prepare your toppings. Dice your tomato into small, uniform pieces and remove excess seeds and juice with paper towels—this prevents your crunchwrap from becoming soggy. Dice your red onion finely and set aside. Shred your lettuce into bite-sized pieces. Having everything prepped and ready makes assembly quick and efficient.
If making nacho cheese sauce from scratch, melt two tablespoons of butter in a saucepan over medium heat. Whisk in two tablespoons of all-purpose flour to create a roux, cooking for one minute while stirring constantly. Gradually add one cup of whole milk, whisking to prevent lumps. Once smooth and thickened, add two cups of shredded sharp cheddar cheese and one-quarter teaspoon of cayenne pepper. Stir until completely melted and smooth. If using jarred sauce, warm it gently in a microwave-safe container.
This preparation phase is crucial because it allows you to focus entirely on assembly without distractions. When you’re ready to build your crunchwrap, everything should be at arm’s reach and ready to use.
Step-by-Step Assembly Instructions
Assembly is where the magic happens, and getting the order right ensures structural integrity and flavor in every bite. Lay one flour tortilla flat on a clean work surface. This will be your base.
Spread three tablespoons of sour cream in a circular pattern across the tortilla, leaving about one inch of border around the edges. The sour cream acts as an adhesive and flavor component, so distribution matters.
Layer your seasoned ground beef next, using about one-quarter of your cooked meat. Spread it evenly across the sour cream layer, again maintaining that border. Don’t overfill—restraint here prevents overflow during grilling.
Add one-quarter cup of nacho cheese sauce in drizzles across the beef. You can use the back of a spoon to spread it gently, or simply drizzle and let it distribute naturally during grilling.
Place three to four tostada shells or tortilla chips strategically across the cheese layer. These provide the signature crunch and are essential to the crunchwrap experience. Break larger chips to fit, creating a single layer rather than stacking.
Add one-quarter cup of shredded lettuce on top of the crispy layer. This fresh element provides textural contrast and helps keep the sandwich from being too heavy.
Sprinkle two tablespoons of diced tomato and one tablespoon of diced red onion across the lettuce. These fresh vegetables add brightness and acidity that balances the rich cheese and sour cream.
Now comes the critical folding technique. This is what transforms a loaded tortilla into an actual wrapped sandwich. Fold the tortilla in half, then fold it in half again, creating a triangular or roughly square shape. The key is folding tightly enough that everything stays contained but not so tight that the tortilla tears. Some cooks prefer four equal folds from each side toward the center, creating a square packet. Choose whichever method feels most comfortable and secure.
Repeat this assembly process three more times, creating four complete crunchwraps. You should have four individual packets ready for grilling.
Cooking and Grilling Your Crunchwraps
The final cooking step seals everything together and creates that signature golden, crispy exterior. Heat a large skillet or griddle over medium-high heat. You can use butter, vegetable oil, or cooking spray—about one tablespoon of fat per batch.
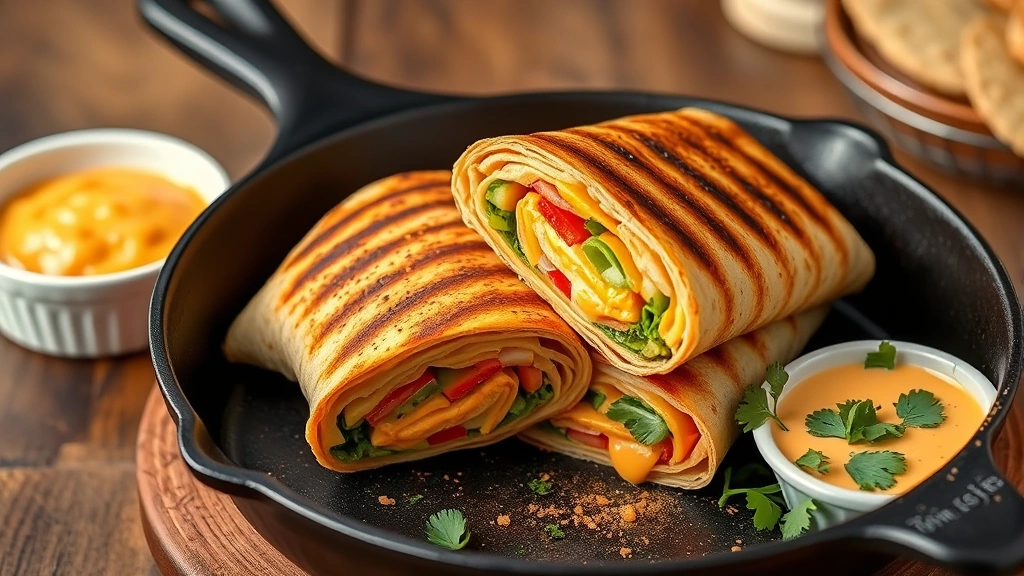
Once your cooking surface is hot, carefully place one crunchwrap seam-side down in the skillet. The seam should be on the bottom, which helps seal it shut. Cook for 2-3 minutes without moving it, allowing the tortilla to develop a golden-brown crust and the cheese to begin melting inside.
Using a wide spatula, carefully flip the crunchwrap and cook the other side for another 2-3 minutes. You’re looking for a similar golden-brown color on both sides. The tortilla should be crispy on the outside while the filling heats through completely.
Transfer the finished crunchwrap to a cutting board and tent it loosely with foil to keep it warm while you cook the remaining three. Work in batches rather than crowding the skillet, which prevents even cooking.
Once all four are cooked, you can serve them immediately or hold them in a 200-degree oven for up to 10 minutes. The crunchwrap is best enjoyed hot, so timing your cooking to coincide with serving is ideal.
If you’re making these as part of easy dinner recipes for beginners, the straightforward cooking method makes this accessible even for novice cooks. The hands-on nature of assembly also makes it fun for family cooking projects.
Pro Tips for Success
Creating the perfect crunchwrap supreme involves several techniques that experienced cooks have perfected. First, don’t skip the sour cream layer. It’s not just a topping—it’s structural glue that holds everything together and adds essential moisture and tang.
The crispy tortilla element is what distinguishes a crunchwrap from a regular burrito. Use fresh tostada shells or tortilla chips that still have crunch. Stale chips lose their textural appeal. If your chips are slightly soft, you can crisp them in a 300-degree oven for 3-5 minutes before assembly.
When grilling your crunchwrap, resist the urge to flip too early. The first side needs sufficient time to develop a crust before flipping. This crust seals in moisture and prevents the tortilla from tearing when you flip it.
For cheese distribution, some cooks prefer placing a cheese slice directly on the tortilla before the sour cream layer. This ensures maximum melting and cheese flavor in every bite. Experiment to find your preference.
Keep your vegetable pieces small. Large chunks of tomato or onion can poke through the tortilla during grilling and make handling difficult. Uniformly small pieces distribute better and create more balanced bites.
If you’re serving these alongside other meals, consider pairing them with healthy crockpot recipes that you’ve prepared ahead, making dinner preparation efficient and stress-free.
Creative Variations to Try
Once you’ve mastered the basic crunchwrap supreme recipe, you can experiment with variations that suit your preferences or dietary needs. The vegetarian version substitutes seasoned black beans or lentils for ground beef, providing protein and that hearty satisfaction. Season the beans with the same taco seasoning for consistency.
The chicken variation uses seasoned shredded chicken breast instead of beef. Cook diced chicken breasts with taco seasoning until cooked through, then shred using two forks. This lighter option works well for those watching calories or preferring poultry.
Add jalapeños and hot sauce for a spicy version. Layer fresh jalapeño slices into your assembly, and drizzle hot sauce along with the nacho cheese. This variation appeals to heat-lovers and adds complexity to the flavor profile.
Create a breakfast version by substituting scrambled eggs and crispy bacon for the seasoned beef, incorporating it into your quick breakfast recipes rotation. Use mild salsa instead of nacho cheese for a different flavor direction.
The loaded version adds extra toppings like guacamole, pico de gallo, black olives, and corn. This creates a more substantial sandwich, so you may need to be more careful with folding to prevent overstuffing.
Experiment with different cheeses such as pepper jack for heat, smoked gouda for depth, or a blend of Mexican cheeses. Each cheese brings different melting properties and flavor profiles to explore.
FAQ
Can I make crunchwraps ahead of time?
Yes, you can assemble crunchwraps several hours ahead and refrigerate them. Store them in an airtight container with parchment paper between each one. Grill them directly from the refrigerator, adding an extra minute to each side since they’ll start cold. However, the tostada chips may soften over time, so assemble no more than 4-6 hours before cooking for optimal crunch.
What’s the best way to reheat leftover crunchwraps?
Reheat in a skillet over medium heat for 2-3 minutes per side, which restores crispiness better than a microwave. Alternatively, wrap them in foil and place in a 350-degree oven for 10-12 minutes. Microwaving works but results in softer tortillas and potentially soggy chips.
Can I use corn tortillas instead of flour tortillas?
Corn tortillas are more fragile and may tear during folding with a full filling. Flour tortillas are preferable for their flexibility and strength. However, you could use thicker corn tortillas or double them for added strength if you prefer corn’s flavor.
Why is my crunchwrap falling apart during grilling?
This usually indicates insufficient sour cream for adhesion or overstuffing. Use the recommended three tablespoons per tortilla and don’t exceed the specified amounts for each ingredient. Also ensure your folds are tight and secure before cooking.
Is there a vegetarian or vegan option?
Absolutely. Substitute ground beef with seasoned black beans, lentils, or crumbled tofu for the protein. Use dairy-free cheese alternatives and vegan sour cream for a fully vegan version. The assembly and cooking methods remain identical.
How many crunchwraps does this recipe make?
This recipe makes four complete crunchwraps, serving four people as a main course or eight as a snack or appetizer. The recipe doubles easily if you need more servings.
What external resources help master wrapping techniques?
The Crafty Cooking cooking techniques guide provides detailed wrapping instructions. Additionally, Serious Eats offers comprehensive food science explanations for why certain techniques work, helping you understand the principles behind this recipe. The Spruce Eats features video demonstrations of assembly techniques that prove invaluable for visual learners.
Can I cook these on a panini press or waffle iron?
A panini press works excellently for cooking crunchwraps, creating even browning on both sides simultaneously. Cook for 3-4 minutes total. A waffle iron creates interesting texture but may cause filling to squeeze out due to the ridged surface. Stick with a skillet or panini press for best results.
What sides pair well with crunchwraps?
Serve alongside salsa, guacamole, or additional nacho cheese sauce for dipping. Fresh Mexican rice, refried beans, or a simple green salad complement the richness of the crunchwrap well. For inspiration on complete meal planning, explore healthy dessert recipes to round out your meal with a satisfying finish.


