Authentic Gipfeli Recipe: Swiss Baker’s Secret
Gipfeli, pronounced “GHIP-fell-ee,” is Switzerland’s iconic croissant-like pastry that has captured hearts across Europe for centuries. Unlike its French cousin, the croissant, gipfeli features a distinctive crescent shape and a slightly sweeter, more tender crumb that makes it irresistibly craveable. This quick breakfast recipe staple represents the pinnacle of Swiss baking craftsmanship, combining buttery layers with precision technique that separates authentic gipfeli from mediocre imitations.
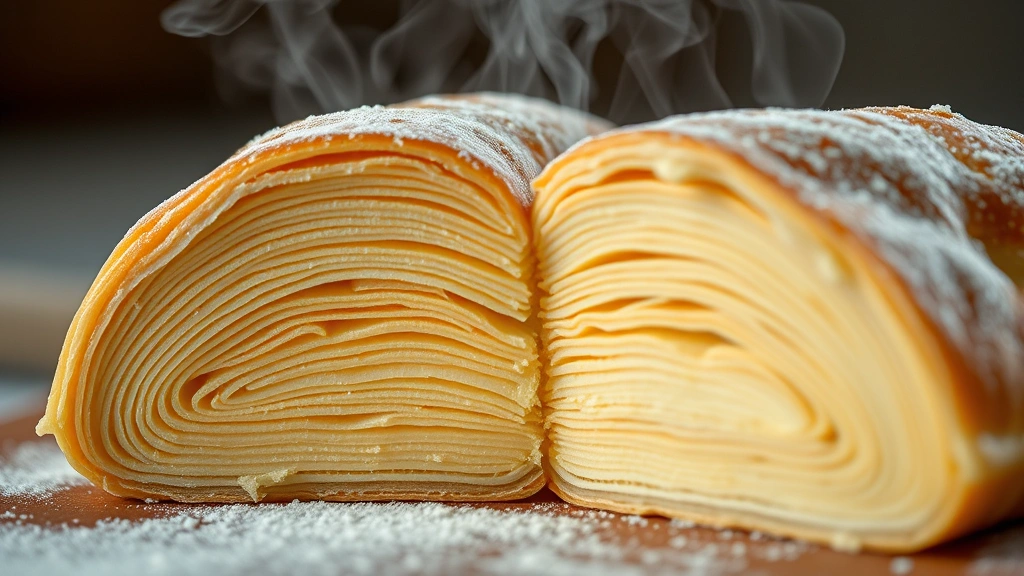
The magic of gipfeli lies in its laminated dough—a technique where butter is folded into yeast dough multiple times to create hundreds of gossamer-thin layers. When baked, these layers puff up dramatically, creating a pastry that’s simultaneously crispy on the outside and tender within. Swiss bakers have perfected this craft over generations, and today we’re unveiling their most closely guarded secrets so you can recreate this masterpiece in your own kitchen.
Understanding Gipfeli: History and Characteristics
Gipfeli holds a special place in Swiss culinary tradition, with roots tracing back to 17th-century Austria and Hungary. However, Switzerland has made this pastry entirely its own, developing techniques and flavor profiles that distinguish Swiss gipfeli from Austrian kipferl and French croissants. The name itself derives from the German word “Gipfel,” meaning peak or summit—a fitting description for the pastry’s distinctive pointed ends.
What sets authentic gipfeli apart is its subtle sweetness, achieved through the addition of sugar and sometimes honey to the dough. The crumb structure is notably finer and more tender than a croissant, with a delicate, almost melt-in-your-mouth quality. Traditional Swiss gipfeli are typically smaller than French croissants, making them perfect for a single serving at breakfast or as an afternoon treat paired with coffee.
Swiss bakeries follow strict standards for gipfeli production, with many establishments refusing to use margarine or shortening—only real butter creates the authentic flavor and texture. This commitment to quality ingredients is fundamental to understanding why homemade gipfeli, when made properly, tastes so remarkably different from mass-produced versions.
Essential Ingredients for Authentic Gipfeli
Creating authentic gipfeli requires precision in ingredient selection. Here’s what you’ll need for approximately 16 gipfeli:
- 500g bread flour (high protein content helps develop gluten structure)
- 300ml whole milk (room temperature for optimal dough development)
- 60g granulated sugar (provides subtle sweetness characteristic of Swiss style)
- 10g sea salt (enhances flavor and controls fermentation)
- 7g instant yeast (or 14g fresh yeast)
- 400g cold unsalted butter (essential for lamination; European butter with higher fat content preferred)
- 1 egg yolk (for egg wash to achieve golden color)
- 15ml water (for egg wash)
The quality of butter cannot be overstated. Swiss bakers exclusively use European-style butter with 84-86% butterfat content, compared to standard American butter at 80%. This higher fat content creates superior flakiness and flavor. If possible, source butter from local dairies or specialty shops—your gipfeli will noticeably improve.
Flour selection also matters significantly. Bread flour with 12-14% protein creates better gluten development than all-purpose flour. This stronger gluten network supports the lamination process and prevents butter from breaking through during folding.
Step-by-Step Dough Preparation
The foundation of exceptional gipfeli begins with properly prepared dough. This isn’t merely mixing ingredients—it’s a methodical process that requires patience and attention to temperature control.
Step 1: Combine Dry Ingredients
In a large mixing bowl, whisk together 500g bread flour, 60g sugar, and 10g sea salt. This dry mixing ensures even distribution of salt and sugar throughout the dough, preventing pockets of over-salted or overly sweet areas. Set aside your dry mixture while you prepare the wet ingredients.
Step 2: Activate the Yeast
Pour 300ml of room-temperature milk into a separate bowl. Sprinkle 7g instant yeast over the milk and let it sit for 2-3 minutes. This “blooming” period allows the yeast to fully hydrate and activate. You should see foam developing on the surface, indicating viable yeast. If no foam appears, your yeast may be expired—discard and start with fresh yeast.
Step 3: Mix the Dough
Create a well in the center of your dry ingredients and pour the yeast-milk mixture into it. Using a wooden spoon or your hands, gradually incorporate the dry ingredients into the wet mixture. Mix until a shaggy dough forms—don’t worry if it appears rough and uneven at this stage. Continue mixing for approximately 3-4 minutes until all flour is incorporated and the dough comes together.
Step 4: First Knead (Machine Method)
Transfer your dough to a stand mixer fitted with a dough hook. Knead on medium speed for 8-10 minutes. The dough should become smooth, elastic, and slightly tacky but not sticky. If using the hand-kneading method, work the dough on a lightly floured surface for 12-15 minutes until it reaches the same smooth, elastic consistency. The dough is ready when it springs back quickly after being poked with your finger.
Step 5: First Bulk Fermentation
Shape the dough into a ball and place it in a lightly oiled bowl. Cover with a damp kitchen towel or plastic wrap. Allow the dough to ferment at room temperature (68-72°F is ideal) for 1-1.5 hours, until it increases in volume by approximately 50% (not doubled—this is crucial). Over-fermentation at this stage can result in weak gluten that tears during lamination.
The Lamination Process Explained
Lamination is where gipfeli transforms from ordinary dough into a pastry marvel. This technique requires patience, temperature control, and precise folding.
Preparing the Butter Block
While your dough ferments, prepare your butter. Remove 400g cold butter from the refrigerator and cut it into approximately 2cm cubes. Place the cubes between two sheets of parchment paper and pound them gently with a rolling pin until they form a cohesive but still cold butter block approximately 15cm x 15cm in size. The butter should be cold enough to hold its shape but pliable enough to fold without shattering. This temperature sweet spot—around 16-18°C—is critical for successful lamination.
First Lamination: Enclosing the Butter
After your first bulk fermentation, turn your dough onto a lightly floured surface. Using a rolling pin, gently flatten the dough into a rectangle approximately 20cm x 30cm. Place your prepared butter block in the center of the dough, orienting it like a diamond within the rectangle. Fold the four corners of dough over the butter, overlapping them slightly at the center and sealing the edges gently—this creates what bakers call the “butter envelope.”
Now roll this butter envelope into a rectangle approximately 20cm x 40cm. Be deliberate and gentle—you’re not trying to incorporate the butter yet, just flatten the package. This is your first “turn.” Fold the dough into thirds like a business letter: fold the bottom third up and the top third down, creating three layers. Rotate the dough 90 degrees so the open edges face you. This completes your first turn.
Second through Fourth Turns
Wrap your folded dough in plastic wrap and refrigerate for 20-30 minutes. This rest period allows the gluten to relax and the butter to firm up, preventing tearing during the next turn. Remove from the refrigerator, place on a lightly floured surface with the open edges facing you, and repeat the rolling and folding process. You’re now performing your second turn.
Complete three more turns (turns two, three, and four), refrigerating for 20-30 minutes between each turn. After your fourth turn, refrigerate the dough for at least 2 hours, or preferably overnight. This extended rest is essential—it allows the dough to relax completely and the butter to firm up, making the dough much easier to shape the next day.
Temperature Control: The Critical Factor
Throughout lamination, maintaining proper temperature is absolutely essential. If your kitchen is warm (above 72°F), refrigerate your dough for longer periods between turns. If butter breaks through the dough surface (called “blowout”), immediately refrigerate for at least 1 hour before continuing. Conversely, if your dough becomes too cold and brittle, let it sit at room temperature for 5-10 minutes before rolling.
Shaping and Final Proofing
After your overnight rest, your laminated dough is ready for shaping. This step determines whether your gipfeli will have the characteristic pointed ends and proper expansion during baking.
Preparing for Shaping
Remove your dough from the refrigerator and let it sit at room temperature for 10-15 minutes—this slight warming makes it easier to work with without damaging the layers. On a lightly floured surface, gently roll your dough into a rectangle approximately 30cm x 40cm and about 8mm thick. The thickness is important; too thin and your gipfeli will be too crispy and dry, too thick and they’ll remain doughy inside.
Cutting the Triangles
Using a sharp knife or pastry wheel, cut your dough into 16 triangles. The traditional method involves cutting the rectangle in half lengthwise, then making diagonal cuts across the width to create isosceles triangles. Each triangle should have a base of approximately 8cm and equal sides of approximately 10cm. Uniform sizing ensures even baking.
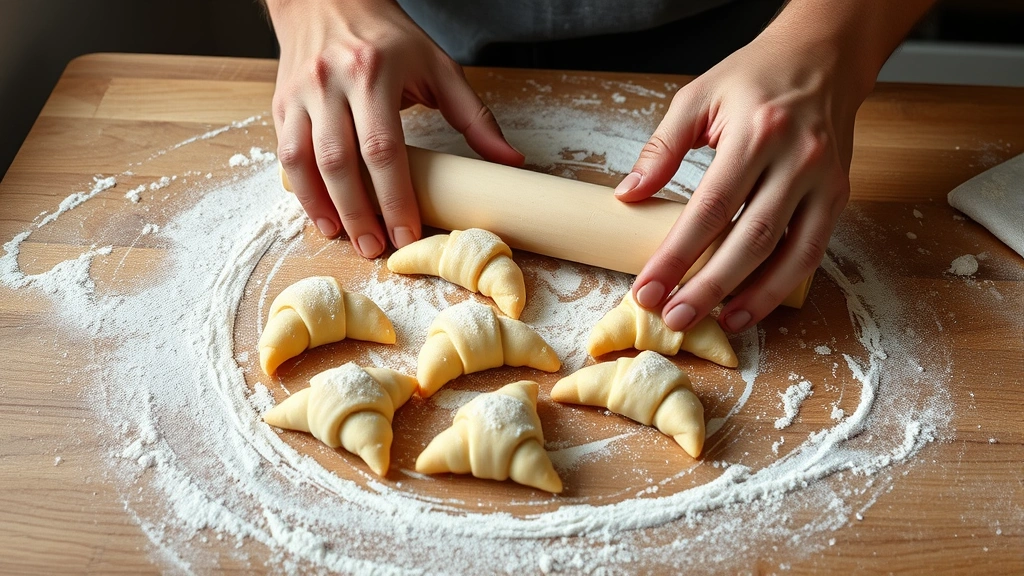
Rolling and Shaping
Take one triangle and gently stretch it slightly to elongate it. Starting from the wide base, tightly roll the triangle toward the point, creating a crescent shape. As you roll, the point should end up tucked underneath. Gently curve the two ends toward each other to create the distinctive crescent shape that characterizes authentic gipfeli. Place each shaped gipfeli point-side down on parchment-lined baking sheets, spacing them approximately 5cm apart.
Final Proofing
Cover your shaped gipfeli with a damp kitchen towel and allow them to proof at room temperature for 2-3 hours, until they’ve increased in volume by approximately 50-75%. Unlike bread, which you want to proof until doubled, gipfeli should have moderate proof—over-proofing results in flat, dense pastries that don’t puff properly in the oven. A properly proofed gipfeli will feel light and airy when gently touched but will spring back slightly.
During the final 30 minutes of proofing, preheat your oven to 200°C (392°F). This high temperature is necessary to create the dramatic puffing action that defines exceptional gipfeli.
Baking to Golden Perfection
The final baking stage transforms your carefully prepared dough into the golden, flaky pastry you’ve been working toward.
Egg Wash Application
Just before baking, prepare an egg wash by whisking together 1 egg yolk with 15ml water. Using a soft pastry brush, gently brush the egg wash over each gipfeli. This creates the characteristic glossy, golden-brown exterior. Be careful not to apply excessive egg wash, which can seal the surface and prevent proper rising.
Baking Process
Place your baking sheets in the preheated 200°C oven. Bake for 18-22 minutes, until the gipfeli are deep golden brown. The exact time depends on your oven’s characteristics—every oven bakes differently. Start checking at the 15-minute mark. Properly baked gipfeli should have a rich, mahogany color and sound crispy when tapped on the bottom.
If you notice the tops browning too quickly while the interiors remain doughy, reduce your oven temperature to 190°C and continue baking. Some bakers prefer rotating their baking sheets halfway through baking to ensure even browning.
Cooling
Remove your gipfeli from the oven and transfer them to a wire cooling rack. This allows air to circulate underneath, preventing steam from making the bottoms soggy. Gipfeli are best enjoyed warm or at room temperature on the same day they’re baked. Store any leftovers in an airtight container for up to 2 days, though they’re most delicious within the first 24 hours.
Troubleshooting Common Gipfeli Problems
Gipfeli Are Flat and Dense
This typically indicates insufficient lamination or over-fermentation. Ensure you’re completing all four turns properly, and avoid proofing until the dough is completely doubled. Flat gipfeli also result from oven temperatures that are too low—verify your oven with an oven thermometer.
Butter Leaks Out During Baking
Butter blowout occurs when the dough temperature is too warm or when you’ve applied excessive pressure during rolling. Keep your dough cold between turns, and use gentle pressure when rolling. If butter begins leaking during baking, you’ve likely over-proofed—the dough became too warm and soft to contain the butter.
Gipfeli Are Tough or Chewy
Tough gipfeli result from over-kneading the initial dough or insufficient lamination. Don’t over-work the dough during the initial mixing stage, and ensure you’re completing all four turns. Additionally, verify you’re using bread flour rather than all-purpose flour—the higher protein content is essential.
Uneven Rising or Shape Issues
Ensure your triangles are cut uniformly and that you’re rolling them with consistent pressure. Uneven rising indicates inconsistent shaping. Also verify that your final proof is occurring at a consistent room temperature—drafts or cold spots near windows will result in uneven proofing.
Insufficient Flakiness
Lack of flakiness suggests inadequate lamination or that your dough is too warm during folding. Complete all four turns, use cold butter, and maintain temperature control throughout the process. Additionally, ensure your butter has 84% butterfat content—lower-fat butter won’t create the same flaky layers.
For more insights into pastry techniques, explore the American Bakers Association resources and detailed laminated dough guides. Understanding the science behind lamination will deepen your appreciation for this technique.
FAQ
Can I make gipfeli without a stand mixer?
Yes, absolutely. Hand-knead the dough for 12-15 minutes until smooth and elastic. The process takes longer but produces identical results. Many traditional Swiss bakers still hand-knead their dough.
What’s the difference between gipfeli and croissants?
Gipfeli are typically smaller, slightly sweeter, and have a more tender crumb than croissants. Croissants are larger, less sweet, and have a more pronounced flaky structure. The fundamental difference lies in dough composition and folding technique.
Can I freeze gipfeli dough?
Yes, you can freeze laminated dough after your final turn. Wrap it tightly in plastic wrap and freeze for up to 3 weeks. Thaw overnight in the refrigerator before shaping and proofing. You can also freeze shaped, unbaked gipfeli for up to 2 weeks—bake directly from frozen, adding 3-5 minutes to baking time.
Why is my oven temperature so important?
High heat (200°C) creates steam rapidly, which causes the laminated layers to puff and separate. Lower temperatures won’t generate sufficient steam, resulting in dense, flat gipfeli. An oven thermometer is essential for accuracy.
Can I use margarine instead of butter?
Technically yes, but you’ll sacrifice authentic flavor and texture. Margarine lacks butter’s rich taste and won’t create the same flaky layers. Swiss bakers consider this sacrilege—real gipfeli are made exclusively with real butter.
How long do baked gipfeli stay fresh?
Freshly baked gipfeli are best consumed within 24 hours. Store them in an airtight container at room temperature. After 2 days, they begin losing their crispy exterior. You can refresh slightly stale gipfeli by warming them in a 160°C oven for 5-7 minutes.
What should I do if my dough tears during lamination?
Small tears are usually fine and will seal during baking. For significant tears, patch them by pressing dough from another area over the tear, then refrigerate before continuing. If the dough is severely compromised, refrigerate for 1-2 hours and start fresh with a new turn.
Is there a quicker method to make gipfeli?
The lamination process requires time for gluten development and proper layer formation. While some recipes suggest fewer folds, you’ll sacrifice the characteristic flakiness. Authentic gipfeli demand patience—there are no true shortcuts without compromising quality.
Making authentic gipfeli connects you to centuries of Swiss baking tradition. While the process demands attention and patience, the reward is a pastry so superior to commercial versions that you’ll understand why Swiss bakers guard their secrets so carefully. Start with quality ingredients, maintain temperature control, and approach each step with intention. Your first batch of homemade gipfeli will taste like a revelation—crispy, tender, buttery, and absolutely unforgettable.


