Gluten-Free Bread Machine Recipe: Expert-Approved Method for Perfect Loaves
Baking gluten-free bread at home has never been easier than with a dedicated bread machine. For years, people with celiac disease or gluten sensitivity resigned themselves to dense, crumbly store-bought loaves or complex manual baking processes. Today’s bread machines, combined with improved gluten-free flour blends and proper technique, can produce bakery-quality results in your kitchen. This comprehensive guide walks you through everything you need to know to master gluten-free bread machine baking.
The key to success lies in understanding how gluten-free doughs behave differently from traditional wheat-based recipes. Without gluten’s elasticity, these doughs require adjustments in liquid ratios, rising times, and ingredient selection. We’ll explore proven formulas, troubleshooting tips, and variations that deliver consistently excellent results. Whether you’re newly diagnosed with gluten sensitivity or a seasoned baker exploring new techniques, this expert-approved recipe will transform your bread machine into a reliable gluten-free bakery.
Why Bread Machines Excel at Gluten-Free Baking
Bread machines offer unique advantages for gluten-free baking that make them superior to hand-kneading methods. Traditional bread relies on developing gluten networks through extended kneading, but gluten-free doughs cannot develop this structure. Instead, bread machines provide consistent mechanical mixing that properly hydrates starches and distributes ingredients evenly without requiring the baker to develop feel and intuition.
The controlled environment of a bread machine maintains stable temperatures throughout fermentation, which is critical for gluten-free doughs that can be temperamental. Unlike manual baking where ambient temperature fluctuations cause inconsistent results, machines regulate conditions automatically. The heating elements ensure proper yeast activation and enzyme activity, while the timer function removes guesswork from rising times.
Additionally, bread machines eliminate the need for manual shaping, which presents challenges with gluten-free doughs. These doughs are stickier and more delicate than wheat-based versions, making them difficult to work with by hand. The machine’s paddle does the heavy lifting, producing uniform crumb structure and even browning that’s difficult to achieve manually.
Essential Ingredients for Success
Gluten-Free Flour Blends: The foundation of any successful gluten-free bread machine recipe is a quality flour blend. Pre-mixed blends specifically formulated for bread baking work best—brands like Bob’s Red Mill 1-to-1, King Arthur Measure for Measure, or Caputo Fioreglut are engineered to mimic wheat flour’s properties. These blends typically combine rice flour, tapioca starch, potato starch, and other starches in proportions that promote proper rise and texture.
Binders and Structure: Since gluten provides elasticity and structure, gluten-free doughs need substitutes. Xanthan gum (½ teaspoon per cup of flour) or psyllium husk powder creates the network that traps gas bubbles. Some bakers prefer combinations of both for superior crumb structure. Ensure your flour blend doesn’t already contain xanthan gum to avoid doubling up.
Yeast and Leavening: Use active dry yeast or instant yeast—both work equally well in bread machines. The enclosed environment provides consistent warmth for reliable fermentation. Some bakers add a small amount of dough enhancer or vital wheat gluten substitute, though this is optional with quality flour blends.
Liquid Ratios: Gluten-free doughs require more liquid than traditional recipes because starches absorb moisture differently than gluten. Most successful recipes use a ratio of 1 cup flour to approximately ¾ cup liquid. Warm water (110°F) activates yeast optimally, while milk (dairy or non-dairy) adds richness and helps browning.
Fats and Eggs: Butter, olive oil, or coconut oil improves texture and shelf life. Eggs act as binders and create structure, with most recipes using 1-2 eggs per loaf. These ingredients also contribute to browning and create a softer crumb.
Salt and Sweetener: Salt strengthens flavor and controls yeast activity—use ¾ to 1 teaspoon per loaf. A tablespoon of honey, sugar, or agave provides food for yeast and aids browning. Don’t skip sweetener; it’s essential for proper fermentation and crust development.
Master Gluten-Free Bread Recipe
Ingredients (1.5 lb loaf):
- 1¾ cups warm water (110°F)
- 2 cups gluten-free bread flour blend
- 1 tablespoon honey or sugar
- 1½ teaspoons salt
- 2 tablespoons olive oil or melted butter
- ½ teaspoon xanthan gum (if not in flour blend)
- 1½ teaspoons active dry yeast or instant yeast
- 1 egg (optional, for richer crumb)
For 2 lb loaf, multiply all ingredients by 1.33:
- 2¼ cups warm water
- 2⅔ cups gluten-free bread flour blend
- 1¼ tablespoons honey
- 2 teaspoons salt
- 3 tablespoons olive oil
- ⅔ teaspoon xanthan gum
- 2 teaspoons yeast
- 1-2 eggs
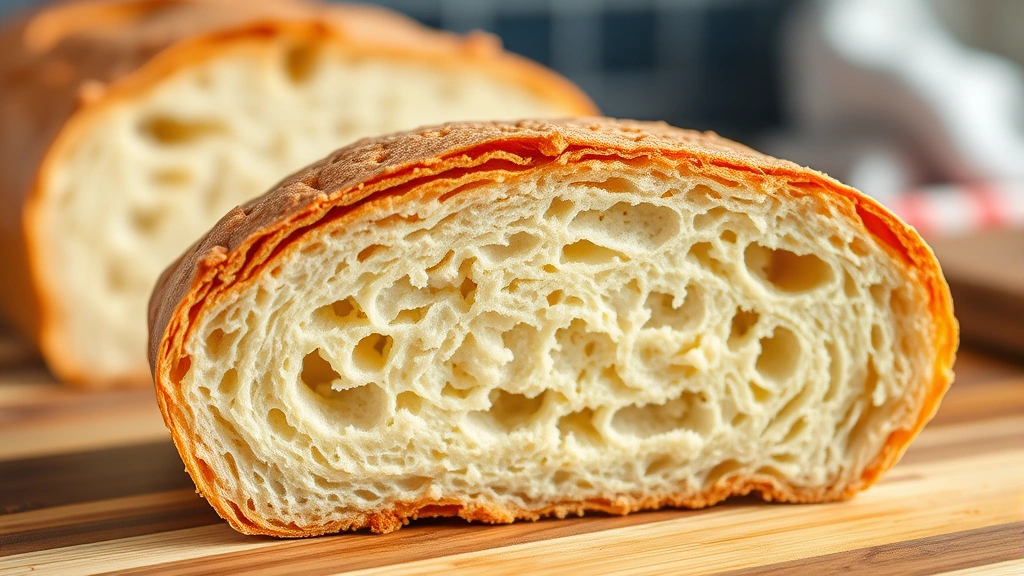
This recipe produces a tender crumb with excellent moisture retention and a crispy crust. The proportions have been tested extensively and work with most standard bread machine cycles.
Step-by-Step Instructions
Preparation (5 minutes):
- Measure all ingredients separately before beginning. Accuracy is critical in gluten-free baking—use a kitchen scale for flour if possible, or fluff flour before measuring with dry measuring cups.
- Ensure water temperature is exactly 110°F. Use a kitchen thermometer; too hot kills yeast, too cold slows fermentation.
- If using eggs, bring them to room temperature for better incorporation.
- Check your bread machine’s manual for ingredient order. Most machines require liquid first, followed by dry ingredients, with yeast in a separate well or added last.
Loading the Machine (3 minutes):
- Add warm water to the bread machine pan first.
- Sprinkle flour blend evenly over water. Use a spatula to level the flour surface, creating a barrier between liquid and yeast.
- Create a small well in the flour center and add yeast. Some machines have dedicated yeast dispensers; follow your manual’s recommendation.
- Add salt, honey, oil, xanthan gum, and egg (if using) in separate corners of the pan, away from yeast contact.
- Close the lid and select the gluten-free cycle. Most modern machines have dedicated cycles optimized for these doughs’ unique requirements.
Machine Cycle (3-4 hours):
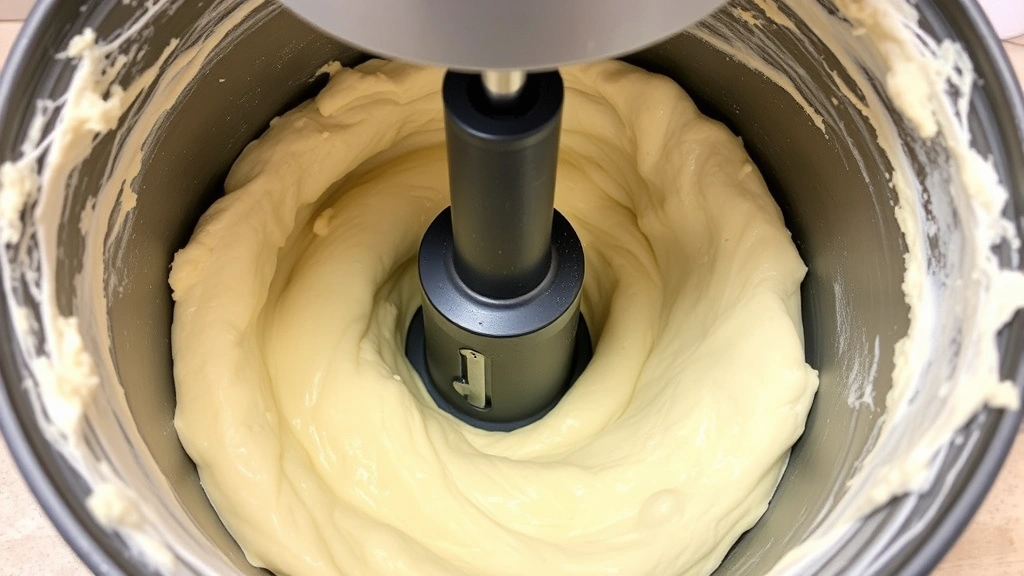
- The machine begins mixing immediately. After 2-3 minutes, pause and check dough consistency. It should resemble thick cake batter, not stiff dough. If too dry, add water one tablespoon at a time through the top opening. If too wet, add flour blend one tablespoon at a time.
- The machine will knead for approximately 15 minutes during the first phase. Unlike wheat doughs, gluten-free doughs shouldn’t form a ball—they remain more batter-like.
- First rise occurs over 45-60 minutes. The dough should rise noticeably but not double (gluten-free doughs rise differently than wheat).
- Punch down occurs automatically on most machines, then a second rise of 30-45 minutes follows.
- Baking happens in the machine for 45-55 minutes at approximately 350°F. The crust develops a golden-brown color.
Finishing (10 minutes):
- When the cycle completes, carefully remove the hot pan using oven mitts. The paddle will still be inside.
- Let the bread cool in the pan for 5 minutes. This allows the crumb to set slightly, making removal easier.
- Turn the pan upside down and gently shake the loaf onto a wire cooling rack.
- If the paddle is stuck inside the loaf, wait 2-3 minutes and gently wiggle it free. Don’t force it, as this damages the crumb.
- Cool completely on the rack (at least 2 hours) before slicing. Cutting warm bread crushes the crumb structure.
For comparison, if you enjoy healthy crock pot recipes, you’ll appreciate how bread machines similarly automate the cooking process, allowing you to set and forget while focusing on other meal preparation.
Troubleshooting Common Issues
Dense, Heavy Crumb: The most common complaint with gluten-free bread machine recipes stems from overly dense texture. This usually indicates insufficient rise time or inadequate leavening. Verify your yeast is fresh (check expiration date), ensure water temperature is correct, and confirm you’re using the gluten-free cycle which provides longer rise times than standard cycles. Some machines require manual yeast additions if not using the dispenser.
Dry Bread: If your loaf emerges dry and crumbly, your dough likely didn’t have enough moisture. Gluten-free doughs need more liquid than wheat versions. Increase water by 2-3 tablespoons in your next attempt, or reduce flour by 2 tablespoons. The dough should resemble thick cake batter before baking, not traditional bread dough.
Gummy Interior: Underbaking causes sticky, gummy centers. Extend the baking time by 5-10 minutes, or select a machine cycle with longer baking duration. Gluten-free breads need slightly longer baking than wheat breads to fully set the crumb. Insert a thermometer into the center; the internal temperature should reach 205-210°F.
Bread Won’t Rise: Failed rises indicate yeast problems or temperature issues. Confirm water temperature is 110°F exactly. If using instant yeast stored in the pantry exposed to heat and humidity, replace it with fresh yeast. Keep yeast in an airtight container in the refrigerator. Additionally, ensure your kitchen isn’t too cold; bread machines work best in environments above 68°F.
Collapsed Top or Sunken Center: Overproofing causes structure collapse. This happens when dough rises too long before baking. Try reducing the first or second rise time by 10-15 minutes, or switch to a machine cycle with shorter rise phases. Some machines have adjustable rise settings—consult your manual.
Uneven Browning: If the crust browns unevenly, your oven temperature may be off. Use an oven thermometer to verify accuracy. Additionally, ensure the machine isn’t positioned near drafts from windows or air conditioning, which affect baking temperature.
Paddle Stuck in Bread: This common annoyance happens because gluten-free dough is stickier. After removing bread from the pan, let it cool for 5 minutes before attempting to remove the paddle. If still stuck, run warm water around the paddle shaft to loosen it, then gently wiggle it free. For future bakes, lightly oil the paddle before use.
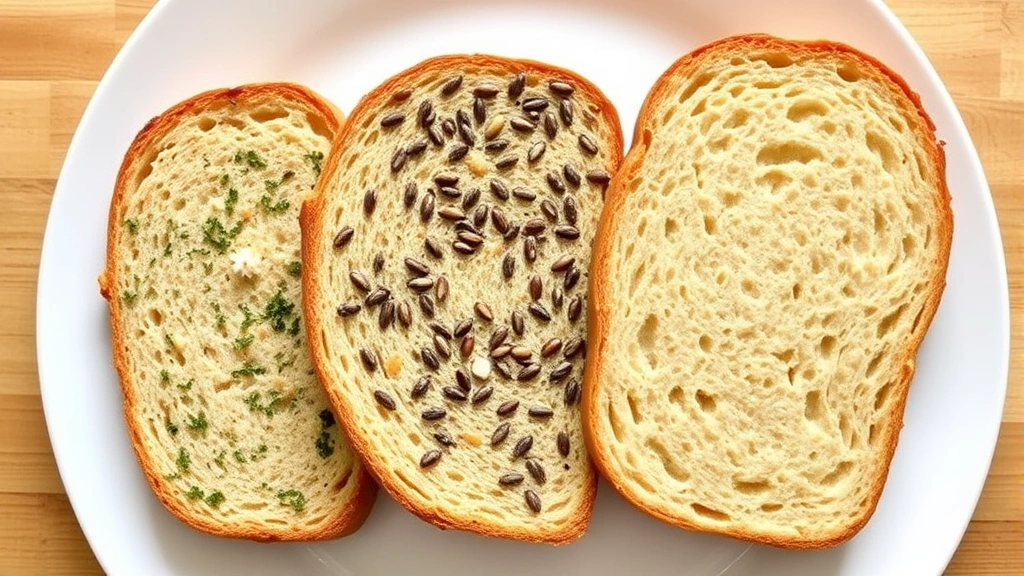
Flavor Variations and Additions
Herb and Garlic Bread: Add 2 teaspoons dried Italian herbs, ½ teaspoon garlic powder, and 2 tablespoons grated Parmesan cheese to the dry ingredients. The result is a savory loaf perfect for soups or as a side to chili recipe crockpot dishes.
Whole Grain Boost: Replace ½ cup of gluten-free flour blend with sorghum flour, teff flour, or buckwheat flour for added nutrition and subtle flavor. These ancient grains increase fiber and create earthier notes while maintaining adequate rise.
Seed and Nut Bread: Fold in ½ cup sunflower seeds, pumpkin seeds, or chopped nuts after the first rise. Add these additions through the top opening when the machine signals. They provide texture contrast and nutritional boost without affecting rise significantly.
Cinnamon Raisin: Add 2 teaspoons ground cinnamon to dry ingredients and ¾ cup raisins (soaked in warm water for 10 minutes) after the first rise. This variation works beautifully for breakfast toast.
Everything Bagel Style: Top the dough after the final rise (before baking) with a mixture of sesame seeds, poppy seeds, dried onion flakes, and coarse sea salt. The machine will bake these toppings directly onto the crust.
Sourdough Flavor: Add ¼ teaspoon cream of tartar along with the yeast to create subtle tangy notes without maintaining a starter. Increase salt to 1¼ teaspoons for enhanced flavor complexity.
These variations demonstrate the versatility of your gluten-free bread machine recipe, allowing you to customize based on dietary preferences or meal pairings. Unlike preparing buffalo chicken dip recipe crock pot style, bread machine baking rewards consistency, but these flavor additions are forgiving and encourage experimentation.
Storage and Shelf Life
Room Temperature Storage: Cooled gluten-free bread keeps at room temperature in an airtight container or bread box for 2-3 days. Because gluten-free breads lack the protein structure that slows staling, they become dry faster than wheat bread. Store away from direct sunlight and heat sources.
Refrigerator Storage: While refrigeration preserves freshness longer (up to 5 days), it accelerates staling through a process called retrogradation. Only refrigerate if your kitchen is very warm or if you notice mold developing.
Freezing for Long-Term Storage: Freeze cooled loaves wrapped tightly in plastic wrap and then aluminum foil for up to 3 months. Slice before freezing for convenient grab-and-toast portions. Thaw at room temperature for 2-3 hours, or toast directly from frozen.
Extending Shelf Life Naturally: Add 1 tablespoon of apple cider vinegar or lemon juice to the water in your next bake. The acid slows mold growth and extends freshness by 1-2 days. This technique is common in professional gluten-free bakeries.
Reheating Suggestions: Refresh day-old bread by wrapping it in damp paper towels and microwaving for 15-20 seconds, or toasting it. These methods restore moisture and improve texture significantly. For easy vegan breakfast ideas, toasted gluten-free bread with nut butter and berries makes a satisfying morning meal.
Repurposing Stale Bread: Don’t discard older loaves. Cube and dry them for breadcrumbs, blend into flour for gluten-free baking, or make bread pudding. These applications make use of every loaf and reduce waste.
FAQ
Can I use regular flour in a gluten-free bread machine cycle?
No. Gluten-free cycles have longer rise times and different temperature profiles optimized for doughs that behave differently than wheat-based doughs. Using regular flour on a gluten-free cycle produces dense, under-baked results. Always match your flour type to the appropriate machine cycle.
Why does my gluten-free bread have a gummy center?
Gummy centers indicate insufficient baking. Gluten-free breads need internal temperatures of 205-210°F to fully set the crumb. Extend baking time by 5-10 minutes, or use a thermometer to verify doneness. Additionally, ensure you’re using the gluten-free cycle, which provides appropriate baking duration.
How do I know if my yeast is still active?
Test yeast viability by mixing ¼ teaspoon yeast with ¼ cup warm water and ½ teaspoon sugar. Within 5-10 minutes, it should become foamy. If no foam develops, your yeast is dead and needs replacement. Always keep yeast in airtight containers in cool, dry storage.
Can I make this recipe without xanthan gum?
If your gluten-free flour blend already contains xanthan gum, omit it entirely. Adding extra creates overly gummy bread. If your blend doesn’t contain xanthan gum, it’s highly recommended for proper structure. Alternatives include psyllium husk powder (use same amount) or ground flaxseed (use 2 tablespoons per cup flour, adding extra water).
Why is my bread machine not offering a gluten-free cycle?
Older machines may lack dedicated gluten-free cycles. Use the “whole wheat” or “dough” cycle instead, then manually monitor rising and baking times. Add 10-15 minutes to standard rise times. If your machine has a “custom” cycle, you can often program specific rise and bake durations.
How much water should I add if my dough seems too dry?
Add water one tablespoon at a time through the top opening during the first 5 minutes of mixing. The dough should resemble thick cake batter, not traditional bread dough. It’s easier to add water than remove it, so add conservatively and check consistency frequently.
Can I use this recipe in a stand mixer instead of a bread machine?
Yes, though results differ. Mix on low speed for 5 minutes, then medium speed for 8-10 minutes until dough reaches proper consistency. Transfer to a greased bowl, cover, and let rise at room temperature for 60-90 minutes. Punch down and let rise again for 45 minutes. Transfer to a greased loaf pan and bake in a preheated 375°F oven for 40-45 minutes until golden brown.
What’s the best gluten-free flour blend for bread machines?
For reliable results, King Arthur Measure for Measure and Bob’s Red Mill 1-to-1 are industry-leading options engineered specifically for bread applications. Both contain xanthan gum and are formulated to mimic wheat flour’s properties. King Arthur’s bread machine guide offers additional detailed resources for perfecting technique.
How do I prevent my bread from staling quickly?
Store in airtight containers at room temperature for 2-3 days maximum. Add 1 tablespoon apple cider vinegar to the water when baking for natural mold inhibition. Slice and freeze portions for long-term storage. Gluten-free breads naturally have shorter shelf lives than wheat breads due to lack of gluten’s protective properties.
Can I double this recipe and make two loaves simultaneously?
Most home bread machines accommodate only one loaf at a time. To make two loaves, prepare two separate batches using two machines, or bake one batch in the machine and one manually in the oven using a loaf pan with the same baking instructions.


