How to Make Cold Foam: Barista-Approved Guide
Cold foam has become the signature touch at specialty coffee shops worldwide, transforming simple iced beverages into Instagram-worthy creations. This velvety, cloud-like topping isn’t just for cappuccinos anymore—it’s a versatile technique that baristas and home coffee enthusiasts use to elevate everything from cold brew to iced lattes and even cold dessert drinks. The beauty of cold foam lies in its simplicity: with just a few ingredients and the right equipment, you can create café-quality drinks in your own kitchen.
What makes cold foam different from regular whipped cream is its texture and preparation method. Unlike traditional foam that requires steam wands and espresso machines, cold foam uses mechanical aeration to incorporate air into milk or alternative liquids. The result is a lighter, airier topping that sits delicately on top of cold beverages without sinking immediately. Whether you’re a coffee aficionado looking to perfect your home barista skills or simply want to impress guests with professional-quality drinks, mastering the cold foam recipe is an essential technique.
What is Cold Foam and Why Use It
Cold foam is a dairy or non-dairy milk product that has been aerated using mechanical means, creating tiny air bubbles throughout the liquid. This process transforms the milk into a light, fluffy substance with a texture that’s somewhere between liquid milk and whipped cream. The primary difference between cold foam and hot foam (created with a steam wand) is the temperature and the aeration method—cold foam maintains the refreshing quality of cold beverages while adding luxurious texture.
Professional baristas prefer cold foam because it offers several advantages over traditional toppings. First, it provides better visual appeal and texture contrast to cold drinks. Second, the aeration process doesn’t require expensive espresso machine equipment, making it accessible to home cooks. Third, cold foam is more stable than some alternatives, meaning it won’t collapse immediately into your drink. The technique has become so popular that major coffee chains now feature cold foam drinks prominently on their menus, and home baristas everywhere are learning how to replicate this café experience.
Understanding the science behind cold foam helps you master the technique. When you aerate milk, you’re essentially trapping air bubbles in the liquid. The protein structure in milk (whether dairy or plant-based) acts as a stabilizer, holding these air bubbles in place. This is why whole milk creates better foam than skim milk—the fat content helps stabilize the bubbles. The same principle applies to non-dairy alternatives like oat milk, which naturally contains proteins and fats that support foam formation.

Essential Equipment and Ingredients
Creating quality cold foam requires minimal equipment, which is part of its appeal. The most popular method uses an electric milk frother, specifically one designed for cold frothing. These handheld devices feature a small whisk attachment that spins rapidly, incorporating air into the milk. You can find quality electric milk frothers for reasonable prices at kitchen supply stores or online retailers. Some baristas prefer the specialty coffee equipment guides from reputable sources to understand different frother options.
Alternative equipment options include a French press, which can be used to create foam through the plunging action, or a mason jar with a tight-fitting lid that you shake vigorously. Some advanced home baristas even use specialized cold foam makers or invest in high-powered blenders. The key is having something that can introduce air into the milk efficiently. For the most consistent results, an electric milk frother designed specifically for cold frothing is your best investment.
Regarding ingredients, the foundation of any cold foam recipe is milk or a milk alternative. Whole milk is the gold standard because its fat content creates the most stable foam with the finest texture. However, you can successfully make cold foam with:
- Two percent milk – works well, though foam may be slightly less stable
- Oat milk – excellent alternative that froths beautifully and adds subtle sweetness
- Almond milk – requires a bit more technique but produces good results
- Coconut milk – creates rich foam with distinctive flavor
- Cashew milk – produces creamy, stable foam
- Half-and-half or heavy cream – creates denser, richer foam
Beyond milk, the basic cold foam recipe requires minimal additional ingredients. Many baristas keep their cold foam simple with just milk and perhaps a touch of sweetener or vanilla extract. However, the versatility of cold foam means you can experiment with various additions to customize the flavor profile for different beverages. Having quality ingredients on hand sets you up for success in creating café-quality cold foam at home.
Step-by-Step Cold Foam Recipe
Making cold foam is straightforward once you understand the process. Here’s the professional method that baristas use:
Basic Cold Foam Recipe (Serves 2-3 drinks)
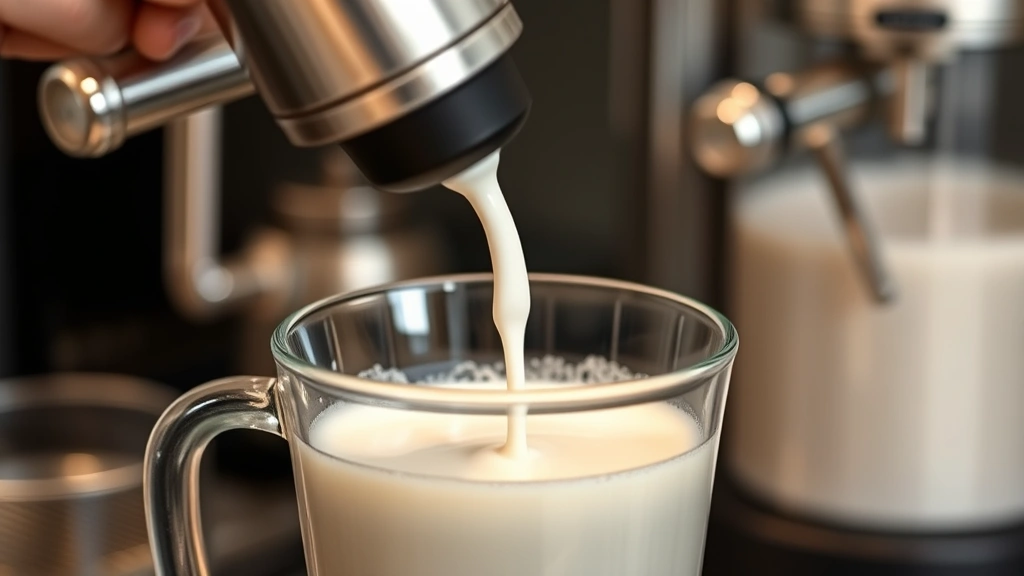
- Pour milk into your frother: Use about one-third to one-half cup of cold milk. The amount depends on your frother’s capacity—you want to fill it only partially to allow room for the milk to expand as air is incorporated. Cold milk froths better than room temperature milk, so remove it from the refrigerator just before use.
- Add sweetener if desired: If you want sweetened cold foam, add one-half to one teaspoon of simple syrup, honey, or vanilla syrup at this stage. Liquid sweeteners blend more smoothly than granulated sugar, which can create a gritty texture. Alternatively, you can skip sweetener entirely for unsweetened foam.
- Activate the frother: Place the whisk attachment into the milk and turn on the frother. The device will begin whisking rapidly, incorporating air into the milk. This process typically takes 30 to 60 seconds, depending on your frother’s power and the amount of milk.
- Monitor the foam formation: Watch as the milk expands and transforms into foam. You’ll notice the volume increasing significantly—this is the air being incorporated into the milk structure. The foam is ready when it reaches your desired thickness and volume, usually when the milk has roughly doubled in size.
- Stop the frother: Turn off the device and carefully remove the whisk attachment. The foam should have a light, airy texture with tiny bubbles throughout. If the foam seems too thin, you can run the frother for another 10-15 seconds.
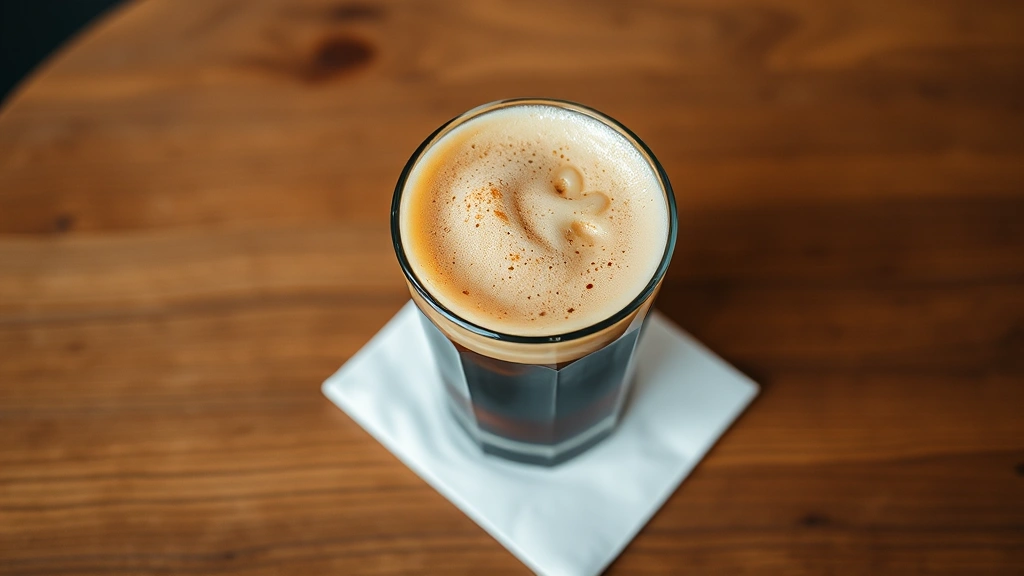
- Pour immediately: Cold foam is best used within a few minutes of creation. Pour your cold beverage (cold brew coffee, iced latte, etc.) into a glass, then gently spoon or pour the cold foam on top. The foam will sit on the surface of your drink, creating that signature café appearance.
The key to success is using properly chilled milk and not overfrothing. Overfrothing can create foam that’s too stiff and loses its pleasant texture. You want foam that’s light and airy but still pourable, with a consistency similar to soft whipped cream. With practice, you’ll develop a feel for exactly how long to froth for your preferred texture.
Flavored Cold Foam Variations
Once you’ve mastered the basic cold foam recipe, the real fun begins with flavor variations. Professional baristas create signature drinks by infusing cold foam with complementary flavors. Here are popular variations that transform your cold beverages:
Vanilla Cold Foam: Add one-half teaspoon of pure vanilla extract to your milk before frothing. This classic variation pairs beautifully with cold brew coffee and vanilla-forward beverages. The vanilla adds subtle sweetness and aromatic complexity without overpowering the drink.
Cinnamon Cold Foam: Combine one-quarter teaspoon of ground cinnamon with one-half teaspoon of honey or simple syrup before frothing. This warm spice complements cold coffee drinks and creates an autumn-inspired flavor profile. Baristas often use this variation as a seasonal offering.
Maple Cold Foam: Use one-half to one teaspoon of pure maple syrup instead of regular sweetener. This creates an earthy, slightly woody flavor that’s particularly popular in fall and winter drinks. Maple foam pairs excellently with cold brew and medium roast coffees.
Brown Sugar Cold Foam: Dissolve one-half teaspoon of brown sugar in a small amount of hot water to create a syrup, then let it cool before adding to your milk. The molasses notes in brown sugar add depth and complexity to your foam.
Caramel Cold Foam: Add one-half to one teaspoon of caramel syrup to your milk before frothing. This creates rich, indulgent foam that transforms simple cold brew into a dessert-like beverage. Many coffee shops feature caramel cold foam as a signature drink.
Lavender Cold Foam: Infuse your milk with lavender by steeping one-quarter teaspoon of dried culinary lavender in the cold milk for 30 minutes, then straining before frothing. Add a touch of honey to balance the floral notes. This sophisticated variation appeals to adventurous coffee drinkers.
Chocolate Cold Foam: Add one-half teaspoon of unsweetened cocoa powder and one-half teaspoon of honey to your milk before frothing. Whisk thoroughly to dissolve the cocoa powder, then proceed with frothing. This creates a mocha-inspired topping perfect for chocolate-forward drinks.
These flavored variations demonstrate the versatility of cold foam. You can experiment with any flavoring you enjoy—almond extract, hazelnut syrup, coconut syrup, or even a pinch of sea salt for savory applications. The technique remains the same; only the flavor additions change.
Pro Tips from Professional Baristas
Professional baristas have refined the cold foam technique through years of practice. Here are insider tips that will elevate your home cold foam game:
Temperature matters significantly: Use milk that’s straight from the refrigerator. Cold milk froths more efficiently and creates finer, more stable bubbles than room temperature milk. Some advanced baristas even chill their frother’s whisk attachment before use for optimal results.
Choose the right milk: Whole milk consistently produces superior cold foam compared to lower-fat options. If you prefer lower-fat milk, look for brands that add microfoam stabilizers. Oat milk has become a barista favorite because it froths beautifully and adds subtle sweetness without extra additives. When selecting plant-based alternatives, check the ingredient list for added proteins and fats that support foam formation.
Don’t overfill your frother: Only fill it one-third to one-half full. Overfilling prevents proper aeration and can cause the frother to overflow. The milk needs room to expand as air is incorporated.
Use a consistent technique: Hold your frother at a slight angle and position the whisk just below the surface of the milk initially, then slightly deeper as the foam forms. This technique, borrowed from espresso machine steaming, helps create even texture throughout your foam.
Time your frothing: Most quality cold foam is ready in 30-60 seconds. Frothing longer than 90 seconds can create foam that’s too stiff and loses its pleasant, creamy quality. Develop a sense for when the foam reaches the ideal texture—it should roughly double in volume.
Invest in quality equipment: A dedicated electric milk frother designed for cold frothing is worth the investment. Look for models with variable speed settings, which give you more control over foam texture. Brands recommended by specialty coffee associations often produce reliable equipment.
Keep your frother clean: Immediately after use, rinse your frother thoroughly with hot water to prevent milk residue from hardening inside. A clean frother performs better and lasts longer. Some models have removable whisks that are easier to clean thoroughly.
Practice consistency: Make cold foam regularly to develop muscle memory and intuition about timing and technique. Most baristas can tell by sight and sound when foam has reached the perfect stage.
Troubleshooting Common Problems
Even experienced baristas encounter occasional issues with cold foam. Here’s how to troubleshoot common problems:
Foam won’t form: This usually indicates your milk isn’t cold enough or your frother isn’t powerful enough. Ensure milk is freshly refrigerated. If using plant-based milk, verify it contains adequate protein and fat. Some ultra-processed alternatives won’t froth well. Try a different brand or switch to whole dairy milk to test your technique.
Foam is too thin and watery: Your milk may be too warm, or you haven’t frothed long enough. Reduce temperature and extend frothing time by 15-20 seconds. Ensure you’re not overfilling the frother, which prevents proper aeration.
Foam is too stiff and grainy: You’ve likely overfrothed. Reduce frothing time significantly—aim for 30-45 seconds instead of a full minute. The foam should be light and creamy, not dense like whipped cream. If using sweetened foam, ensure your sweetener is fully dissolved before frothing, as granules can create graininess.
Foam collapses into the drink immediately: This indicates either insufficient aeration or an issue with your milk’s protein structure. Try using whole milk, which froths more stably. Alternatively, your frother may not be creating fine enough bubbles. Ensure the whisk attachment is clean and functioning properly.
Unpleasant taste or smell: This usually means your milk has begun to spoil or your frother needs cleaning. Always use fresh milk and clean your equipment immediately after use. If using flavored additions, ensure they’re fresh and high quality.
Difficulty pouring foam: If your foam is too thick to pour, it’s been overfrothed. In future batches, stop frothing earlier. You can still use overfrothed foam by spooning it onto your drink rather than pouring it.
Storage and Shelf Life
Understanding how to store cold foam helps you prepare ahead for entertaining or busy mornings. Cold foam is best used immediately after creation, when the bubbles are finest and the texture is most luxurious. However, you can store it briefly under certain conditions.
Refrigerator storage: Cold foam can be refrigerated in an airtight container for up to 24 hours, though quality diminishes over time. The bubbles gradually collapse, and the foam becomes denser and less airy. For the best results, use refrigerated foam within 2-4 hours of creation. Before serving, you can briefly re-froth the stored foam to revive some of the aeration, though it won’t be quite as luxurious as freshly made foam.
Best practices for storage: Use a clean container with a tight-fitting lid to minimize air exposure and prevent contamination. Label your container with the date and contents. Keep it toward the back of your refrigerator where temperature is most stable. Don’t store cold foam near strong-smelling foods, as it can absorb odors.
Why fresh is better: The primary reason baristas make cold foam to order is that freshly created foam has the finest bubble structure and most pleasant texture. Each hour in storage allows some bubbles to coalesce, creating larger air pockets and a less pleasant mouthfeel. For special occasions or when serving guests, making cold foam fresh for each drink ensures the best experience.
Make-ahead strategy: If you’re hosting and want to minimize last-minute work, prepare your flavored milk mixture ahead of time. Store the milk with your chosen flavoring additions in the refrigerator, then froth it fresh just before serving each drink. This gives you the benefits of both preparation and fresh foam.
For those interested in exploring complementary beverage techniques, you might also enjoy learning about creating homemade flavor syrups and dressings that can enhance your cold beverages. Similarly, understanding flavor layering techniques can improve how you combine ingredients in cold foam drinks.
FAQ
Can you make cold foam without an electric frother?
Yes, though results vary. You can use a French press by filling it one-third with cold milk and pumping the plunger vigorously for 30-60 seconds. Alternatively, pour milk into a mason jar with a tight lid and shake vigorously for 1-2 minutes. These manual methods work but require more effort and produce less consistent results than electric frothers. The texture may be slightly coarser with visible larger bubbles.
What’s the difference between cold foam and cold brew concentrate?
Cold foam is aerated milk or milk alternative used as a topping, while cold brew concentrate is strongly brewed coffee made by steeping grounds in cold water for extended periods. They serve different purposes—cold foam adds texture and flavor to drinks, while cold brew concentrate provides the base coffee flavor. Some drinks use both together.
Can you make cold foam with non-dairy milk?
Absolutely. Oat milk, almond milk, coconut milk, and other plant-based alternatives all create excellent cold foam. Oat milk is particularly popular among baristas because it froths beautifully and adds subtle sweetness. Choose brands with added proteins and fats for better frothing results. Ultra-thin or low-protein alternatives may not froth well.
How long does it take to make cold foam?
The actual frothing process takes 30-90 seconds with an electric frother. Preparation (measuring milk, adding flavorings) adds another 1-2 minutes. Total time is typically 2-3 minutes, making cold foam a quick addition to your beverage routine.
Is cold foam the same as whipped cream?
No, though they’re similar. Cold foam is lighter and airier than whipped cream, with a texture more like soft mousse. Whipped cream is denser and heavier. Cold foam works better for cold beverages because it doesn’t sink as quickly and has a more pleasant mouthfeel when combined with cold drinks. Additionally, cold foam is made through mechanical aeration of milk, while whipped cream is typically made by whipping heavy cream with added sweeteners and flavorings.
What’s the best coffee drink to pair with cold foam?
Cold brew is the most popular pairing, but cold foam works beautifully with iced lattes, iced cappuccinos, iced mochas, and even cold brew with a shot of espresso. Essentially, any cold coffee drink benefits from cold foam’s luxurious texture. Some adventurous baristas even add cold foam to cold tea drinks and other cold beverages for added sophistication.
Can you make savory cold foam?
Yes, though it’s less common. Some chefs experiment with savory cold foam using vegetable broths or unconventional ingredients. However, the standard application in specialty coffee shops focuses on sweet and aromatic flavors. If you’re interested in exploring culinary techniques beyond beverages, check out resources on advanced cooking techniques.
Why is my cold foam not holding together?
This typically results from using low-fat milk, overfrothing, or frothing milk that’s too warm. Switch to whole milk or oat milk, ensure your milk is cold, and reduce frothing time. The foam should be light but stable, with bubbles that hold their structure for several minutes.
Can you add protein powder to cold foam?
Yes, though it affects texture. Add one-half to one teaspoon of unflavored protein powder to your milk before frothing. The powder may create a slightly grainy texture, so ensure it’s fully dissolved by whisking briefly before frothing. Flavored protein powders can also work but may alter the taste significantly.
Is cold foam suitable for people with dairy allergies?
Absolutely. Use any dairy-free milk alternative you prefer. Oat milk, almond milk, coconut milk, and other plant-based options all create excellent cold foam. Always verify that your chosen milk alternative doesn’t contain hidden dairy ingredients and is certified appropriate for your dietary needs.


