Homemade Bagels Recipe: Tested and Delicious
There’s something magical about biting into a warm, freshly baked bagel with a perfectly chewy interior and a slightly crispy exterior. Store-bought bagels simply cannot compare to the satisfaction of making them from scratch in your own kitchen. This homemade bagels recipe has been tested extensively and produces consistently delicious results that will have your family and friends asking for seconds.
Making bagels at home might seem intimidating, but with the right technique and ingredients, you’ll discover it’s an achievable goal for any home baker. The key to authentic bagels lies in understanding the importance of boiling before baking, which creates that signature dense, chewy crumb and shiny crust that makes bagels so irresistible. Once you master this recipe, you’ll understand why bagels have been a beloved staple for generations.
Ingredients You’ll Need
Creating authentic homemade bagels requires just a few simple, quality ingredients. Unlike some bread recipes that call for numerous additions, bagels celebrate simplicity and let the flour, water, and yeast shine through.
- Bread flour: 4 cups (500 grams) – bread flour’s higher protein content creates the chewy texture bagels are known for
- Water: 1½ cups (360 ml) – use filtered water if possible for best results
- Instant yeast: 2 teaspoons (7 grams) – active dry yeast works too, but instant dissolves more readily
- Salt: 1½ teaspoons (9 grams) – kosher salt is preferred for even distribution
- Sugar: 1 tablespoon (12 grams) – feeds the yeast and adds subtle sweetness
- Honey or malt syrup: 1 tablespoon (15 ml) – adds to boiling water for browning and subtle flavor
- Vegetable oil: ½ teaspoon – prevents sticking during shaping
For topping your bagels, you can use sesame seeds, poppy seeds, everything seasoning, coarse salt, or leave them plain for an elegant finish. If you’re interested in creating more substantial breakfast options, you might also explore recipes like our high protein low calorie recipes to pair with your bagels.
Essential Equipment
You don’t need fancy equipment to make excellent bagels, but having the right tools makes the process significantly easier and more enjoyable.
- Stand mixer with dough hook: Makes kneading effortless, though hand-kneading works fine
- Large mixing bowl: For dough development and rising
- Large pot: For boiling your bagels – at least 4-quart capacity
- Slotted spoon or spider strainer: Essential for safely removing boiled bagels
- Baking sheets: Two standard-size baking sheets lined with parchment paper
- Kitchen scale: For precise measurements, though volume measurements work
- Thermometer: Helps monitor water temperature and dough temperature
Step-by-Step Instructions
Mixing the Dough
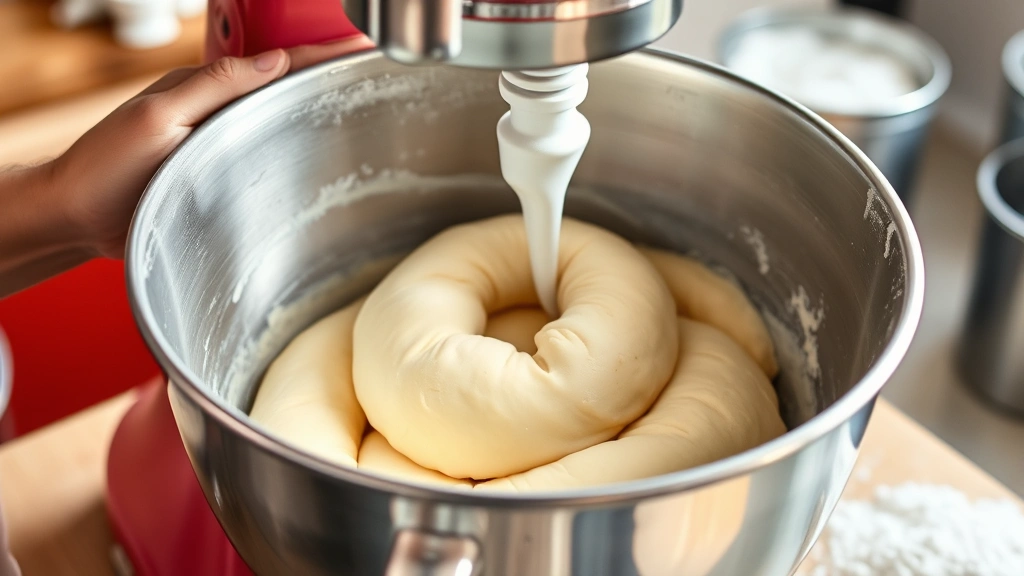
Begin by combining your dry ingredients in the bowl of your stand mixer. Add 4 cups of bread flour, 2 teaspoons of instant yeast, 1½ teaspoons of salt, and 1 tablespoon of sugar. Mix these ingredients on low speed for about 30 seconds until evenly distributed. The even distribution of salt and yeast is crucial for consistent fermentation and flavor.
Slowly add your 1½ cups of water while mixing on low speed. Continue mixing until all the flour is hydrated and a shaggy dough forms, approximately 2-3 minutes. Once the dough comes together, increase the speed to medium and knead for 10 minutes. The dough should be quite stiff and dense—much firmer than bread dough. This stiffness is intentional and creates the characteristic bagel texture.
When the dough is properly kneaded, it should be smooth and elastic but still quite firm. You should be able to stretch it without it tearing, and it should spring back when poked. If you’re hand-kneading, this will take approximately 15-20 minutes of vigorous kneading on a lightly floured surface.
First Rise and Bulk Fermentation
Transfer your dough to a lightly oiled bowl, turning it to coat all sides. Cover the bowl with a damp kitchen towel or plastic wrap. Let the dough rise at room temperature (around 70°F) for 1 to 2 hours. You’re looking for the dough to increase in volume by about 50 percent—not a full double, as you want some residual density.
This first rise develops flavor through fermentation and begins gluten development. If your kitchen is particularly warm, check the dough after 45 minutes to prevent over-fermentation. Conversely, if your kitchen is cool, the rise may take closer to 2 hours.
Dividing and Pre-shaping
Once the dough has risen, turn it out onto a lightly floured surface. Gently press down to release excess gas, but be careful not to deflate it completely. Divide the dough into 8 equal pieces using a bench scraper or sharp knife. A kitchen scale helps here—each piece should weigh approximately 62-65 grams if you’re using the weights provided earlier.
Shape each piece into a loose ball by pulling the edges toward the center and rolling it on the work surface. This pre-shaping helps develop surface tension and makes the final shaping easier. Let these pre-shaped pieces rest for 10 minutes under a towel while they relax.
Shaping and Boiling
Final Shaping
After the 10-minute rest, it’s time to shape your bagels. Take one pre-shaped ball and poke a hole in the center with your thumb. Gently stretch the dough, making the hole larger while rotating the bagel to create an even ring shape. The hole should be about 2 inches in diameter—it will shrink slightly during boiling and baking.
An alternative method involves rolling the dough into a rope about 8 inches long and connecting the ends by pinching them together firmly. Both methods work equally well; choose whichever feels more natural to you. Place each shaped bagel on your parchment-lined baking sheet, spacing them about 2 inches apart.
Cold Overnight Rise (Optional but Recommended)
For the best flavor development, cover your shaped bagels and refrigerate them overnight (8-16 hours). This slow fermentation creates a more complex flavor profile and makes the bagels easier to handle when boiling. The dough will become quite firm in the refrigerator, which is exactly what you want.
If you’re in a hurry, you can let them rise at room temperature for 2-4 hours until they’re puffy and slightly jiggly when the pan is tapped. The overnight method is superior, but both work.
Preparing for Boiling
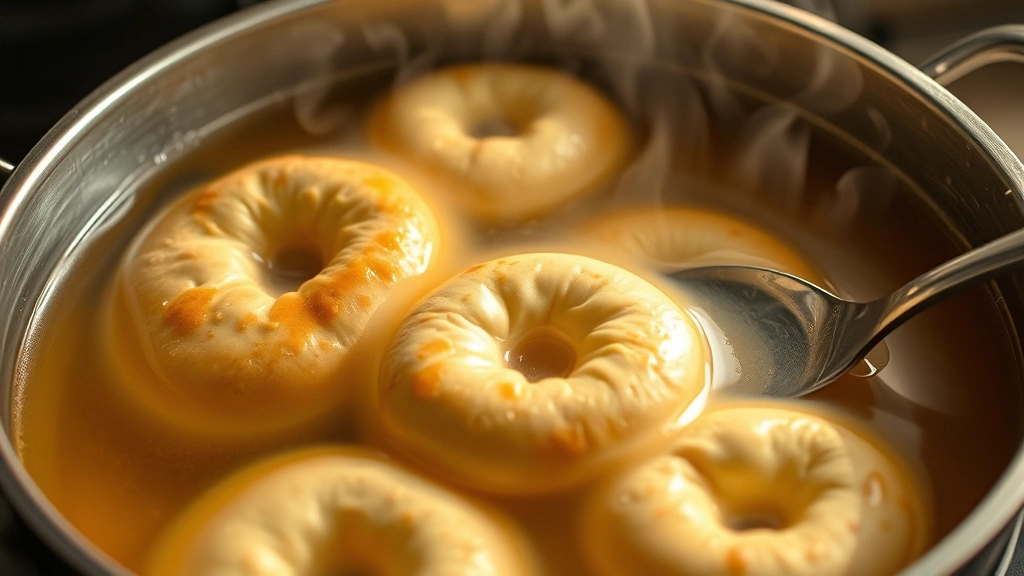
About 30 minutes before boiling, remove your bagels from the refrigerator if you used the cold rise method. Fill a large pot with 3-4 quarts of water and bring it to a boil. Add 1 tablespoon of honey or malt syrup to the water—this helps create the beautiful brown exterior and adds subtle sweetness.
Some bakers add ½ teaspoon of baking soda to the water, which increases alkalinity and deepens browning. This is optional but creates an even more authentic bagel crust. The boiling water temperature should be around 212°F (100°C).
The Boiling Process
Working in batches of 2-3 bagels at a time (don’t overcrowd the pot), gently place them into the boiling water using a slotted spoon. The bagels should sink initially, then float to the surface after 30-60 seconds. Once they float, boil them for 1 minute on each side—total boiling time is approximately 2 minutes per bagel.
This brief boiling sets the crust and creates steam that gives bagels their characteristic chew. If you boil too long, they become tough; too short, and they lack the proper texture. Use a slotted spoon to remove the boiled bagels and place them back on your parchment-lined baking sheets.
Baking to Perfection
Topping Your Bagels
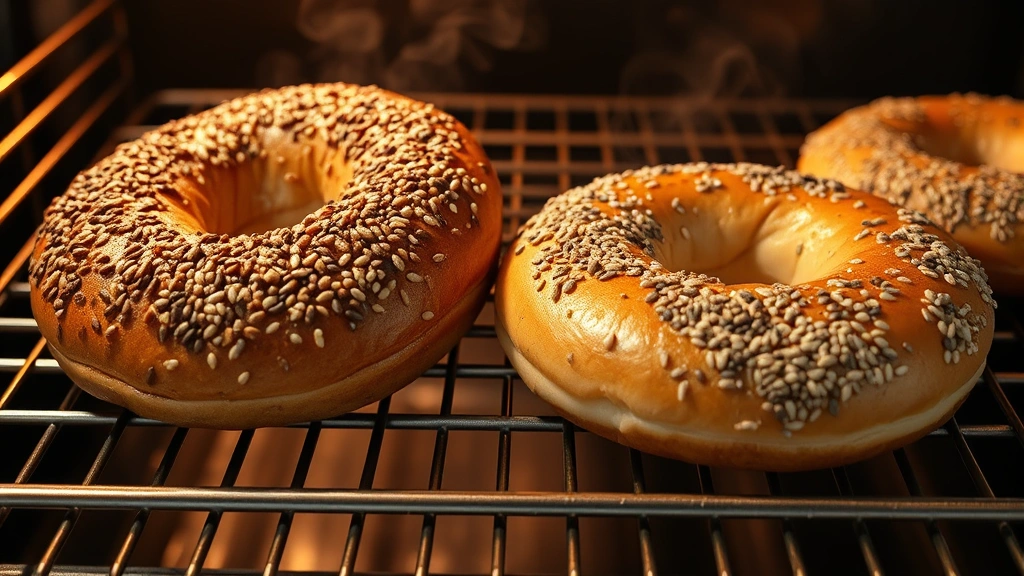
While the bagels are still slightly wet from boiling, apply your toppings if desired. Brush the top of each bagel lightly with water, then sprinkle your chosen toppings. Everything seasoning, sesame seeds, and poppy seeds are classics. For a green goddess inspired option, try an herb-seasoned salt blend. Press the toppings gently so they adhere properly.
Oven Preparation and Baking
Preheat your oven to 425°F (220°C) for at least 15 minutes before baking. A hot oven is essential for proper browning and crust development. Place your bagels on the parchment-lined baking sheets directly in the oven.
Bake for 20-25 minutes until the bagels are deep golden brown. If you’re baking two sheets simultaneously, rotate them halfway through baking for even browning. The bagels should sound hollow when tapped on the bottom when fully baked.
Remove the bagels from the oven and let them cool on a wire rack for at least 10 minutes before slicing. This cooling time allows the interior to set properly and makes slicing much easier. Warm bagels are delicious, but cutting them while too hot risks compressing the crumb.
Bagel Variations
Whole Wheat Bagels
Substitute 1 cup of whole wheat flour for 1 cup of bread flour. Whole wheat bagels will be slightly denser and nuttier. You may need to add an extra tablespoon of water since whole wheat flour absorbs more liquid than white flour.
Cinnamon Raisin Bagels
Add 2 tablespoons of cinnamon and 2 tablespoons of sugar to your dough during mixing. Fold in ¾ cup of raisins during the final minute of kneading. These pair wonderfully with cream cheese and make an excellent breakfast option alongside your savory roasted proteins for brunch.
Everything Bagels
Everything seasoning typically includes sesame seeds, poppy seeds, dried garlic, dried onion, and salt. Mix this blend and sprinkle generously on wet bagels before baking. The result is a complex, savory bagel perfect for any time of day.
Jalapeño Cheddar Bagels
Fold in ½ cup of sharp cheddar cheese and ¼ cup of minced jalapeños during the final minute of kneading. These bagels develop a spicy kick and creamy cheese flavor that makes them perfect for sandwiches.
Troubleshooting Tips
Bagels Are Too Dense or Gummy Inside
This typically results from under-baking or over-boiling. Ensure your bagels bake for the full 20-25 minutes until deeply golden. Additionally, limit boiling to exactly 2 minutes total (1 minute per side). Dense bagels also result from using all-purpose flour instead of bread flour—bread flour’s higher protein content is essential.
Bagels Spread Out Instead of Rising Up
Your dough may have over-fermented during the bulk rise or final proof. Reduce rising times, especially if your kitchen is warm. Alternatively, your dough may be too wet. Bread flour should measure 4 cups exactly; too much water creates slack dough that spreads rather than rises.
Bagels Have Large Holes or Tunneling
This occurs when the dough over-ferments and large gas pockets form. Reduce your rising times, particularly the bulk fermentation. If using the overnight cold rise, ensure your refrigerator is cold enough (below 40°F). Also, ensure you’re degassing gently when shaping—aggressive pressing can create irregular air pockets.
Bagels Are Pale or Lack Browning
Add honey or malt syrup to your boiling water—this dramatically improves browning. You can also add ½ teaspoon of baking soda to the boiling water for increased alkalinity. Ensure your oven is truly preheated to 425°F; use an oven thermometer to verify accuracy.
Bagels Are Too Chewy or Tough
You may have over-boiled them. Limit boiling to exactly 1 minute per side. Additionally, avoid over-kneading during the initial dough development—10 minutes is sufficient. Over-developed gluten creates excessive chewiness.
Storage and Serving
Cooling and Storage
Once bagels have cooled completely, store them in an airtight container or resealable plastic bag at room temperature for up to 3 days. For longer storage, freeze bagels in a freezer bag for up to 3 months. Frozen bagels can be thawed at room temperature or toasted directly from frozen.
Reheating Bagels
For the best texture, slice bagels and toast them in a toaster or toaster oven until warmed through. This restores the crispy exterior while warming the interior. Avoid microwaving, which makes bagels rubbery and tough.
Serving Suggestions
Serve warm bagels with cream cheese, lox, capers, and red onion for a classic New York-style bagel. You can also use them for sandwiches—try pairing with slow-cooked brisket and rich au jus for an elevated bagel sandwich. Toast and spread with butter and jam for breakfast, or create a gourmet steak sandwich using your homemade bagels as the base.
Frequently Asked Questions
Can I use all-purpose flour instead of bread flour?
While technically possible, all-purpose flour contains less protein (10-12%) compared to bread flour (12-14%). This results in less chewy bagels with a more tender crumb. Bread flour is strongly recommended for authentic results. If you must use all-purpose flour, expect slightly softer bagels.
Why is my dough so stiff?
Bagel dough is intentionally much stiffer than bread dough. This stiffness creates the dense, chewy crumb bagels are famous for. If your dough seems difficult to knead, that’s actually correct—it should be challenging. Only add more water if the dough won’t come together at all.
Can I skip the overnight refrigeration?
Yes, you can let bagels rise at room temperature for 2-4 hours instead. However, the overnight cold fermentation creates superior flavor development through slow fermentation. The overnight method is highly recommended if time permits.
How do I know when bagels are properly boiled?
Bagels should float to the surface within 30-60 seconds of entering the boiling water. Once floating, boil for exactly 1 minute per side. They should have a slightly puffy, swollen appearance when removed from the water. Under-boiled bagels will be dense; over-boiled ones become tough.
What’s the difference between instant yeast and active dry yeast?
Instant yeast has smaller particles and dissolves more readily than active dry yeast. They’re largely interchangeable in this recipe, though instant yeast may ferment slightly faster. Use the same weight measurement if substituting.
Can I make bagels without a stand mixer?
Absolutely! Hand-kneading works fine, though it requires more effort and takes 15-20 minutes. The key is developing sufficient gluten structure through vigorous kneading on a lightly floured surface. Your arms will get a workout, but the results are identical.
Why do my bagels have holes in the crust?
Holes in the crust usually result from air bubbles in the dough rising too quickly or unevenly. Ensure you’re degassing gently when shaping, and avoid letting shaped bagels over-proof at room temperature. The overnight cold rise prevents this issue effectively.
How should I score my bagels?
Bagels don’t require scoring like artisan breads. The hole in the center serves as the distinguishing feature. However, you can create a slight cross pattern on top with a sharp knife before baking if desired—this is purely decorative.
Can I use sourdough starter instead of commercial yeast?
Yes, though the process requires adjustment. Use approximately 1 cup of active sourdough starter and reduce the water to 1 cup. The bulk fermentation will take longer (3-4 hours at room temperature). The flavor will be more complex and slightly tangy.
What water temperature is best for mixing?
Use lukewarm water around 75-80°F (24-27°C). Water that’s too hot can kill yeast; water that’s too cold slows fermentation. If you don’t have a thermometer, water that feels slightly warm to your wrist works well.


