How to Cook Beef Ribs: BBQ Expert Tips for Perfect Results
Beef ribs are a showstopper at any barbecue, delivering tender, smoky meat that falls off the bone with minimal effort. Whether you’re a seasoned pitmaster or a backyard grilling enthusiast, mastering the art of cooking beef ribs requires understanding the right techniques, temperatures, and timing. This comprehensive guide walks you through everything you need to know to create restaurant-quality beef ribs at home.
The key to exceptional beef ribs lies in patience, proper seasoning, and consistent heat management. Unlike chicken or pork ribs, beef ribs benefit from longer cooking times and can handle bold flavor profiles. By following these expert tips, you’ll transform even budget-friendly cuts into a memorable meal that impresses family and friends.
Selecting and Preparing Your Beef Ribs
The foundation of exceptional beef ribs starts with selecting the right cut. Beef short ribs and beef back ribs are the two primary options available at most butcher shops and grocery stores. Beef short ribs are larger, meatier, and typically contain more marbling, making them ideal for smoking. Beef back ribs are smaller and leaner, cooking faster but requiring careful attention to prevent drying out.
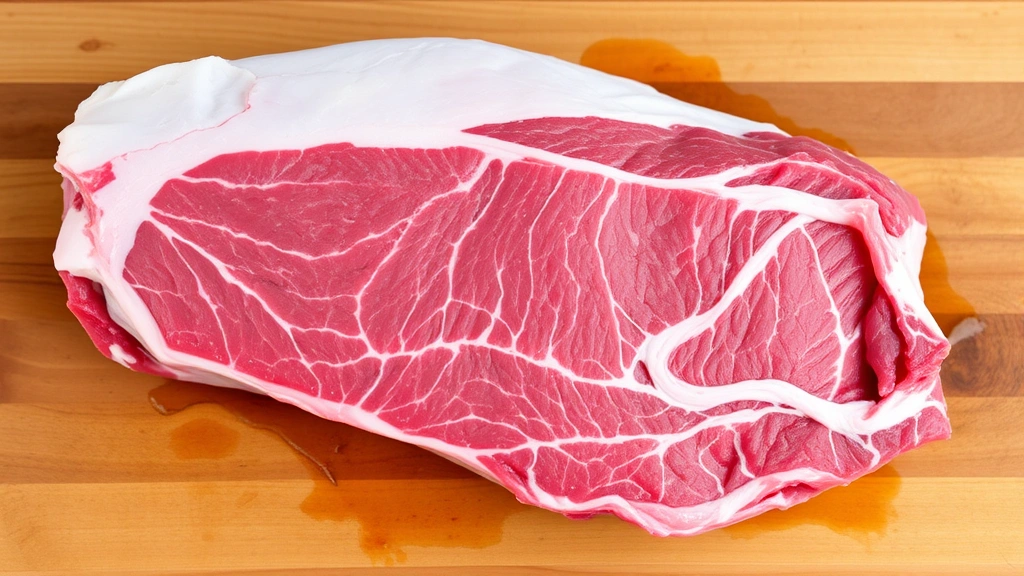
When shopping, look for ribs with a deep red color and visible marbling throughout the meat. The fat cap should be white or cream-colored, indicating freshness. Plan to purchase approximately one pound of ribs per person, accounting for bone weight and potential shrinkage during cooking.
Preparation begins with trimming excess fat from the back of the ribs. Use a sharp knife to remove the silver skin—the thin, translucent membrane covering the bone side. This membrane prevents smoke and seasonings from penetrating the meat, so removing it is crucial. Leave a quarter-inch fat cap on the meat side to protect it during cooking and add flavor.
Pat your ribs dry with paper towels before applying seasonings. Moisture on the surface interferes with smoke adhesion and prevents proper browning. Allow your trimmed ribs to sit at room temperature for thirty minutes before cooking, ensuring even heat distribution throughout the meat.
Essential Seasoning and Dry Rub Techniques
A quality dry rub is the backbone of flavorful beef ribs. Unlike pork ribs, beef can handle bold, aggressive seasonings that complement its rich, beefy flavor. The classic competition-style rub combines brown sugar, paprika, garlic powder, onion powder, black pepper, and salt in equal proportions, adjusted to personal preference.
Create your own signature rub by experimenting with these base ingredients:
- Brown sugar (sweetness and bark development)
- Paprika (color and mild pepper flavor)
- Garlic powder (savory depth)
- Onion powder (umami complexity)
- Black pepper (heat and bite)
- Sea salt (flavor enhancement)
- Cayenne pepper (optional heat)
- Mustard powder (tanginess)
Apply your dry rub generously, working it into the meat with your fingers. Don’t be shy—a thick, even coating develops the flavorful bark that makes smoked ribs special. Many pitmasters use a binding agent like yellow mustard or olive oil before applying the rub, helping it adhere better and create a more cohesive crust.
Let your seasoned ribs sit for at least two hours, though overnight refrigeration develops even deeper flavor. Remove them from the refrigerator thirty minutes before cooking to allow the surface to dry and the meat to reach ambient temperature.
Temperature Control and Smoking Methods
Maintaining consistent temperature is fundamental to cooking perfect beef ribs. The ideal range is 225-250°F, with 235°F being the sweet spot for most setups. This temperature range allows fat to render slowly while the meat absorbs smoke without becoming too dark or bitter.
You have several options for cooking beef ribs: offset smokers, drum smokers, pellet grills, or even conventional ovens with added smoke. Offset smokers provide traditional smoke flavor but require more active temperature management. Pellet grills offer convenience and consistency, though purists argue they produce less authentic smoke flavor. Drum smokers (like 55-gallon barrel modifications) provide excellent heat retention and are relatively affordable.
Wood selection dramatically impacts flavor. Hickory provides a strong, assertive smoke character ideal for beef. Oak offers a milder, more balanced approach. Mesquite is bold and slightly bitter—use sparingly with beef. Fruit woods like apple or cherry add sweetness and complexity. Many experts combine two wood types, using a primary wood for the majority of cooking and a secondary wood for accent flavor during the final hours.
Manage smoke by using thin, blue smoke rather than thick, white smoke. Thick smoke contains unburned particles that create an acrid, unpleasant flavor. Thin blue smoke indicates complete combustion and proper smoke generation. Monitor your smoker’s exhaust—it should look like light smoke, almost invisible from a distance.
Water pans help maintain humidity and stabilize temperature fluctuations. Place a pan of hot water in your smoker away from direct heat. This creates a buffer against temperature spikes and keeps the cooking environment moist, preventing the meat from drying excessively.
The 3-2-1 Method Explained
The 3-2-1 method is a proven technique that breaks cooking into three distinct phases, each optimizing different aspects of rib development. This method works exceptionally well for beef ribs, though timing may vary based on rib size and smoker characteristics.
Phase One (3 hours): Smoke and Set the Bark
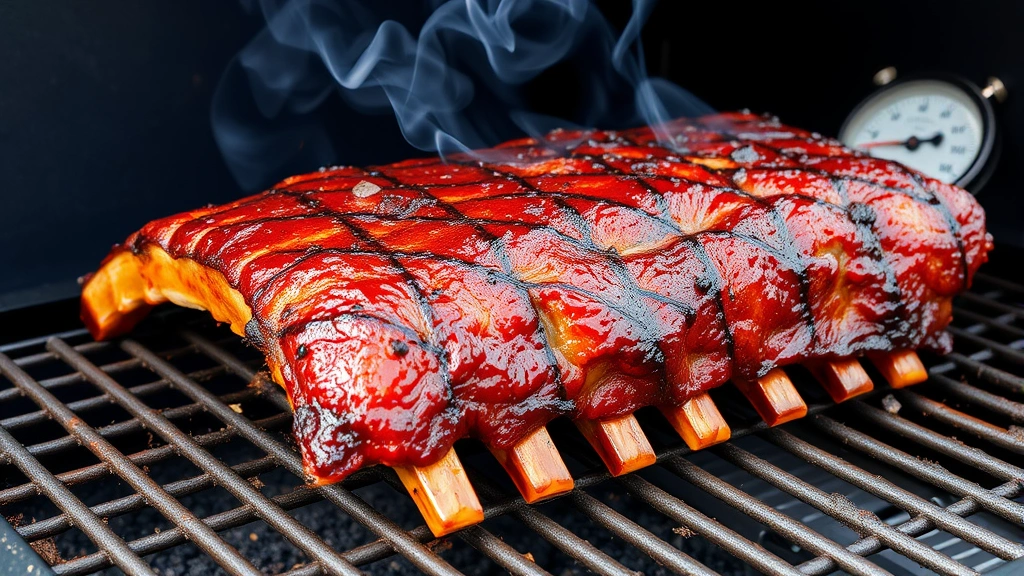
Place your seasoned ribs bone-side down on the smoker at 235°F. Don’t wrap them; allow the smoke to work directly on the meat surface. This phase develops the all-important bark—the flavorful, slightly crunchy exterior layer. Resist the urge to spritz or wrap; let the dry rub form a solid crust. Maintain consistent temperature and thin blue smoke throughout this period.
Phase Two (2 hours): Wrap and Braise
After three hours, wrap your ribs tightly in heavy-duty foil. Before wrapping, add a layer of flavor by including butter, brown sugar, and a splash of apple juice or cider vinegar inside the foil packet. This creates a braising environment that accelerates cooking and renders remaining fat. The foil traps steam, softening the meat and pushing the cooking process forward significantly.
Return the wrapped ribs to the smoker at the same temperature. The foil protects the bark from over-smoking while the meat continues absorbing heat. Some pitmasters add wood smoke during this phase for additional flavor, while others skip it entirely, allowing the braising liquid to dominate.
Phase Three (1 hour): Unwrap and Glaze
Unwrap your ribs carefully—the contents will be extremely hot and steamy. If you’re planning to apply homemade sauces, this is the ideal time. Brush your preferred BBQ sauce generously over the ribs. Return them unwrapped to the smoker for the final hour, allowing the sauce to set and caramelize while the exterior re-develops a slight crust.
Total cooking time ranges from six to eight hours depending on rib size, though this timeline is flexible. The goal is tender meat that pulls cleanly from the bone, not meat that falls apart at a glance.
Building Flavor with BBQ Sauces
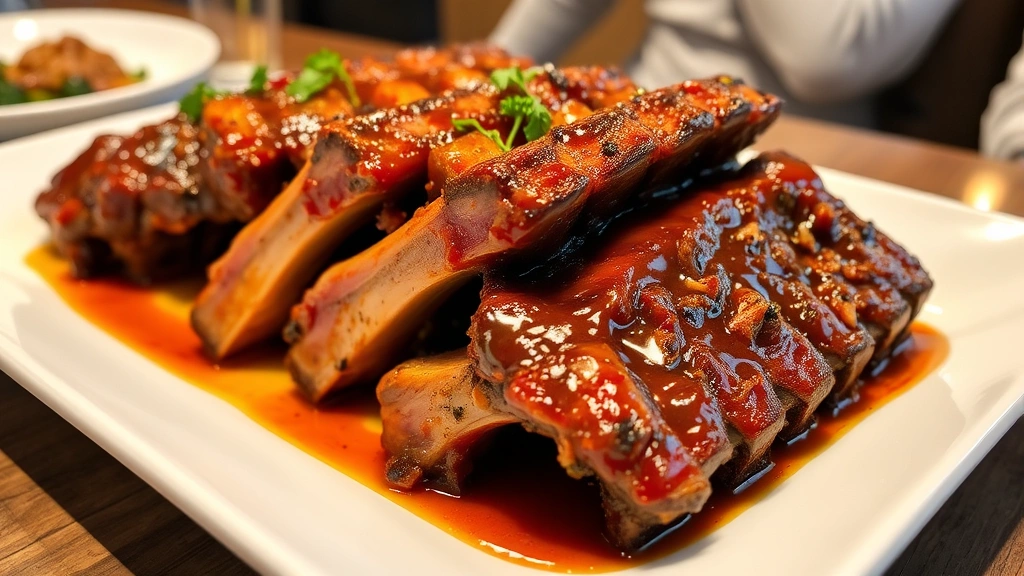
While a quality dry rub and smoke are sufficient for exceptional beef ribs, adding sauce elevates the experience. Beef ribs pair beautifully with robust, tangy sauces that complement their rich flavor. Learn how to make homemade sauces that rival any commercial option.
Classic beef rib sauce combines ketchup, Worcestershire sauce, apple cider vinegar, brown sugar, and spices. The acidity cuts through fat, while the sweetness balances heat. Brush sauce during the final hour of cooking, allowing it to caramelize on the meat surface. Multiple thin coats build flavor better than one heavy application.
Consider regional styles: Kansas City sauces are thick and sweet, perfect for tender beef ribs. Texas sauces emphasize vinegar and heat, cutting through rich meat. Carolina sauces use mustard as a base, adding complexity and tang. Experiment with different styles to discover your preference.
For those seeking alternative flavoring options, consider vinegar-based glazes that add brightness without heaviness. A simple mixture of apple cider vinegar, Dijon mustard, and honey creates a sophisticated finish.
Testing Doneness and Resting Your Ribs
Determining when beef ribs are perfectly done requires understanding the meat’s texture and appearance. The bend test is the most reliable indicator: pick up the ribs with tongs in the middle. If they bend and the meat nearly tears apart, they’re done. If they’re still rigid, they need more time.
The toothpick test also works well: insert a sharp toothpick between the bones. It should slide through with minimal resistance, similar to inserting a knife into butter. If it meets resistance, continue cooking.
Internal temperature is less critical for beef ribs than for other cuts, as the high fat content prevents drying at higher temperatures. However, aim for an internal temperature of 195-205°F in the thickest part of the meat (not touching bone).
Once done, remove your ribs from the smoker and wrap them loosely in foil. Allow them to rest for fifteen to twenty minutes. This resting period lets residual heat distribute evenly and allows juices to reabsorb into the meat, ensuring maximum tenderness and juiciness when you cut.
Common Mistakes to Avoid
Even experienced cooks make mistakes when cooking beef ribs. Understanding common pitfalls helps you avoid them:
Cooking Too Hot: Temperatures above 250°F accelerate cooking but prevent proper smoke absorption and bark development. Stick to 225-250°F for optimal results.
Removing the Silver Skin: Failing to remove the membrane on the bone side prevents seasonings and smoke from penetrating the meat. Always trim this thin layer before cooking.
Wrapping Too Early: Wrapping before three hours prevents adequate bark formation. The unwrapped phase is crucial for developing that flavorful crust.
Using Thick White Smoke: This indicates incomplete combustion and creates bitter, acrid flavors. Aim for thin, blue smoke that’s barely visible.
Skipping the Rest: Resting allows juices to redistribute. Cutting immediately after cooking results in dry meat despite proper cooking time.
Oversaucing: Too much sauce masks the natural beef flavor and smoke character you’ve worked to develop. Apply sauce sparingly and let the meat shine.
Inconsistent Temperature: Fluctuating smoker temperature prevents even cooking and extends cooking time. Invest in a quality thermometer and manage airflow carefully.
Choosing Low-Quality Meat: Poor-quality ribs with minimal marbling produce tough, dry results. Spend extra for well-marbled, fresh beef ribs from a trusted butcher.
Insufficient Seasoning: Beef ribs can handle bold flavors. Don’t be timid with your dry rub. A thick, generous coating is necessary for proper bark development.
Ignoring Wood Smoke Timing: Adding wood smoke during the wrapped phase is unnecessary and can create bitter flavors. Most smoking should occur during the first three-hour phase.
Pro Tips from Competition Pitmasters
Top competition barbecue experts share these insider techniques for exceptional beef ribs:
- Inject Before Smoking: Many champions inject beef ribs with a mixture of beef broth, butter, and Worcestershire sauce before cooking. This adds moisture and flavor throughout the meat, preventing dryness.
- Use a Spritz: During the wrapped phase, some pitmasters spritz ribs every thirty minutes with apple juice or cider vinegar. This keeps the surface moist and accelerates cooking.
- Layer Your Rubs: Apply a thin base rub, let it set for an hour, then apply a second coat. This creates a more complex flavor profile and better bark adhesion.
- Control Your Wrap: Use butcher paper instead of foil for a less aggressive braise. Paper allows some smoke penetration while still trapping moisture. This creates a middle ground between unwrapped and fully wrapped ribs.
- Finish with Butter: During the final thirty minutes, brush ribs with melted butter mixed with brown sugar and spices. This adds richness and helps the exterior caramelize.
Mastering beef ribs takes practice, but these techniques provide a solid foundation. Each smoker is unique, so keep notes about timing, temperature, and results. Over several cooks, you’ll develop an intuitive understanding of your equipment and refine your personal style.
FAQ
How long does it take to cook beef ribs?
Using the 3-2-1 method, expect six to eight hours total. Beef short ribs require more time than back ribs. Always cook to tenderness rather than a strict timeline, as rib size and smoker characteristics affect cooking duration.
What’s the difference between beef short ribs and beef back ribs?
Beef short ribs are larger, meatier cuts with more bone and fat, ideal for smoking low and slow. Beef back ribs are smaller, leaner, and cook faster. Short ribs are preferred for competition and serious barbecue enthusiasts.
Can I cook beef ribs in the oven?
Yes, though you’ll miss the smoke flavor. Cook at 225-250°F for eight to ten hours using the same 3-2-1 method. For smoke flavor, use liquid smoke in the braising liquid or add a smoker box to your oven.
Should I wrap my beef ribs?
Wrapping during the middle phase accelerates cooking and renders fat while protecting the bark. However, some prefer unwrapped ribs for maximum bark development and smoke absorption, which requires longer cooking times.
What temperature should beef ribs reach internally?
Aim for 195-205°F in the thickest meat section. Beef ribs’ high fat content prevents drying at these temperatures. Use the bend and toothpick tests as primary doneness indicators rather than relying solely on temperature.
How do I prevent beef ribs from drying out?
Maintain consistent 225-250°F temperatures, use a water pan, wrap during the middle phase, and avoid over-smoking. Beef ribs’ fat content naturally keeps them moist if you avoid excessively high temperatures.
Can I prepare beef ribs the day before cooking?
Absolutely. Season your ribs the night before and refrigerate them. This allows flavors to penetrate deeper. Remove from refrigeration thirty minutes before cooking to bring to room temperature.
What wood smoke pairs best with beef ribs?
Hickory and oak are traditional choices for beef. Hickory provides strong flavor, while oak is milder and more balanced. Avoid over-smoking with mesquite, which can become acrid. Combine woods for complexity.
How should I store leftover beef ribs?
Refrigerate in an airtight container for up to four days. Reheat gently at 250°F, wrapped in foil with a splash of apple juice to restore moisture. Beef ribs also freeze well for up to three months.
Do I need to marinate beef ribs before smoking?
Marinating isn’t necessary if using a quality dry rub and proper smoking technique. However, injecting with beef broth or marinade adds moisture and flavor, especially beneficial for leaner back ribs.


