How to Can Salsa at Home: Pro Tips for Perfect Homemade Canned Salsa
Canning salsa at home is one of the most rewarding kitchen projects you can undertake. There’s nothing quite like opening a jar of vibrant, flavorful salsa you’ve made yourself during peak tomato season. Whether you’re preserving the summer harvest or preparing gifts for friends and family, homemade canned salsa recipe techniques will transform your kitchen into a small-scale production facility. The process combines fresh ingredients, proper sterilization, and precise timing to create shelf-stable salsa that maintains its fresh taste and nutritional value for months.
The beauty of home canning lies in complete control over ingredients and flavors. Commercial salsas often contain preservatives, excess sodium, and additives that homemade versions eliminate entirely. By mastering the canning process, you’ll produce salsa with superior taste, texture, and quality. This comprehensive guide walks you through every step, from ingredient selection through final storage, ensuring your salsa turns out perfectly every time.
Essential Equipment and Supplies
Before you begin any canning project, gather all necessary equipment. Having everything prepared prevents mid-process scrambling and ensures food safety. The foundation of successful home canning starts with proper tools and understanding their purpose in the preservation process.
Water bath canner: This large pot with a rack holds jars submerged in boiling water. The intense heat kills bacteria and creates the seal that preserves your salsa. Standard models accommodate seven quart jars or more simultaneously. If you don’t own a dedicated canner, a large stockpot with a canning rack works adequately, though dedicated canners distribute heat more evenly.
Mason jars: Use only glass jars specifically designed for canning. Pint and quart sizes work best for salsa. Inspect each jar for chips or cracks before use. Older jars may have imperfections that prevent proper sealing. New jars come pre-sterilized but still require processing according to safety guidelines.
Lids and bands: Two-piece lids consist of flat metal discs and screw bands. The flat lid contains a sealing compound that creates an airtight seal when heated. Bands hold lids in place during processing. Never reuse flat lids—they lose effectiveness after one use. Bands are reusable if undamaged.
Additional tools: A jar lifter safely removes hot jars from boiling water without burns. A bubble remover tool eliminates air pockets that prevent proper sealing. A wide-mouth funnel directs salsa into jars without spillage. A clean cloth and headspace measuring tool complete your toolkit. These specialized items aren’t expensive and make the process significantly safer and easier.
Ingredient Selection and Preparation
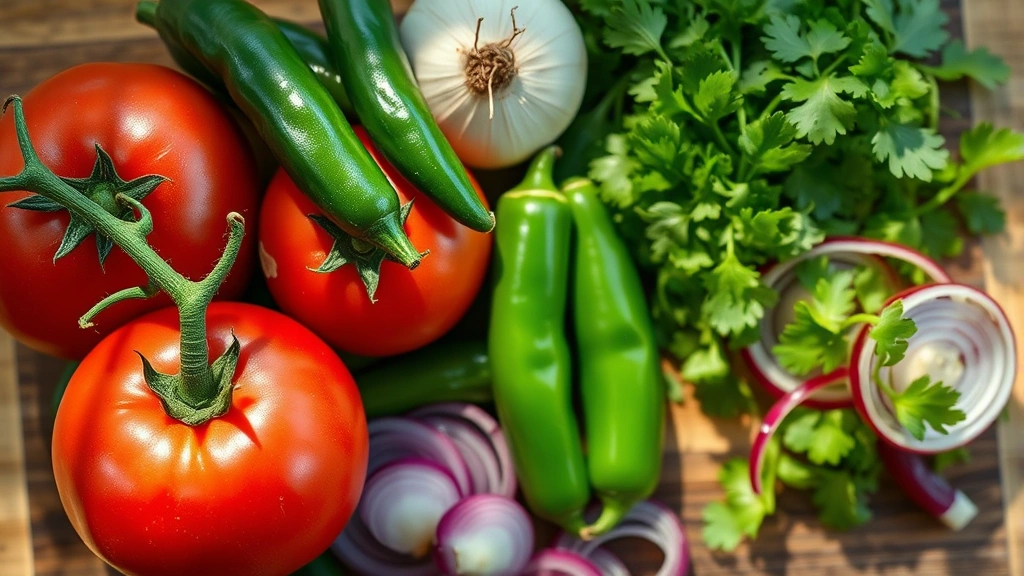
The quality of your final product depends entirely on ingredient selection. Fresh, ripe tomatoes form the foundation of exceptional salsa. Choose varieties like Roma, San Marzano, or other paste tomatoes with fewer seeds and thicker flesh. Beefsteak tomatoes work but contain more water, requiring longer cooking times.
Tomato selection: Pick tomatoes at peak ripeness when they’re deeply colored and slightly soft. Underripe tomatoes lack flavor and acidity necessary for proper preservation. One bushel of tomatoes (53 pounds) yields approximately 15-20 pints of salsa. Plan your canning day around tomato availability for best results.
Acid requirements: Salsa’s safety depends on proper acidity levels. The low-acid nature of tomatoes requires additional acid to reach the pH level (below 4.0) that prevents botulism. Add bottled lemon juice or white vinegar as specified in tested recipes. Never reduce acid amounts or substitute fresh lemon juice, which has variable acidity levels. This step isn’t optional—it’s a critical food safety measure.
Additional ingredients: Onions, peppers (both sweet and hot), cilantro, garlic, and lime juice create authentic flavor profiles. Select firm vegetables without soft spots. Jalapeños, serranos, and habaneros offer varying heat levels—adjust quantities based on your preference. Fresh garlic enhances flavor significantly, though some recipes use garlic powder for consistency.
Preparation technique: Wash all produce thoroughly under running water, rubbing surfaces gently. Remove tomato skins by blanching in boiling water for 30-60 seconds, then plunging into ice water. Skins slip off easily once cooled. Dice vegetables uniformly so they cook evenly and create appealing texture in finished salsa.
If you’re using this salsa with Mexican chicken recipes, ensure your salsa has robust flavor that complements the protein without overwhelming it. The acidity and fresh vegetable notes should enhance rather than dominate the dish.
Sterilization Process
Proper sterilization eliminates pathogens and ensures your canned salsa remains safe throughout its shelf life. This critical step can’t be rushed or skipped. The sterilization process involves both jar preparation and the heat treatment during water bath canning.
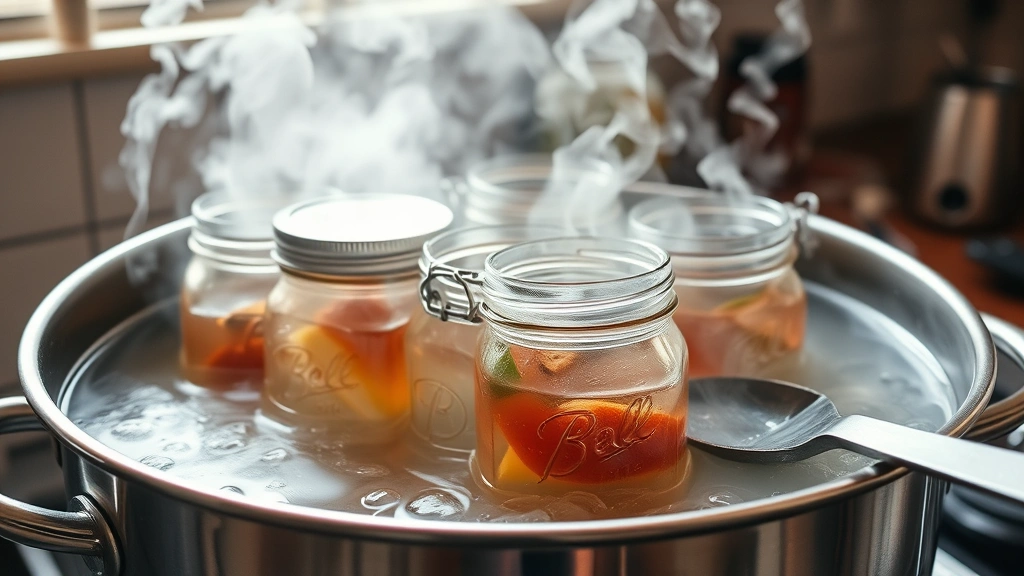
Jar sterilization: Fill your water bath canner with water and bring to a rolling boil. Submerge clean jars completely for 10 minutes. Remove jars using a jar lifter and place them upright on a clean towel. Keep them hot until ready to fill. Hot jars prevent thermal shock that could cause cracking when filled with hot salsa.
Lid preparation: Place lids in a small saucepan and cover with water. Simmer (don’t boil) for 5 minutes to soften the sealing compound. Keep lids in hot water until ready to apply them to filled jars. This ensures proper seal formation when the lid is applied.
Water bath processing: This is the final sterilization step that creates the seal. After filling jars with hot salsa and applying lids, submerge them completely in boiling water. The water level should cover jar tops by at least 1 inch. Process pint jars for 15 minutes and quart jars for 20 minutes (adjusting for altitude if necessary). Processing time varies based on altitude—consult the National Center for Home Food Preservation for your specific location.
Step-by-Step Canning Instructions
Step 1: Prepare your workspace. Gather all equipment and ingredients before beginning. Set up a clean work surface with paper towels or cloth to absorb spills. Fill your water bath canner with water and bring it to a boil. Start sterilizing jars while you prepare salsa ingredients.
Step 2: Cook the salsa base. In a large, heavy-bottomed pot, combine chopped tomatoes, onions, peppers, and garlic. Bring to a boil over medium-high heat, stirring frequently to prevent sticking. Reduce heat and simmer for 10 minutes, allowing flavors to meld. Add cilantro, lime juice, bottled lemon juice, and salt. Continue simmering for 5 more minutes until flavors develop fully.
Step 3: Fill hot jars. Remove hot, sterilized jars from water bath canner. Using a wide-mouth funnel, carefully ladle hot salsa into jars, leaving ½-inch headspace (the space between salsa and jar rim). This headspace allows for proper sealing. Use a bubble remover tool to eliminate trapped air pockets by running it around the jar interior.
Step 4: Apply lids. Wipe jar rims clean with a damp cloth to remove any salsa residue that might prevent sealing. Remove a hot lid from water using a magnetic lid lifter. Center it on the jar and screw the band on tightly but not excessively—turn until you feel resistance, then give a quarter-turn more.
Step 5: Process in water bath. Using a jar lifter, carefully place filled, sealed jars into boiling water bath canner, ensuring they don’t touch each other or the pot sides. Water should cover jar tops by at least 1 inch. Once water returns to a rolling boil, begin timing: 15 minutes for pints, 20 minutes for quarts.
Step 6: Cool and test seals. After processing time expires, remove jars using a jar lifter and place them upright on a clean towel. Allow them to cool undisturbed for 12-24 hours. You’ll hear distinct “pinging” sounds as jars cool and seals form. Test seals by pressing the center of each lid—it should be concave (slightly curved downward) and not flex when pressed. Unsealed jars require refrigeration and use within 3 weeks.
When you’re preparing healthy chicken recipes, homemade salsa becomes an excellent, low-sodium accompaniment that adds flavor without excess calories or preservatives.
Troubleshooting Common Issues
Jars not sealing: Unsealed jars result from several factors. Improper rim cleaning allows salsa residue to prevent seal formation. Insufficient headspace can cause salsa to bubble over during processing, contaminating the sealing surface. Lids applied to cooled jars won’t seal properly—always apply lids to hot jars immediately after filling. If jars fail to seal, refrigerate and consume within 3 weeks, or reprocess using fresh lids.
Cloudy liquid: Cloudiness typically indicates harmless mineral deposits from hard water, though it can occasionally suggest mold growth. If cloudiness appears only in the liquid (not the vegetables), it’s usually safe. If you notice cloudiness plus unusual odors or mold, discard the jar. Always inspect jars before opening and discard any showing signs of spoilage.
Siphoning: Salsa leaking around the lid during processing occurs when jars are packed too tightly or headspace is insufficient. Ensure you maintain ½-inch headspace and don’t pack vegetables too densely. Siphoning can compromise seals, so if you notice it during processing, remove the jar and allow it to cool, then test the seal.
Separation: Separation into liquid and solid layers is normal and doesn’t indicate spoilage. Simply shake or stir the jar before serving. This occurs because salsa ingredients settle over time. Some cooks prevent this by cooking salsa longer to break down tomatoes further, creating a more uniform texture.
Storage and Shelf Life
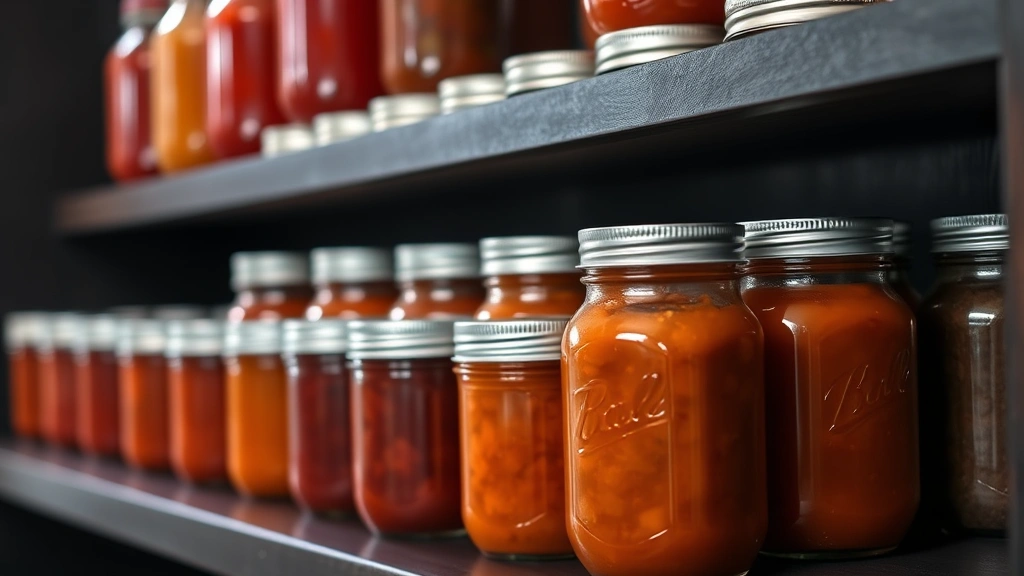
Properly canned salsa maintains quality for 12-18 months when stored correctly. Store jars in a cool, dark location away from direct sunlight. Temperature fluctuations and light exposure degrade color and flavor over time. A pantry, basement, or cupboard provides ideal conditions.
Shelf life factors: Several variables affect how long your salsa remains at peak quality. Higher acid content (more lemon juice or vinegar) extends shelf life. Proper processing ensures sterility. Storage temperature consistency matters—avoid locations near heating vents or where temperatures fluctuate significantly.
After opening: Once opened, canned salsa lasts 2-4 weeks in the refrigerator when stored in a clean container with an airtight lid. Always use clean utensils when removing salsa from the jar to prevent contamination. If mold appears on opened salsa, discard the entire container.
Signs of spoilage: Never consume salsa showing obvious mold, unusual odors, or visible contamination. Bulging lids indicate gas production from bacterial growth—discard immediately. If a sealed jar’s lid pops when you open it, suggesting pressure buildup, discard the contents. These signs indicate improper processing or storage conditions.
Flavor Variations and Recipes
Classic red salsa: The traditional version combines 10 pounds ripe tomatoes, 2 large onions, 4-6 jalapeños, ½ cup cilantro, ¼ cup bottled lemon juice, and 2 tablespoons salt. Cook together until thickened, approximately 30-45 minutes depending on tomato water content. This yields approximately 8 pints.
Green salsa (salsa verde): Replace tomatoes with 8 pounds fresh tomatillos, maintaining similar proportions of onions and peppers. Tomatillos have higher natural acidity, so reduce added lemon juice to 2 tablespoons. Green salsa offers brighter, more herbaceous flavor profiles.
Corn and black bean salsa: Add 3 cups fresh corn kernels and 2 cans black beans (drained and rinsed) to your basic recipe. This variation creates heartier texture and pairs excellently with peri peri chicken recipe preparations.
Mango salsa: Incorporate 4 cups diced fresh mango into your tomato base. Mango’s sweetness balances the acidity beautifully. This variation works wonderfully with seafood and tropical-inspired dishes.
Roasted red pepper salsa: Roast 8 large red bell peppers directly over a gas flame until charred. Place in a covered bowl for 10 minutes to steam, then peel away charred skin. Combine with 6 pounds tomatoes, garlic, onion, and cilantro. This creates a smoky, sophisticated flavor.
Spicy habanero version: For heat lovers, add 8-10 fresh habaneros (with seeds for maximum heat, or seeded for moderate spice). Habaneros are significantly hotter than jalapeños, so adjust quantities based on your heat tolerance. Always wear gloves when handling hot peppers.
These variations allow you to customize your salsa collection based on personal preferences and intended uses. Consider what dishes you’ll serve them with—some variations pair better with specific proteins or cuisines.
Pro Tips for Perfect Results
Use tested recipes only: Never modify acid amounts or processing times in untested recipes. Food safety organizations like the National Center for Home Food Preservation provide thoroughly tested recipes proven safe. Deviations can compromise safety.
Invest in quality equipment: While initial investment seems substantial, quality jars, lids, and canners last for years. Cheap equipment fails more frequently, leading to wasted ingredients and frustration. Proper tools make the process safer and more enjoyable.
Batch your work: Canning large quantities simultaneously is more efficient than making small batches. Process multiple jars in one water bath canner session. If making different salsa varieties, process each type together to streamline the workflow.
Keep detailed records: Note the date, recipe used, and any modifications. Track which variations your family prefers. Over time, you’ll develop a personalized canning routine optimized for your preferences.
Test your water bath canner: Older canners may have dents or damage affecting water circulation and heat distribution. Inspect yours before the canning season begins. Replace any damaged equipment before starting.
Don’t skip the cooling period: Patience is essential in canning. Allow jars to cool completely before testing seals or moving them. Moving hot jars can dislodge lids before seals fully form, resulting in failed seals.
For those interested in expanding their cooking skills beyond canning, exploring culinary institutes offers formal training in food preservation and other cooking techniques. Home canning is an excellent foundation for understanding food science and preservation.
FAQ
Can I use a pressure canner instead of a water bath canner for salsa?
Water bath canning is the recommended method for salsa due to its high acidity. Pressure canners aren’t necessary and can actually overcook the salsa, affecting texture and flavor. Stick with water bath canning for best results.
What if I don’t have bottled lemon juice?
You must use bottled lemon juice or white vinegar for proper acidity levels. Fresh lemon juice has variable acidity and isn’t reliable for food safety. Bottled products have consistent acidity levels tested for safety.
Can I can salsa in a slow cooker?
No. Slow cookers don’t reach temperatures necessary for proper sterilization. Only water bath or pressure canners achieve the heat penetration required for safe canning. Always use proper canning equipment.
How do I know if my salsa has botulism?
Botulism produces gas, causing lids to bulge. Never open a jar with a bulging lid. Botulism can also produce off-odors, but not always. When in doubt, discard the jar. Proper processing and acid levels prevent botulism entirely.
Can I reduce the salt in canned salsa recipes?
Yes, salt primarily adds flavor rather than serving a preservation function. You can reduce it significantly or omit it entirely without compromising safety. Experiment to find your preferred level.
Why does my salsa separate?
Separation is normal and doesn’t indicate spoilage. Ingredients naturally separate over time. Simply shake the jar or stir before serving. Cooking salsa longer before canning creates a more uniform consistency if you prefer less separation.
Can I use a dishwasher to sterilize jars?
Dishwashers don’t reliably reach the temperatures required for sterilization. The boiling water bath method is more reliable and ensures proper sterilization. Always use the water bath sterilization method.
How long should I process salsa in a water bath canner?
Process pint jars for 15 minutes and quart jars for 20 minutes at sea level. Processing times vary based on altitude—consult altitude adjustment charts if you live above 1,000 feet. Longer processing times don’t harm the salsa but may affect texture.
What’s the difference between salsa and pico de gallo?
Pico de gallo is a fresh, uncooked mixture of diced tomatoes, onions, peppers, and cilantro. Salsa is typically cooked and canned for preservation. Pico de gallo must be refrigerated and consumed within a few days. Salsa can be shelf-stable for months.
Can I double a salsa recipe for larger batches?
Doubling recipes works fine as long as you maintain proper proportions of all ingredients, especially acid. Ensure your pot is large enough to accommodate the increased volume without boiling over. Cook times may increase slightly with larger batches.


