What’s the Best Egg Wash? Baking Expert Tips
An egg wash is one of the simplest yet most transformative techniques in baking and pastry work. This thin coating of egg applied to dough before baking creates that coveted golden-brown shine, helps toppings adhere, and gives baked goods a professional bakery finish. Whether you’re making croissants, bread, pastries, or pie, mastering the perfect egg wash recipe can elevate your baking game significantly.
The magic of egg wash lies in its versatility. Different ratios of egg components—whole eggs, yolks, or whites—produce distinctly different results. Some formulas create a glossy, dark mahogany finish, while others yield a subtle sheen or matte appearance. Understanding these variations helps you choose the ideal egg wash for your specific baking project. Throughout this guide, we’ll explore every aspect of egg wash preparation, application techniques, and expert tips that professional bakers use to achieve consistent, stunning results.
Understanding Egg Wash Basics
An egg wash is fundamentally a mixture of egg and liquid that creates a protective coating on dough surfaces. The primary function is aesthetic—it promotes browning through the Maillard reaction, a chemical process where proteins and sugars interact under heat to create color and flavor compounds. However, egg wash serves additional practical purposes in baking.
The protein structure in eggs acts as a natural adhesive, making egg wash ideal for securing toppings like seeds, nuts, or sugar crystals to your dough. This adhesive quality prevents toppings from sliding off during proofing or baking. Additionally, the proteins in egg create a slight seal on the dough surface, which can help retain moisture in some applications while promoting crust development in others.
Temperature matters significantly when working with egg wash. Applying it to cold dough produces different results than applying it to room-temperature dough. Cold dough absorbs less wash, resulting in a thinner coating and subtler browning. Warm dough absorbs more wash and develops deeper color. Professional bakers adjust their timing and application methods based on whether they want dramatic browning or understated shine.
The type of flour you’re using also influences how egg wash performs. Whole wheat doughs and enriched doughs (containing butter, milk, and eggs) respond differently to egg wash than lean doughs. High-fat doughs already brown well and need less dramatic egg wash, while lean doughs benefit from a more robust egg wash application to develop appealing color.
Classic Whole Egg Wash Recipe
The most versatile and commonly used egg wash formula combines whole eggs with a small amount of liquid. This balanced approach provides reliable browning and a pleasant sheen suitable for most baking applications.
Basic Whole Egg Wash Formula:
- 1 large egg
- 1 tablespoon water, milk, or cream
- Pinch of salt (optional but recommended)
Preparation Method:
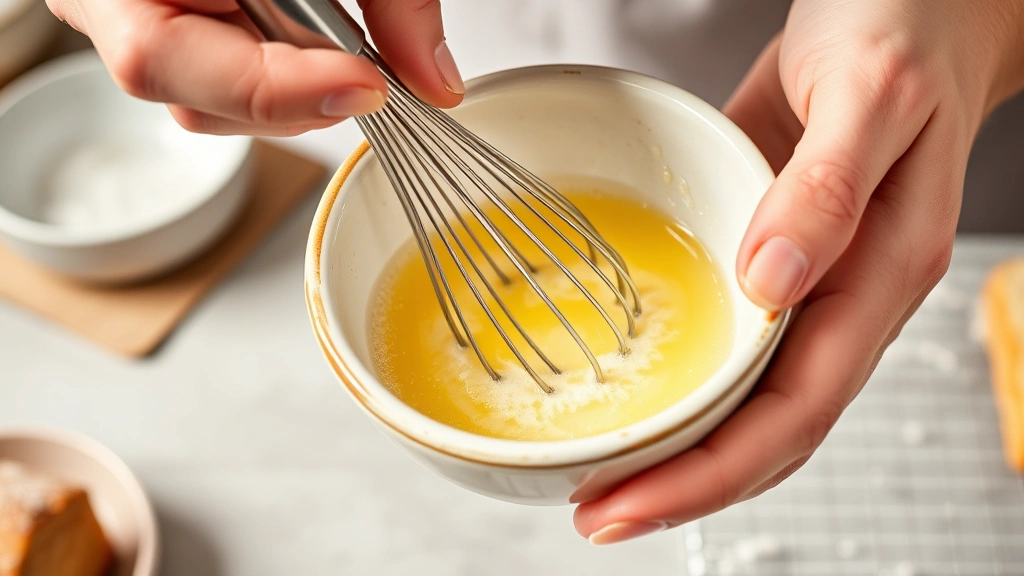
- Crack one egg into a small bowl
- Add one tablespoon of your chosen liquid
- Whisk vigorously for 30-45 seconds until completely combined and slightly frothy
- Strain through a fine-mesh sieve to remove any membrane pieces or thick white strands
- Use immediately or refrigerate for up to 24 hours
The straining step is crucial for achieving a smooth, even application. Egg whites contain thick strands that can create uneven coating if not removed. When you strain your egg wash, you’re ensuring consistent coverage across all surfaces of your dough.
This standard formula works beautifully on croissants, Danish pastries, dinner rolls, and enriched breads. It produces a medium-golden brown color with a gentle shine that doesn’t appear overly glossy. The salt enhances browning and adds subtle flavor depth.
For pastries that require multiple layers—like laminated doughs—you may apply egg wash between layers and again on the final surface. This technique, common in professional pastry preparation, ensures consistent color development throughout the baked good.
Yolk-Only Egg Wash for Maximum Shine
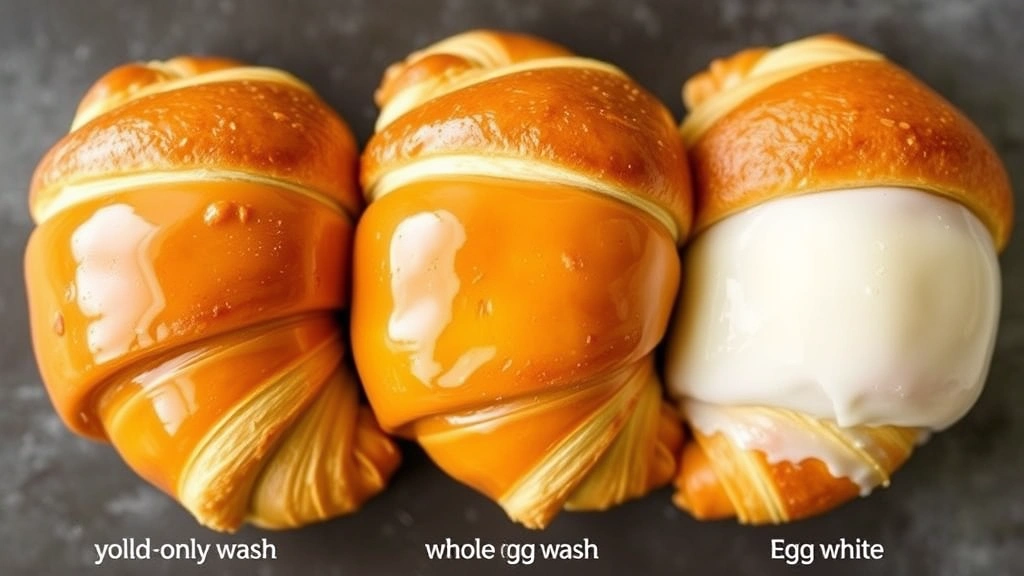
When you want dramatic, professional-looking shine and deep golden-brown color, yolk-only egg wash is your secret weapon. Egg yolks contain higher concentrations of fat and emulsifiers than whole eggs, creating a richer, more lustrous coating.
Rich Yolk Egg Wash Formula:
- 1 egg yolk
- 1 teaspoon water or milk
- Pinch of salt
Preparation:
- Separate one egg, reserving the yolk in a small bowl
- Add one teaspoon of liquid
- Whisk until smooth and completely combined
- Strain if desired (less critical than with whole egg wash but still beneficial)
Yolk-only wash produces the most luxurious finish you can achieve. It’s the choice of professional pastry chefs for showstopping applications like French pastries, premium bread loaves, and special occasion baked goods. The color development is noticeably darker and more mahogany-toned than whole egg wash.
This richer formula is particularly effective on laminated doughs like croissants and puff pastry, where you want each golden layer to shine distinctly. It’s also ideal for bread applications where you want impressive browning without any matte appearance.
One consideration: yolk-only wash can occasionally create a slightly sticky surface if applied too heavily. Use a light hand and apply thin, even coats. If you’re concerned about tackiness, reduce the liquid slightly—try three-quarters teaspoon instead of a full teaspoon.
Interestingly, the unused egg whites can be used for other purposes. Food preservation techniques sometimes employ egg whites in specific applications, though their primary use in baking contexts differs from wash applications.
Egg White Wash for Matte Finish
Egg white wash creates a completely different aesthetic—a subtle matte finish with minimal shine. This option suits rustic breads, whole grain loaves, and baked goods where you want a naturalistic appearance rather than glossy finish.
Egg White Wash Formula:
- 1 egg white
- 1 tablespoon water
- Pinch of salt
Preparation:
- Separate one egg, reserving the white in a small bowl
- Add one tablespoon water
- Whisk until foamy and combined
- Strain through fine mesh to remove any thick strands
Egg white wash is primarily protein with minimal fat, so it doesn’t create shine but rather a clean, matte surface. It still promotes browning through protein denaturation, but the result appears more understated and rustic. This wash is perfect for artisan bread applications where you want authentic, bakery-style appearance without excessive gloss.
The matte finish of egg white wash also works beautifully for seeded breads and rolls. When you apply seeds to egg white-washed dough, they adhere well without the seeds themselves becoming overly shiny, creating a more natural appearance.
Another advantage of egg white wash: it’s lower in fat, making it an excellent choice if you’re concerned about dietary considerations or want a less rich-appearing final product. The browning is still excellent, just without the luxurious sheen.
Milk and Cream Variations
The liquid component of your egg wash dramatically influences final results. While water is traditional, milk and cream offer distinct advantages that professional bakers exploit.
Whole Milk Egg Wash:
- 1 whole egg
- 1 tablespoon whole milk
- Pinch of salt
Milk contains lactose and milk proteins that contribute to browning and add subtle richness to the wash. This formula creates slightly warmer, more golden tones compared to water-based wash. It’s excellent for enriched breads, dinner rolls, and pastries where you want enhanced browning without the maximum shine of yolk-only wash.
Heavy Cream Egg Wash:
- 1 whole egg
- 1 tablespoon heavy cream
- Pinch of salt
Heavy cream creates the most luxurious, richest-appearing finish available. The high fat content produces shine approaching yolk-only wash but with slightly different color qualities. This premium formula is reserved for special applications—holiday breads, competition baking, or high-end pastry work. The cream adds a subtle richness that’s unmistakable in the final appearance.
Water-Based Wash:
- 1 whole egg
- 1 tablespoon water
- Pinch of salt
Water is the most neutral choice, allowing the egg’s natural browning properties to shine without additional flavor or richness contributions. This is your standard-issue formula, reliable and straightforward.
Some bakers create combination washes mixing these liquids. For example, half milk and half water creates a middle ground between pure milk and pure water formulas. These variations let you fine-tune your results based on your specific dough and desired appearance.
Application Techniques and Timing
How you apply egg wash matters as much as the formula itself. Application technique determines coverage consistency, browning uniformity, and final appearance quality.
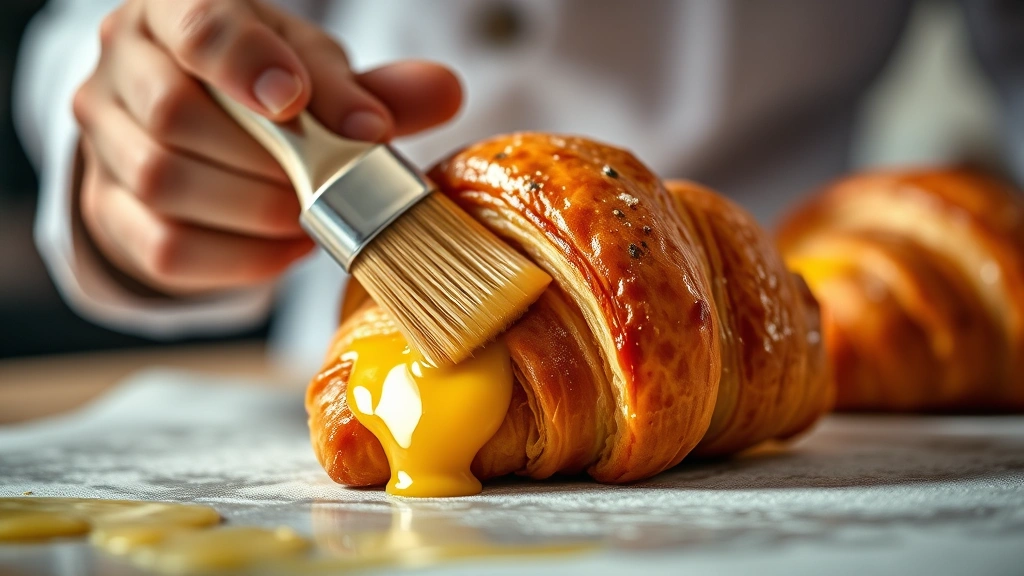
Brush Application Method:
A soft pastry brush is the traditional tool for egg wash application. Use a brush with natural bristles (like goat hair) rather than synthetic, as natural bristles hold more liquid and distribute it more evenly. Dip your brush into the egg wash and apply in thin, even strokes, following the dough’s natural contours. Work quickly but carefully, ensuring complete coverage without excessive pooling.
For laminated doughs like croissants, apply egg wash in the direction of the layers. This technique helps emphasize the beautiful striations of your laminated work. Make multiple thin passes rather than one heavy application—this approach prevents excessive soaking and ensures even browning.
Spray Application Method:
Professional bakeries often use spray bottles for extremely even, consistent application. Dilute your egg wash slightly (add an extra half-teaspoon of liquid) to make it spray-able. Fine misting produces incredibly uniform coverage, though home bakers may find this method less practical than brush application.
Timing Considerations:
The optimal timing for egg wash application depends on your dough’s proofing schedule. Apply egg wash after final shaping but before the final proof for best results. This timing allows the dough to rise slightly while the egg wash sets, creating even color development.
For doughs requiring extended final proof (12-18 hours, as in cold fermentation), apply egg wash at the moment you place the shaped dough in the refrigerator. The cold slows the egg’s protein denaturation, and the wash sets properly during the long, slow proof. Alternatively, apply fresh egg wash immediately before baking—this timing works beautifully for cold-proofed doughs.
If your dough requires a shorter final proof (1-2 hours), apply egg wash about 30 minutes before baking. This timing allows the wash to set slightly while the dough completes its rise, preventing the wash from absorbing too much into the dough and maintaining maximum shine.
Multiple Applications:
For dramatic color development, apply egg wash twice. First application goes on immediately after shaping. Allow it to dry for 5-10 minutes, then apply a second, thin coat just before baking. This technique creates noticeably deeper color and more impressive shine—professional bakers use it routinely for competition work and premium products.
When applying egg wash to decorated or topped items, work carefully around toppings to avoid displacing them. Apply wash to bare dough areas, then gently brush around seeds or other toppings to secure them without moving them from their intended positions.
Troubleshooting Common Issues
Uneven Browning:
If some areas brown much darker than others, your egg wash application was inconsistent. Use thinner, more careful brush strokes and ensure complete coverage. For laminated doughs, uneven browning often indicates uneven egg wash application between layers—take extra care when brushing between folds.
Oven hot spots can also cause uneven browning. Rotate your baking sheet halfway through baking, moving it from a hotter area to a cooler area. If your oven has significant temperature variations, consider using an oven thermometer to identify these zones and adjust placement accordingly.
Excessive Shine or Gloss:
If your egg wash created more shine than desired, you applied too much wash or used a formula with excessive fat content. Switch to egg white wash or reduce your liquid quantity. For future applications, use thinner coats and allow them to dry slightly between applications.
Insufficient Browning:
If your baked goods aren’t browning adequately despite egg wash, consider several factors. First, verify your oven temperature with an oven thermometer—inaccurate temperature prevents proper browning. Second, ensure you’re using egg wash that hasn’t degraded; old egg wash loses browning effectiveness. Third, switch to yolk-only wash for maximum browning power.
Dough composition also affects browning. Lean doughs (without fat, eggs, or milk in the dough itself) benefit from richer egg wash formulas and sometimes require slightly higher baking temperatures to develop adequate color.
Sticky or Tacky Surface:
Excessive egg wash application can leave a sticky surface. Apply thinner coats and allow adequate drying time between applications. If you’ve already applied too much, there’s unfortunately no remedy—the baked good will still be delicious, just with a slightly tacky texture that usually disappears after cooling.
Flaking or Peeling Wash:
If your egg wash flakes off the dough during baking, you likely applied it to dough that was too dry or cold. Ensure your dough surface is slightly moist (not wet) before applying wash. If using cold-proofed dough, allow it to come to room temperature for 15-20 minutes before baking, or apply fresh egg wash just before baking rather than before the extended proof.
Insufficient Adhesion of Toppings:
If your seeds or toppings are sliding off during baking, apply egg wash generously in the areas where toppings will sit. Press toppings gently into the wash immediately after application. For stubborn toppings or extra security, consider applying a thin second coat of wash after placing toppings, gently brushing around (not over) them.
FAQ
Can I make egg wash ahead of time?
Yes, you can refrigerate egg wash for up to 24 hours in an airtight container. Stir well before using, as separation may occur during storage. However, freshly prepared egg wash often performs slightly better, so prepare it as close to baking time as practical.
Is there a vegan egg wash alternative?
Yes, several options work reasonably well. Aquafaba (chickpea cooking liquid) creates browning similar to egg white wash. Dilute one-quarter cup aquafaba with one-quarter cup water, whisk, and strain. Alternatively, use a slurry of one tablespoon cornstarch mixed with one-quarter cup water and one tablespoon maple syrup. These alternatives don’t produce quite the same results as real egg wash, but they provide acceptable browning and shine.
What’s the difference between egg wash and egg glaze?
Egg wash is applied before baking to promote browning and shine. Egg glaze is applied after baking to create additional gloss and sometimes holds toppings. The formulas are similar, but glaze may include additional ingredients like corn syrup for extra shine.
Can I use powdered eggs or egg substitute?
Powdered eggs work if reconstituted properly according to package directions, though results may be slightly less impressive than fresh eggs. Most commercial egg substitutes don’t work well for egg wash—they lack the proteins necessary for browning and adhesion.
Does egg wash affect dough flavor?
Minimally. The thin coating of egg wash contributes subtle richness and perhaps slight savory depth from the salt, but the flavor impact is negligible compared to other dough ingredients. Egg wash is primarily functional rather than flavor-focused.
Should I apply egg wash to the bottom of baked goods?
Typically no. The bottom surface usually sits on the baking sheet and doesn’t brown well regardless. Focus your egg wash application on exposed surfaces—top, sides, and any visible edges. Applying wash to the bottom can cause sticking issues.
What’s the best brush for egg wash application?
Natural bristle brushes (goat hair or similar) are ideal. They hold more wash and distribute it more evenly than synthetic brushes. Choose a brush about one to one-and-a-half inches wide—large enough for efficiency but manageable for precise work. Rinse your brush immediately after use before the egg dries and hardens the bristles.
Can I use egg wash on all types of baked goods?
Almost all. Egg wash works beautifully on breads, pastries, croissants, Danish, and most savory baked goods. It’s less commonly used on cookies, cakes, or quick breads, where other glazes or frostings are more appropriate. However, some decorative cookies do benefit from egg wash for shine and topping adhesion.
How does oven temperature affect egg wash browning?
Higher temperatures accelerate browning. If your oven runs cool, increase the temperature by 25°F to promote better color development. Conversely, if your oven runs hot, you may need to reduce temperature slightly or cover items with foil partway through baking to prevent over-browning.
Does egg wash work on frozen dough?
Apply egg wash after the dough thaws or during the final stages of thawing. Applying wash to frozen dough results in poor adhesion as the wash won’t properly contact the dough surface. Allow frozen dough to thaw in the refrigerator overnight, then apply egg wash before the final room-temperature proof.
Mastering the perfect egg wash elevates your baking from good to bakery-quality. Whether you choose the classic whole egg formula, rich yolk-only wash, or understated egg white version, understanding the science behind these mixtures and their application techniques ensures consistent, professional results. Experiment with different formulas on your favorite recipes to discover which produces your preferred appearance and browning characteristics. Your baked goods will thank you with their stunning golden-brown sheen and impressive presentation.


