
Sure Jell Jam Recipe: Grandma’s Secret to Perfect Preserves
There’s something magical about opening a jar of homemade jam on a cold winter morning. The vibrant colors, the rich fruit flavors, and that perfect spreadable consistency—it’s pure nostalgia in a jar. For generations, home cooks have relied on Sure Jell pectin to transform simple fruit and sugar into stunning preserves that rival anything from a gourmet shop. My grandmother kept her Sure Jell jam recipe tucked in a worn recipe box, and today I’m sharing her secrets with you.
Sure Jell is a powdered fruit pectin that helps jam set properly without requiring endless cooking times. Unlike older jam-making methods that demanded hours of stirring and testing, Sure Jell recipes deliver consistent, beautiful results every single time. Whether you’re preserving fresh strawberries, homegrown raspberries, or seasonal peaches, understanding how to use Sure Jell correctly will elevate your jam-making game from uncertain to confident.
In this comprehensive guide, we’ll walk through everything you need to know about Sure Jell recipes, from selecting the right fruit to achieving that perfect gel. You’ll learn my grandmother’s techniques, discover troubleshooting tips, and explore variations that let you create custom flavors your family will treasure.
Understanding Sure Jell Pectin
Sure Jell is a brand of powdered fruit pectin derived from citrus fruit or apples. Pectin is a naturally occurring substance in fruit that helps jam gel. When you combine pectin, sugar, and fruit juice at the right temperature, the pectin forms a network that traps liquid, creating that characteristic jam texture.
What makes Sure Jell special is its reliability. The pectin is pre-extracted and standardized, meaning you don’t have to guess whether your fruit has enough natural pectin. This is especially important for fruits like strawberries, which are naturally low in pectin. My grandmother always said that Sure Jell took the guesswork out of preserving, allowing her to focus on flavor instead of worrying about whether her jam would set.
There are two main types of Sure Jell available: original and low-sugar versions. The original formula requires a specific sugar-to-fruit ratio to set properly, while low-sugar versions use different gelling agents and work with reduced sugar amounts. Choose based on your dietary preferences and desired sweetness level.
Understanding the science behind Sure Jell helps you adapt recipes and troubleshoot problems. Pectin molecules need heat, acid, and sugar to gel effectively. Without all three elements working together, your jam won’t set, no matter how much Sure Jell you add.
Essential Ingredients and Equipment
For Sure Jell recipes, you’ll need:
- Fresh fruit (4 cups crushed for most recipes)
- Sure Jell pectin (one 1.75-ounce package per batch)
- Granulated sugar (typically 5-7 cups depending on recipe)
- Butter (1 teaspoon to reduce foaming)
- Lemon juice (freshly squeezed, if not included in fruit)
- Water (sometimes needed for juice-based recipes)
Essential equipment includes:
- Large stainless steel pot (at least 8-quart capacity)
- Candy thermometer (reaches 220°F)
- Wooden spoon for stirring
- Canning jars (8-ounce or pint-sized)
- Lids and bands (new lids each time)
- Large canning pot with rack
- Jar lifter and bubble remover
- Clean kitchen towels
- Measuring cups and spoons
- Colander or fine-mesh strainer
My grandmother emphasized that investing in proper equipment makes the entire process safer and more enjoyable. She kept her canning supplies in a dedicated cabinet, always checking that her thermometer was accurate and her jars were free from chips or cracks.
Classic Strawberry Jam Recipe
Strawberry jam is the foundation recipe that most home canners start with. It’s forgiving, delicious, and uses ingredients everyone has on hand. This is the recipe my grandmother made every June when the strawberries were at peak ripeness.
Ingredients:
- 4 cups crushed fresh strawberries (about 2 pounds)
- 1/4 cup fresh lemon juice
- 1 package (1.75 oz) Sure Jell pectin
- 1/2 teaspoon butter
- 5 cups granulated sugar
Yield: About 6 to 7 eight-ounce jars
The key to exceptional strawberry jam starts with selecting ripe, fragrant berries. Avoid over-ripe fruit that’s mushy, as it won’t provide the structure you need. Mix berries at different ripeness levels—some just-ripe and some slightly under-ripe—to achieve the best flavor balance and natural pectin content.
Crush the berries thoroughly using a potato masher. You want small pieces, not a smooth puree. This texture creates that lovely jam consistency where you can still see fruit pieces. Measure your crushed berries carefully; this determines the final set of your jam.
Step-by-Step Jam Making Process
Step 1: Prepare Your Jars and Canning Equipment
Before you start cooking, prepare your jars and equipment. Wash all jars, lids, and bands in hot soapy water and rinse thoroughly. Place them in a large pot of simmering water to sterilize. Keep them hot until you’re ready to fill them. This prevents the jars from cracking when you pour in hot jam.
Fill your canning pot with water and bring it to a simmer. You’ll use this later for processing your filled jars. Having everything ready before you start cooking eliminates stressful scrambling once your jam reaches the gel point.
Step 2: Combine Fruit and Lemon Juice
In your large stainless steel pot, combine the crushed fruit and lemon juice. The acid is crucial—it enhances flavor and helps the pectin gel. If your fruit is naturally acidic (like raspberries), you might use slightly less. For sweeter fruits, stick to the full amount.
Stir well to distribute the lemon juice evenly throughout the fruit. Let this mixture sit for a few minutes so the fruit releases its juices.
Step 3: Mix Pectin with Sugar
In a separate bowl, mix the Sure Jell pectin with 1/4 cup of the sugar. This prevents lumping when you add the pectin to the hot fruit. Lumpy pectin won’t dissolve properly and can create grainy jam.
My grandmother shared a trick: she’d mix the pectin-sugar combination in a small bowl and let it sit while she prepared the fruit. This allowed the pectin to fully absorb the sugar, creating a smoother mixture.
Step 4: Bring Fruit Mixture to a Boil
Place the pot with fruit and lemon juice over high heat. Stir frequently to prevent sticking and scorching on the bottom. The fruit will begin releasing more liquid as it heats. You’re looking for a rolling boil—large bubbles that break the surface continuously.
Add the butter now. Just 1/2 teaspoon helps reduce the foam that forms during cooking. Less foam means easier skimming and cleaner jars.
Step 5: Add Pectin and Sugar
Once your fruit mixture reaches a full rolling boil, add the pectin-sugar mixture all at once. Stir constantly for 1 minute. This ensures the pectin distributes evenly throughout the jam. Uneven pectin distribution causes some jars to gel while others remain runny.
Return the mixture to a full rolling boil. Now add the remaining sugar, stirring constantly. Once it returns to a boil, you’ll maintain that boil for exactly 1 minute. This timing is critical for Sure Jell recipes—it’s what creates the proper gel.
Step 6: Test for Gel Point
While your jam cooks, place several ceramic plates in the freezer. After the 1-minute boil, remove one plate and drop a small spoonful of jam onto it. Let it cool for a few seconds, then push it with your finger. If it wrinkles and doesn’t flow back together immediately, you’ve reached the gel point.
If it’s still too runny, return to the boil and test again after 30 seconds. Don’t rely solely on thermometer readings—the wrinkle test is more reliable for home jam makers.
Step 7: Remove Foam and Fill Jars
Remove the pot from heat. Skim off any foam that has formed on the surface using a clean spoon. This foam is harmless but affects the appearance of your finished jam.
Using your jar lifter, remove a hot jar from the canning pot and place it on a clean towel. Ladle jam into the jar, leaving 1/4-inch headspace. This space allows for expansion during processing and helps create a proper seal.
Wipe the jar rim with a clean, damp cloth. Any jam residue prevents proper sealing. Place a hot lid and band on each jar, tightening the band until it’s snug but not overly tight.
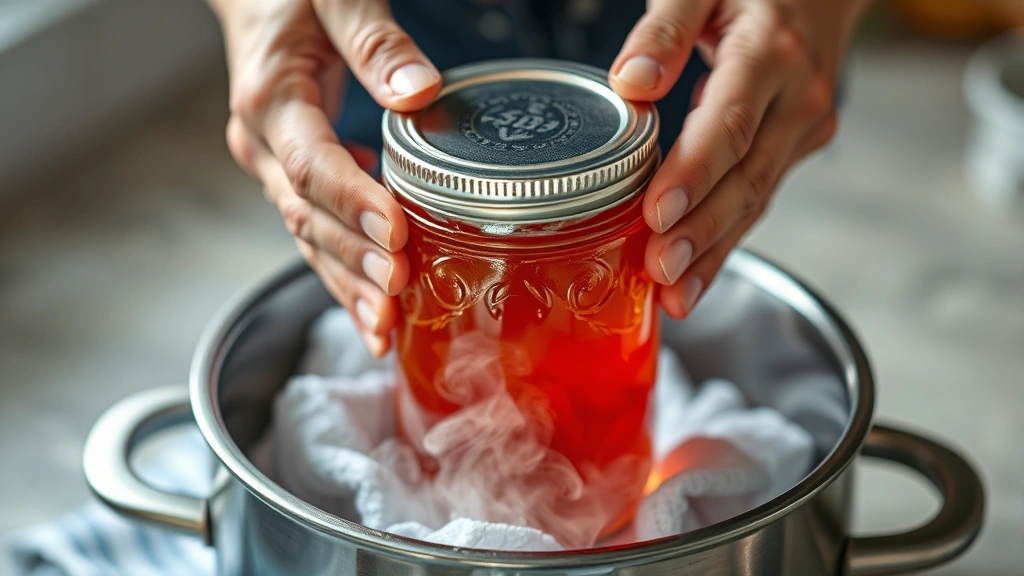
Step 8: Process in Boiling Water
Place filled jars into your canning pot, ensuring they’re covered by at least 1 inch of boiling water. Process for 10 minutes (adjust time if you live at high altitude—add 1 minute for every 1,000 feet above sea level).
Processing kills any microorganisms and creates a vacuum seal as jars cool. This is what makes your jam shelf-stable for up to one year.
Step 9: Cool and Set
Remove jars from the canning pot and place them on a clean towel, leaving space between each jar for air circulation. You’ll hear the satisfying “pop” as lids seal—this is the sound of success!
Let jars sit undisturbed for 24 hours before checking seals. Press the center of each lid; it should be concave and not flex. If a lid flexes, that jar didn’t seal properly and should be refrigerated for immediate use.
The jam will continue to set as it cools. Don’t be alarmed if it seems slightly soft after processing—it firms up over the next few days as pectin fully develops.
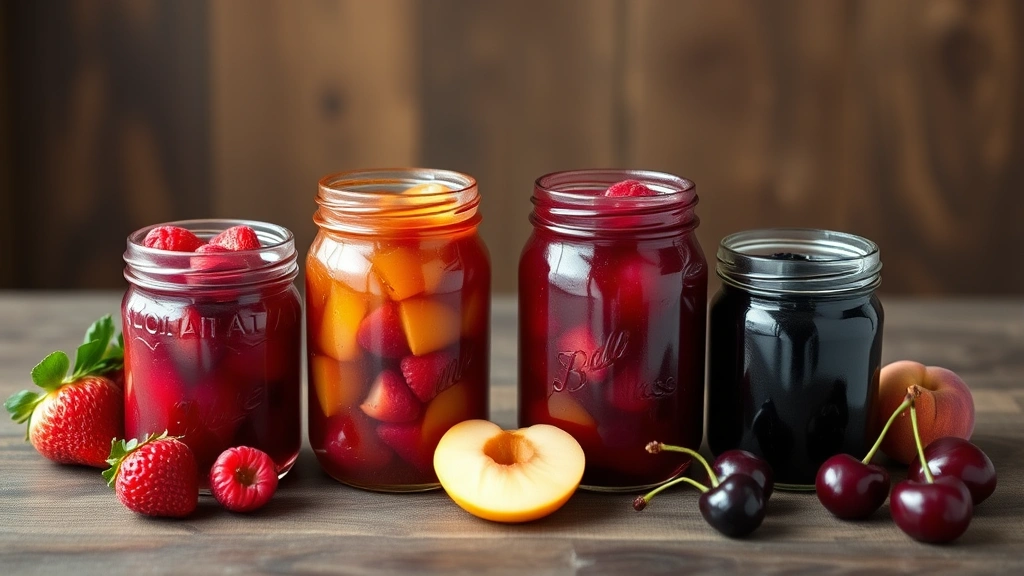
Flavor Variations and Creative Ideas
Once you master the basic Sure Jell jam process, endless flavor possibilities await. My grandmother’s recipe box contained dozens of variations, each carefully tested and annotated.
Raspberry Jam
Use 4 cups crushed fresh raspberries, 1/4 cup lemon juice, 1 package Sure Jell, 1/2 teaspoon butter, and 5 cups sugar. Raspberries are naturally high in pectin, so they work beautifully with Sure Jell. The result is a jewel-toned jam with a slightly tart flavor that pairs perfectly with cream cheese and pastries.
Mixed Berry Jam
Combine 2 cups strawberries, 1 cup raspberries, and 1 cup blackberries. Add 1/4 cup lemon juice and proceed with the standard Sure Jell recipe. The flavor complexity is extraordinary—each berry contributes its own character to create something greater than the sum of its parts.
Peach Jam with Vanilla
Use 4 cups crushed fresh peaches, 1/4 cup lemon juice, 1 package Sure Jell, 1/2 teaspoon butter, 5 cups sugar, and 1 teaspoon vanilla extract (added after cooking). Summer in a jar—this jam captures the essence of warm afternoons and fresh-picked fruit.
Cherry Jam with Almond Extract
Combine 4 cups pitted and crushed fresh cherries, 2 tablespoons lemon juice, 1 package Sure Jell, 1/2 teaspoon butter, 5 cups sugar, and 1/4 teaspoon almond extract. The almond notes enhance the cherry flavor beautifully and create a sophisticated preserve.
Blackberry Jam with Bourbon
Use 4 cups crushed blackberries, 1/4 cup lemon juice, 1 package Sure Jell, 1/2 teaspoon butter, 5 cups sugar, and 2 tablespoons bourbon (added after cooking). This grown-up version is perfect for glazing duck or pairing with sharp cheddar cheese.
When adding extracts or spirits, always do so after cooking and removing the pot from heat. This preserves delicate flavors that would otherwise cook off. Stir well to distribute evenly before filling jars.
Troubleshooting Common Jam Problems
Jam Won’t Set (Too Runny)
This is the most common complaint. Causes include insufficient cooking time, using overripe fruit, or inaccurate measurements. To fix runny jam, empty jars back into your pot, add 1/4 cup lemon juice and 1 package Sure Jell mixed with 1/4 cup sugar, bring to a rolling boil for 1 minute, and reprocess.
For future batches, ensure your fruit isn’t over-ripe and measure carefully. Sticky, over-ripe fruit contains less natural pectin and more liquid, making it harder to gel.
Jam Sets Too Hard (Like Rubber)
Over-cooking or using fruit that’s too high in natural pectin causes overly firm jam. Unfortunately, this can’t be fixed. For the next batch, reduce the Sure Jell by 1/4 package or add 1-2 tablespoons of water per batch.
Crystals Form in Finished Jam
Sugar crystallization happens when jam is stored too long or in fluctuating temperatures. Store jars in a cool, dark, consistent-temperature location. If crystals form, gently reheat the jar in warm water or use the jam in cooking where crystal texture won’t matter.
Mold or Fermentation Appears
This indicates improper sealing or contamination during processing. Never eat jam that shows signs of mold, fermentation, or unusual odors. Proper sterilization, clean technique, and adequate processing time prevent this issue.
Proper Storage and Safety
Properly processed and sealed jam lasts up to one year in cool, dark storage. Unopened jars can last even longer, though flavor gradually fades. My grandmother kept her jams in a cool basement pantry where they remained in perfect condition year after year.
Once opened, jam lasts 3-4 weeks in the refrigerator. Store with a clean spoon and avoid double-dipping, which introduces bacteria. If you notice any mold, discard the entire jar—mold can spread throughout jam.
For long-term storage, keep jars away from direct sunlight, which fades color and degrades flavor. Avoid temperature fluctuations, which cause condensation inside jars and promote mold growth. A cool pantry, basement, or dedicated storage area is ideal.
If you’re gifting jam, include a label with the type, date made, and storage instructions. Homemade jam makes a thoughtful gift that shows you care enough to spend hours at the stove creating something special.
When making other preserves and recipes, apply the same safety principles. Food preservation requires attention to detail and proper technique to prevent foodborne illness.
For comprehensive information about food preservation safety, consult the National Center for Home Food Preservation, which provides research-backed guidelines for all preservation methods.
FAQ
Can I use Sure Jell for jelly or only jam?
Sure Jell works for both jam and jelly. For jelly, strain juice through cheesecloth before cooking to remove pulp, then follow the same basic recipe. The texture will be clear and spreadable rather than chunky.
What’s the difference between Sure Jell and other pectin brands?
Sure Jell is one of the most reliable and widely available brands. Other brands like Ball and Certo also work well. Follow the specific instructions for each brand, as formulations vary slightly. Sure Jell’s consistency and availability make it my grandmother’s choice, and mine too.
Can I reduce sugar in Sure Jell recipes?
Original Sure Jell requires specific sugar amounts to gel properly. For reduced sugar, purchase Sure Jell for Low Sugar recipes, which use different gelling agents. Don’t reduce sugar in original recipes unless you enjoy runny jam.
How do I know if my jam is properly sealed?
After jars cool completely (24 hours), press the center of the lid. Sealed lids are concave and don’t flex when pressed. If a lid flexes or pops when you press it, the jar didn’t seal and should be refrigerated for immediate use.
Can I use frozen fruit for Sure Jell jam?
Yes, frozen fruit works well for jam. Thaw fruit completely and measure the crushed amount as you would fresh fruit. Frozen fruit has already broken down slightly, which actually helps with the jam-making process. Flavor is comparable to fresh fruit jam.
Why does my jam taste less sweet than store-bought jam?
Sure Jell recipes call for less sugar than commercial jam production. This is actually better—it lets fruit flavor shine through. If you prefer sweeter jam, add an extra 1/2 cup sugar, though this may affect setting.
Can I double a Sure Jell recipe?
Doubling recipes works, but requires a very large pot and careful monitoring. Never triple or quadruple in a home kitchen, as heat distribution becomes uneven. Stick to doubling at most, and ensure your pot is at least 12 quarts.
What altitude adjustments do I need for jam processing?
At elevations above 1,000 feet, add 1 minute processing time for every 1,000 feet above sea level. At 5,000 feet elevation, process for 15 minutes instead of 10. High altitude affects boiling point and processing effectiveness.
Can I use honey instead of sugar in Sure Jell recipes?
Not directly. Sure Jell requires specific sugar amounts to gel. Honey has different properties and would require formula adjustments. Stick with granulated white sugar for reliable results, or use Sure Jell’s low-sugar formula if sweetener alternatives interest you.
How do I clean up sticky jam spills?
Soak sticky equipment in hot water for 10 minutes before washing. Hot water dissolves sugar much more effectively than cold. Never scrape dried jam off equipment, as this can damage surfaces.


