Peruvian Chicken Recipe: Chef-Approved Guide to Pollo a la Brasa
Peruvian chicken, or pollo a la brasa, represents one of South America’s most beloved culinary traditions. This iconic dish features succulent, perfectly seasoned rotisserie chicken with crispy, golden skin and impossibly tender meat that falls off the bone. The magic lies in the marinade—a vibrant blend of native Peruvian peppers, citrus, cumin, and garlic that has been perfected over generations. Whether you’re a home cook seeking to master this restaurant-quality dish or a culinary enthusiast exploring authentic international cuisine, this chef-approved guide will walk you through every step of creating authentic pollo a la brasa in your own kitchen.
What makes Peruvian chicken so exceptional is its perfect balance of bold flavors and technique. Unlike simple roasted chicken, pollo a la brasa requires understanding the interplay between the marinade’s acidity, the spice profile, and proper cooking methodology. The dish emerged from Peru’s coastal regions and has become a national obsession, with dedicated restaurants serving nothing but variations of this single protein. By following this comprehensive guide, you’ll discover the secrets that professional chefs use to achieve restaurant-quality results that will impress family and friends alike.
Understanding Pollo a la Brasa: Peru’s Most Iconic Dish
Pollo a la brasa translates to “grilled chicken” in Spanish, but the term encompasses far more than simple grilled poultry. This Peruvian staple originated in the 1950s when immigrants brought rotisserie cooking techniques to Lima, which were then adapted to local ingredients and flavor profiles. The result became so popular that Peru now consumes more chicken per capita than almost any other nation, with pollo a la brasa accounting for a significant portion of that consumption.
The dish’s cultural significance extends beyond mere sustenance. Pollo a la brasa restaurants, called “pollería,” have become social gathering spots where families celebrate milestones and friends convene for casual meals. The preparation method—slow-roasting whole birds over open flames or heat sources—creates a distinctive texture: crackling, bronzed skin encasing juicy, tender meat infused with complex spice flavors. Understanding these cultural and technical elements is crucial before beginning your cooking journey.
The authentic preparation involves marinating whole chickens in a mixture featuring cumin, garlic, vinegar, and native Peruvian peppers, then cooking them using dry heat methods that render the fat while crisping the exterior. This differs fundamentally from poaching or braising methods that trap steam and soften skin. The goal is maximum browning through the Maillard reaction while maintaining internal moisture—a technique that requires precision and understanding.
Essential Ingredients for Authentic Flavor
Creating authentic pollo a la brasa begins with sourcing quality ingredients. While some components are traditional and specific to Peruvian cuisine, many are available in well-stocked supermarkets or specialty stores. Let’s examine each essential ingredient:
Whole Chickens: Select 3-4 pound birds for optimal cooking. Larger birds require longer cooking times and may dry out; smaller birds cook too quickly. The chicken quality dramatically impacts final results—look for birds with pale, unblemished skin and good meat-to-bone ratio. Pasture-raised or air-chilled varieties offer superior flavor and texture compared to mass-produced alternatives.
Ají Amarillo: This yellow Peruvian chili pepper provides the foundational flavor for the marinade. It offers moderate heat (around 1,000-1,500 Scoville units) with fruity, slightly sweet undertones. You can find ají amarillo as fresh peppers, frozen paste, or dried versions. If unavailable, substitute with a combination of yellow bell peppers and a touch of habanero for complexity.
Ají Rojo: The red variant brings deeper, earthier notes with additional heat. This pepper is often used dried or as paste, contributing color and a more robust spice profile than its yellow counterpart. The combination of yellow and red peppers creates the signature complex heat that defines authentic pollo a la brasa.
Cumin: Ground cumin serves as the spice backbone, providing warmth and earthiness. Use freshly ground cumin seeds rather than pre-ground powder whenever possible—the difference in flavor intensity is remarkable. Stale cumin loses its volatile oils and becomes flat and dusty-tasting.
Garlic and Vinegar: Fresh garlic adds pungency and depth, while vinegar (traditionally white vinegar or apple cider vinegar) provides acidity that tenderizes the meat while brightening flavors. The acidity is crucial—it breaks down proteins and allows marinade flavors to penetrate deeper into the chicken.
Oil: Use neutral oil with high smoke point—vegetable, canola, or light olive oil work well. The oil carries fat-soluble flavor compounds from the peppers and spices while helping the marinade adhere to the chicken’s surface.
Additional Seasonings: Salt, black pepper, oregano, and sometimes cilantro round out the flavor profile. Some regional variations include paprika, cloves, or even a touch of beer or soy sauce. Building your own spice blend allows customization based on personal preferences.
Preparing the Perfect Marinade
The marinade is where pollo a la brasa’s magic happens. This step cannot be rushed or simplified without compromising authenticity and flavor depth. A proper marinade should be vibrant in color, aromatic, and balanced between heat, acidity, and richness.
Ingredient Ratios for Four Chickens:
- 4-5 ají amarillo peppers (or 3-4 tablespoons paste)
- 2-3 ají rojo peppers (or 2-3 tablespoons paste)
- 8-10 garlic cloves, peeled
- 1/4 cup white vinegar or apple cider vinegar
- 1/4 cup neutral oil
- 2 tablespoons ground cumin
- 2 teaspoons dried oregano
- 1 teaspoon black pepper
- 2-3 teaspoons salt (adjust based on taste)
- 1 tablespoon fresh cilantro (optional)
- Juice of 1 lime (optional but recommended)
Preparation Method:
If using fresh peppers, remove seeds and membranes—these contain excessive heat that can overwhelm the marinade. Roughly chop the peppers and place them in a food processor along with peeled garlic cloves. Pulse until you achieve a chunky paste consistency, being careful not to over-process into a completely smooth puree. The texture should have some dimension.
Transfer the pepper-garlic mixture to a large bowl. Add vinegar, oil, cumin, oregano, black pepper, salt, and cilantro if using. Stir thoroughly, ensuring all ingredients combine evenly. The marinade should smell intensely aromatic and appear as a thick, textured paste ranging from orange-red to deep red depending on your pepper ratio.
Taste a tiny amount on your finger (careful—it’s spicy!) and adjust seasonings. The marinade should be boldly seasoned since it’s distributing across multiple pounds of chicken. Add more salt if it tastes flat, more vinegar if it’s too rich, or more peppers if you desire additional heat. This tasting step is crucial and separates good marinades from exceptional ones.
Marinating Techniques and Timing
Proper marinating technique ensures even flavor distribution and optimal meat tenderness. This isn’t simply about dunking chicken in sauce—it requires strategic placement and timing considerations.
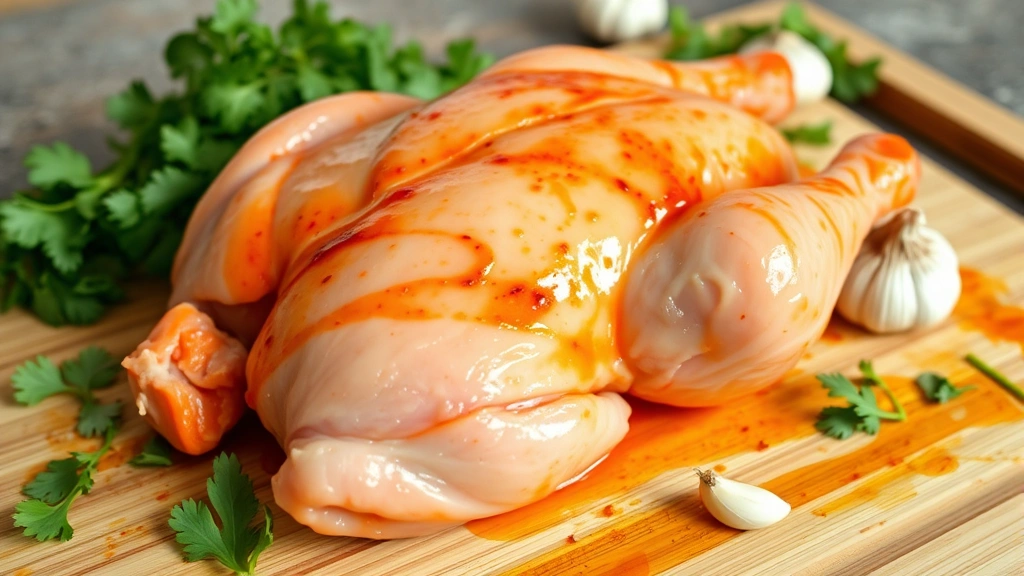
Preparing the Chicken: Pat whole chickens dry with paper towels. Moisture on the surface prevents the marinade from adhering properly and creates steam during cooking, which inhibits browning. Make three or four shallow cuts through the skin on the chicken’s thighs and breasts without cutting into the meat itself. These incisions allow marinade to penetrate beyond the surface, infusing deeper layers with flavor.
Applying the Marinade: Place chickens in a large roasting pan or food-safe container. Generously coat the exterior with marinade, ensuring complete coverage. Use your hands to work the marinade into the skin cuts and under any loose skin flaps. Flip the chickens and repeat on the opposite side. Don’t be shy—the marinade should visibly coat every surface.
Marinating Duration: For optimal results, marinate for 8-24 hours in the refrigerator. Eight hours provides noticeable flavor enhancement; 12-16 hours achieves excellent penetration; 24 hours represents the maximum before flavors become overly intense and the meat’s texture begins degrading from excessive acid exposure. If marinating longer than 12 hours, turn the chickens halfway through to ensure even distribution.
Some chefs prefer marinating for only 4-6 hours at room temperature, claiming this prevents over-acidification. This method works but sacrifices flavor depth. The cooler, slower approach of refrigeration allows flavors to develop more gradually and completely.
Reserve approximately one cup of marinade before cooking. This reserved portion serves multiple purposes: basting during cooking, creating a finishing sauce, or serving alongside the finished chicken as a condiment.
Cooking Methods: From Rotisserie to Oven
While traditional pollo a la brasa uses rotisserie equipment, home cooks have several viable cooking methods. Each approach yields slightly different results, but all can produce delicious, authentic-tasting chicken when executed properly.
Rotisserie Method (Most Authentic): If you have access to a rotisserie grill or rotisserie attachment for your oven, this method produces the most authentic results. Truss the marinated chickens securely using kitchen twine, ensuring legs and wings are tightly against the body. This promotes even cooking and helps maintain shape. Insert the rotisserie spit through each chicken’s cavity, positioning them so they rotate evenly without wobbling.
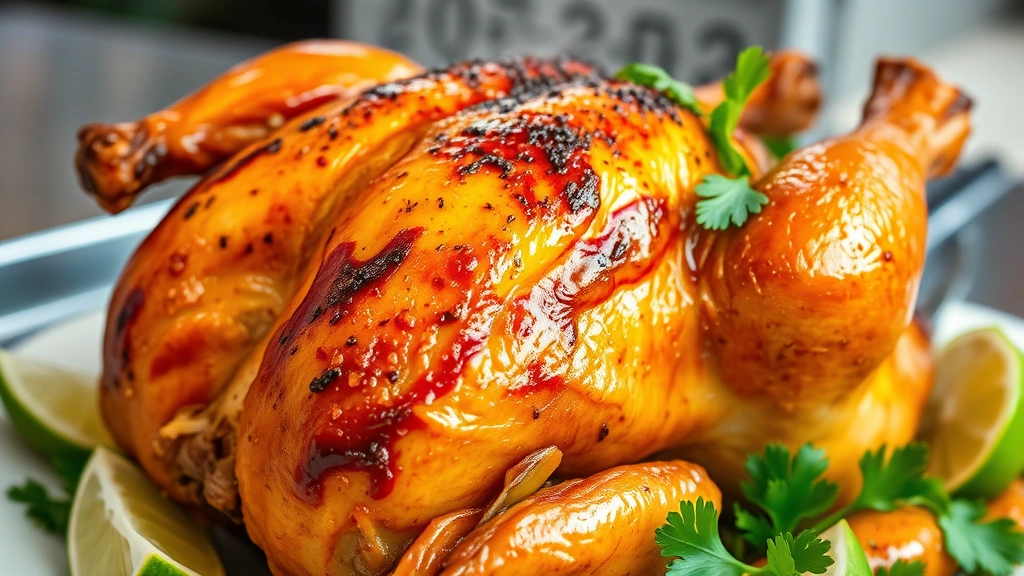
Set the rotisserie to medium-high heat (around 375-400°F if using an oven rotisserie). Depending on chicken size, cooking time ranges from 50-75 minutes. The chickens are done when the thickest thigh reaches 165°F internally and the skin is deep golden-brown with some charred spots. Rotate the basting tray every 15-20 minutes, applying reserved marinade to keep the skin moist and building flavor layers.
Oven Roasting Method (Most Accessible): This method works remarkably well for home cooks without rotisserie equipment. Preheat your oven to 450°F. Place marinated chickens, breast-side up, on a roasting pan fitted with a rack. The rack allows hot air to circulate underneath, promoting even browning.
Roast for 15 minutes at 450°F, then reduce heat to 375°F and continue roasting for 35-50 minutes depending on chicken size. Every 15 minutes, baste with reserved marinade using a brush or spoon. The basting accomplishes two things: it keeps the skin moist and promotes browning through repeated applications of the flavorful liquid.
The chickens are done when the thickest part of the thigh (without touching bone) reaches 165°F on an instant-read thermometer. The skin should be deep mahogany-brown with occasional charred spots. If the skin is browning too quickly but the meat isn’t cooked through, tent loosely with foil to slow surface cooking while allowing the interior to catch up.
Grill Method (Excellent Alternative): For those with outdoor grills, indirect heat grilling produces excellent results. Set up your grill for two-zone cooking with heat on one side and no heat on the other. Preheat to medium-high (around 375°F). Place marinated chickens, skin-side up, on the cooler zone. Cover the grill.
Cook for 50-70 minutes, rotating the chickens every 15-20 minutes and basting with reserved marinade. During the final 10 minutes, move the chickens to the hotter zone to achieve deeper browning and crispier skin. This method produces exceptional flavor through the combination of smoke and high heat.
Cast Iron Skillet Method (Smaller Portions): If cooking for fewer people or using chicken parts rather than whole birds, cast iron offers precision and control. Heat a large cast iron skillet over medium-high heat until smoking. Place skin-side down and sear for 3-4 minutes until the skin achieves golden-brown color.
Flip and transfer the skillet to a 375°F oven for 20-30 minutes, basting occasionally with marinade. This method combines the Maillard reaction benefits of stovetop searing with gentle oven cooking, producing excellent skin texture and juicy meat.
Regardless of cooking method, allow cooked chickens to rest for 10-15 minutes before carving. This crucial step allows juices to redistribute throughout the meat, resulting in moister, more tender portions. Resting also allows the exterior to firm up, making carving easier.
Traditional Accompaniments and Sides
Authentic pollo a la brasa is rarely served alone. Traditional accompaniments enhance the meal and provide textural and flavor contrasts to the rich chicken.
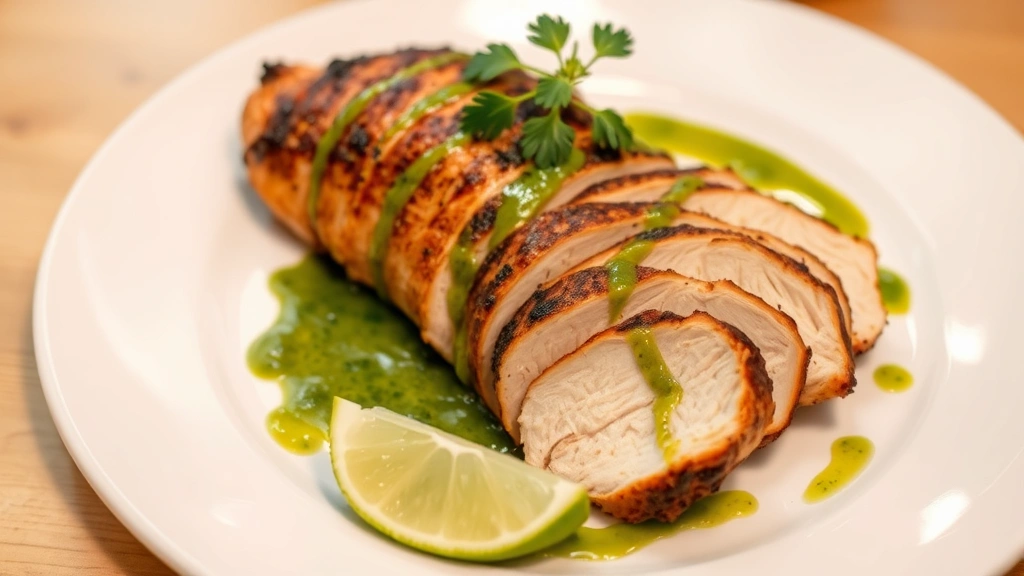
Ají Verde (Green Sauce): This vibrant condiment complements pollo a la brasa perfectly. Blend fresh cilantro, jalapeños, garlic, lime juice, oil, and mayonnaise into a creamy green sauce. The brightness cuts through the richness of the chicken while adding another flavor dimension. Many Peruvian restaurants serve this alongside a milder ají rojo as options for diners.
Papas a la Huancaína: Boiled potatoes topped with a rich, creamy sauce made from ají amarillo, evaporated milk, and cheese. This traditional side is starchy, luxurious, and absolutely essential to an authentic Peruvian chicken dinner. The sauce’s creaminess balances the chicken’s spiced, charred flavors.
Rice and Beans: Simple white rice and black beans provide neutral, filling sides that prevent the meal from becoming overwhelming. The mild flavors allow the chicken to remain the star while providing substance and satiety.
Salads: Fresh Mediterranean-style salads or simple green salads with lime vinaigrette provide acidity and freshness that cuts through the meal’s richness. Consider adding avocado, tomato, and red onion for textural variety.
Corn: Grilled or boiled corn with lime and cotija cheese (or feta as a substitute) offers sweetness and additional textural contrast. This side is particularly popular in Peru and adds authentic regional flair.
When planning your menu, consider that pollo a la brasa is quite rich and flavorful. Balance it with lighter, fresher sides rather than heavy starches and gravies. The goal is a meal where each component shines rather than competing for attention.
Pro Tips from Professional Chefs
Professional chefs who specialize in pollo a la brasa have refined techniques developed through thousands of repetitions. These insights dramatically improve home cooking results:
Chicken Selection Matters: The quality of your starting ingredient determines your ceiling for success. Purchase from reputable butchers or farms whenever possible. Ask for birds that were air-chilled rather than water-chilled—they brown better and develop crisper skin. The age of the chicken matters too; birds around 8 weeks old offer better flavor and texture than younger broilers.
Temperature Control is Critical: Many home cooks fail by cooking too hot or too cold. Use an oven thermometer to verify your actual temperature—most home ovens have calibration issues. Invest in an instant-read thermometer and check chicken temperature at the thickest part of the thigh without touching bone. Overcooked chicken becomes dry; undercooked chicken is unsafe and unpleasant.
Don’t Skip the Resting Period: This final step seems insignificant but dramatically impacts final texture. Resting allows carryover cooking to complete while allowing juices to redistribute. A 10-15 minute rest is non-negotiable for achieving the moistest, most tender results.
Marinade Penetration Requires Time: Rushing the marinade step compromises the final product. The longer the marinade sits, the more thoroughly it penetrates the meat. If you’re short on time, at minimum marinate for 6-8 hours; 12+ hours is ideal.
Basting Creates Flavor Layers: Each basting application adds another layer of flavor while promoting browning. Don’t skip this step. The repeated application of the marinade creates a caramelized, flavorful crust that makes the difference between good chicken and exceptional chicken.
Balance Your Spice Ratio: The traditional ratio of ají amarillo to ají rojo affects heat level and flavor profile. More yellow pepper creates fruiter, milder chicken; more red pepper creates deeper, spicier results. Experiment to find your preference, but maintain the balance rather than using only one variety.
Use Acid Strategically: Vinegar’s acidity tenderizes meat but can over-process it if overused. Professional chefs carefully balance acid content, never exceeding about one part vinegar to four parts other ingredients. Too much acid creates mushy, unpleasant texture.
Consider Your Cooking Equipment: Different equipment produces different results. Rotisserie creates the most even, professional results. Oven roasting is more forgiving and accessible. Grilling adds smoke flavor but requires more attention. Choose your method based on available equipment and desired outcome.
Troubleshooting Common Issues
Even with careful attention, issues sometimes arise. Understanding common problems and their solutions prevents disappointment:
Dry Chicken Meat: This usually results from overcooking. The solution involves temperature precision—remove the chicken when the thigh reaches 160-162°F internally, not 165°F. Carryover cooking will bring it to the safe temperature during resting. Alternatively, use shorter cooking times at higher temperatures rather than long times at lower temperatures. Finally, ensure adequate basting throughout cooking to keep the surface moist, which slows interior cooking.
Pale, Flabby Skin: Insufficient browning typically stems from too-low cooking temperature, inadequate drying before cooking, or insufficient basting. Increase oven temperature by 25°F, ensure the chicken is thoroughly patted dry before cooking, and baste every 15 minutes without fail. If using a rotisserie, increase heat slightly or move the birds closer to the heat source.
Burnt Exterior with Raw Interior: This indicates too-high heat causing surface burning before the interior cooks through. Lower your cooking temperature by 25-50°F and extend cooking time. Tent the chicken loosely with foil if browning too quickly while waiting for the interior to finish cooking.
Bland Flavor Despite Marinade: Either insufficient marinating time or inadequate salt content causes this issue. Ensure you’re marinating for at least 8-12 hours, and taste your marinade before using—it should be quite boldly seasoned. Additionally, ensure you’re basting with reserved marinade throughout cooking rather than plain oil.
Uneven Cooking: Different parts cooking at different rates indicates poor positioning or temperature hot spots in your oven. Rotate the chicken halfway through cooking, and use an oven thermometer to identify hot zones. If your oven has significant temperature variation, adjust the chicken’s position accordingly or rotate it every 15 minutes.
Marinade Sliding Off: This happens when the chicken isn’t thoroughly dried before marinating or when the marinade is too thin. Pat the chicken completely dry with paper towels before applying marinade. If your marinade seems too liquid, reduce the oil content or add a bit more paste. The marinade should be thick enough to cling to the skin without sliding off.
FAQ
Can I use chicken parts instead of whole birds?
Yes, absolutely. Chicken parts cook faster than whole birds—expect 30-40 minutes in the oven at 375°F depending on size. Bone-in, skin-on pieces work best for achieving the characteristic crispy skin and tender meat. Boneless, skinless chicken breasts are less forgiving and tend to dry out. Apply the same marinade and basting techniques regardless of cut.
How long can I store marinated chicken before cooking?
Marinated chicken keeps safely in the refrigerator for up to 24 hours. Beyond this, the acid begins breaking down the protein structure excessively, resulting in mushy texture. If you need to marinate longer, freeze the marinated chicken and thaw it when ready to cook, though this isn’t ideal. Ideally, plan to cook within 12-16 hours of marinating for optimal texture.
Can I make this recipe with slow cooker or crockpot methods?
While technically possible, slow cooking fundamentally changes the dish. The low, moist heat prevents skin crisping and creates steamed rather than roasted chicken. If you must use a slow cooker, marinate the chicken, sear it briefly in a hot skillet to brown the skin, then transfer to the slow cooker with marinade for 3-4 hours on low. This hybrid approach preserves some textural benefits while offering convenience, though it won’t match traditional pollo a la brasa results.
What’s the best way to reheat leftover pollo a la brasa?
Reheating is tricky since you want to warm the meat without drying it further or destroying the crispy skin. The best method involves wrapping the chicken loosely in foil and placing it in a 325°F oven for 15-20 minutes. This gentle reheating warms the meat while protecting the skin. Avoid microwaving, which creates rubbery texture and soggy skin. Leftover chicken is delicious shredded and used in tacos, salads, or sandwiches, which sidestep the reheating challenge entirely.
Can I make a healthier version of this recipe?
Absolutely. Remove the skin before eating to reduce fat content significantly. Use skinless chicken parts rather than whole birds. Reduce the oil in the marinade slightly or use a cooking spray instead. Serve with lighter sides like steamed vegetables or salads rather than heavy starches. The marinade’s flavor remains intense regardless of these modifications, so the dish remains delicious while being more health-conscious.
Where can I source ají peppers if they’re unavailable locally?
Most specialty grocers, Latin American markets, and online retailers carry ají peppers year-round in frozen or paste form. Brands like Inca’s and Tamani offer quality products. If absolutely unavailable, create a substitute by combining yellow bell peppers with a touch of habanero or jalapeño for ají amarillo, and red bell peppers with red chili flakes for ají rojo. While not identical, this combination approximates the flavor profile reasonably well.
Is pollo a la brasa suitable for carnivore diet followers?
Yes, pollo a la brasa fits perfectly within carnivore eating patterns. The recipe focuses entirely on chicken with a flavorful spice marinade. Simply skip the traditional side dishes and serve the chicken alone or with simple butter or fat-based condiments. The marinade’s vegetable components (peppers, garlic) are minimal enough that strict carnivore followers may accept them, though those following stricter interpretations might prefer a simpler preparation.
Can I prepare the marinade in advance?
Yes, the marinade keeps refrigerated for up to one week in an airtight container. Prepare it several days ahead if convenient. This actually allows the flavors to meld and develop further. When ready to use, simply remove from the refrigerator, give it a stir to recombine any separated ingredients, and proceed with marinating the chicken. The advance preparation doesn’t compromise quality and actually offers convenience advantages.


